
1
LeicaSP8TCSUsersManual
Followtheprocedureforstartupandlogonaspostedinthelab.Pleaselogonwithyouraccountonlyanddo
notshareyourpasswordwithanyone.WetrackandconfirmusagethroughWindowsbyyourloginandyou
willbechargedforthetimespentonthemachineasdocumentedthroughtheWindowslogin.
Startup:
1 TurncomputeronbypushingthebuttononthefrontoftheCPU.
2 Loginwithyouruseraccountandpassword.
3 Turnonthetwogreenswitchesandturnthekey(largeboxunderthetable).
4 Turnonthemicroscopebox(CTRadvanced).
5 Turnonmetalhalidelamp(givesfluorescenceonthemicroscopepreview).
6 DoubleclickonLASXsoftware(cantakeuptotwominutesforsoftwaretolaunch).
7 “Machine”operatesthemicroscopewhile“Simulator”istheimageprocessingportionofthesoftware.
8 Highlighttheconfigurationtabtoaccessthelasers.
9 Highlight“LaserConfiguration”.
10 Checkeachlaserboxtoturniton.
11 HighlighttheAcquireTabtogetbacktotheacquisitionsoftware.
Initialfocusinghints:Thisisaninvertedmicroscopewiththeobjectivesbelowthespecimen.Ifusinga
coverslippedslide,youmustturnitupsidedowntoimage.Ifusingaplate,thebottomthicknessoftheplateis
critical.Itmustbeaspecializedglass-bottomeddish,ideallywithathicknessof1or1.5mm(sameasa
coverslip).Ifyoutrytouseaplasticdishorright-sideupslide,youwillhavetoogreataworkingdistancewith
higherNAobjectivesandwillnotbeabletofocusonyoursample.
Whenusingoilimmersionobjectives,useonlyonesmalldropofoil,eitherplaceddirectlyontheoilobjective
oronyourcoverslipbeforeinverting.DONOTUSEOILontheairorwaterlenses!Youwillseverelydamage
themandincurahighrepairbill.
UserguidecreatedbyDanielDeSantisandLindaMayernik,October,2015.
2
Overviewofavailableobjectives:
20x:notUVrated(willNOTtransmitdyesefficientlyintheUVrange,i.e.DAPI)Youmaygetsomesignalbut
yourimagesmaynotlineupwithmulti-channellabeling.
40xCS2oil:chromaticallycorrected;idealforusewithUVandotherspectrumdyes.
63xCS2oil:chromaticallycorrected;idealforusewithUVandotherspectrumdyes.
100xoil:notUVrated(willNOTtransmitdyesefficientlyintheUVrange,i.e.DAPI)Youmaygetsomesignal
butyourimagesmaynotlineupwithmulti-channellabeling.
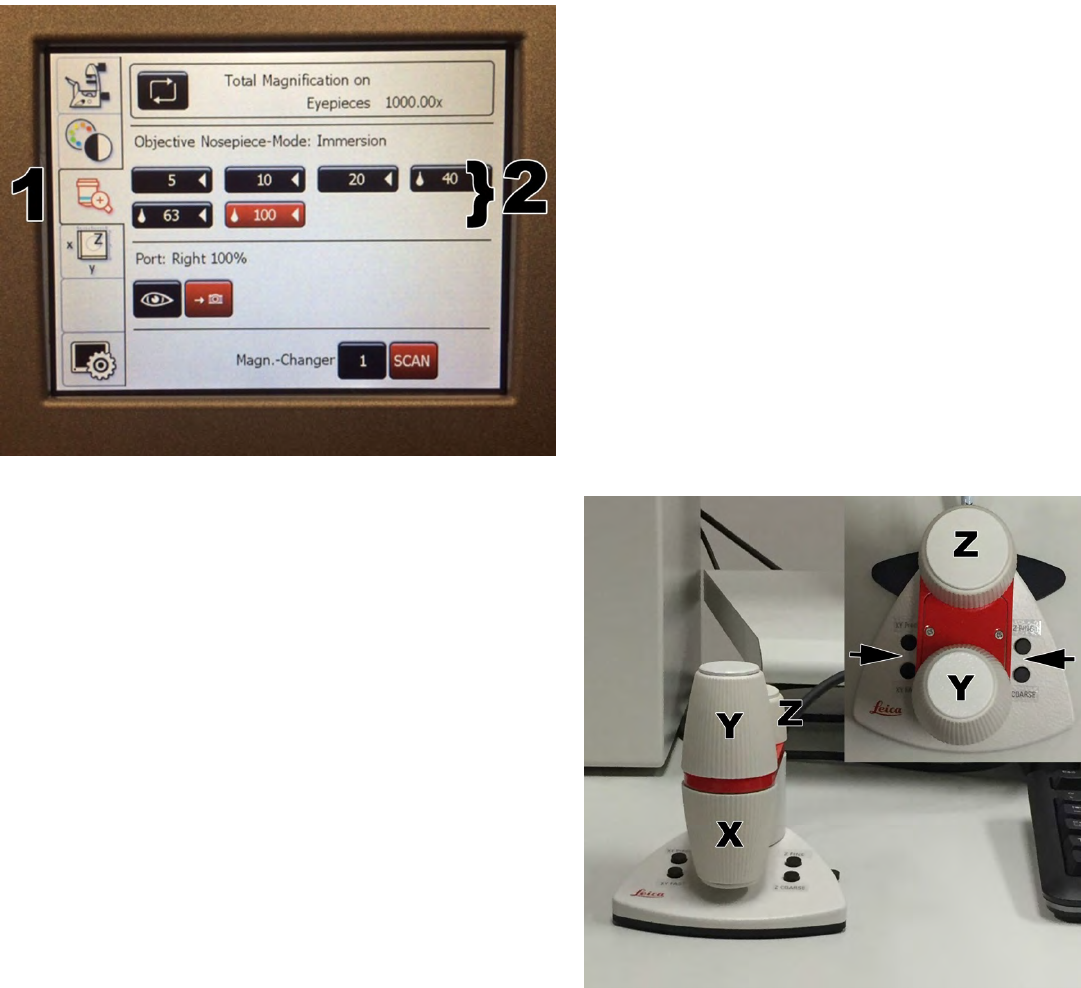
Objectives are selected on the front
touchscreencontrolpanel(1)bytouchingthe
desired button. The turret will turn
automatically to the selected lens.
Alternatively,youcanmanuallyturntheturret
totheobjectiveyouwantandthetouchscreen
willregisterthechangeoryoucanselectyour
desiredobjectivefromtheacquisitiontab(see
page12).
TheSaltandPeppershakeristheonlywaytomove
thestageintheX/Yplane.Thetopknob(Y)moves
intheYplaneandthebottomknob(X)movesinthe
Xplane.Youcantogglebetweenpreciseandfastby
pressingthebuttonsontheleftsideofthebase
(arrow).Similarly,thebackknobcontrolstheZ
movementasanalternatetothefocusknobonthe
microscopeproper.Usingthebuttonsonthebase
ontherightside,youcantogglebetweencoarse
andfinefocusintheZplane.Thisknobisuseful
wheninitiallyfocusingonthesampleandbringing
theobjectiveuptogetwithinrangeoffocusorto
makecontactwiththeoildropletontheinverted
slideorbottomofplatewhenusinganoilobjective.
3
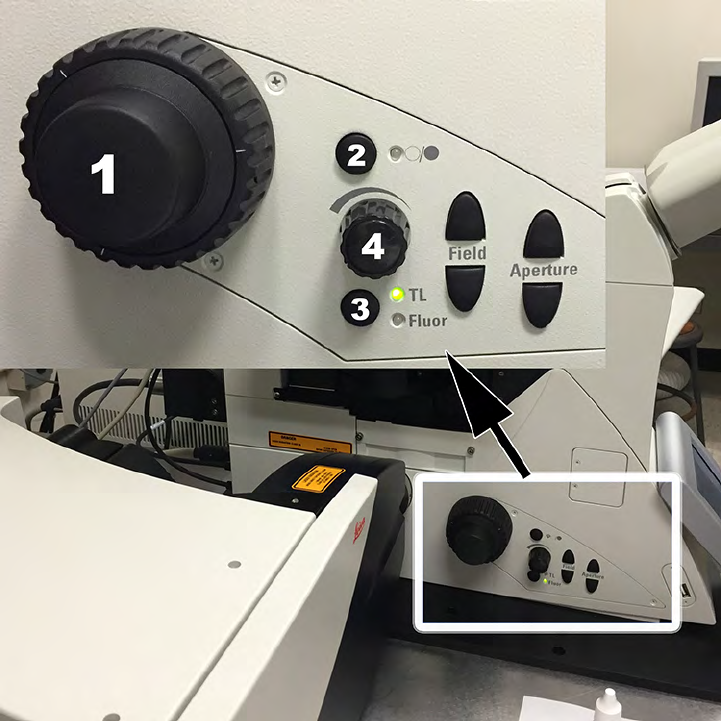
Overviewofbuttonsonbothsidesofthemicroscope:
Leftside:
1) Focusknob:outerknobisthefinefocus,innerknobisthecoarsefocus.
2) Shutterbutton:thisturnsonandoffthelightgoingtotheeyepieces.Itisduplicatedonthesecond
tabofthetouchscreen.Ifyoudon’tseeanythingthroughtheeyepieces,tryclickingtheshutter
buttontoopenuptheshutter.
3) Thisbuttontogglesbetweenbrightfieldandfluorescence.Youcanuseittoviewyoursample
throughtheeyepiecesandseewherethefluorescenceislocatedinrelationtoyourmorphology.
Thismethodisanalternatewayofswitchingbetweenbrightfieldandfluorescencewhichdoesn’t
requiretheusertolookaway(ie,atthetouchscreen)fromthesample.
4) Knobthatcontrolstheintensityofthelightgoingtotheeyepieces(boththewhitelightandthe
fluorescence).Iftheeyepiecesaredark,tryturningittoampupthelight.

4
Rightside:
1) Focusknob:outerknobisthefinefocus,innerknobisthecoarsefocus.
2) Brightfield:switchesonandoffthewhitelight.
3) Fluorescence:switchesonandoffthefluorescentlight;youcantogglebetweenbuttons#2and#3
ifyouwanttoseewherethefluorescenceisinyoursampleinrelationtotheoverallmorphology.
4) Fine/coarsetoggle:togglesbetweenfineandcoarsefocusspeedsfortheZfocus.
x)Doesnothing.
T,M,BLimitbuttons-setupperandlowerstagelimitsasfollows:Tocleartheupperlimit,hittheTand
theMtogether.Thetopgreenlightwillturnoff.Focusthestagetowhereyouwanttosetthetop
limit;hittheTandMtogetheragain.Similarly,toclearthebottomstagelimit,hittheMandB
togetherandthebottomgreenlightwillturnoff.Focusthestagemanuallytoyourlowerlimitandhit
theMandBtogethertoresetthebottomstagelimit.
5
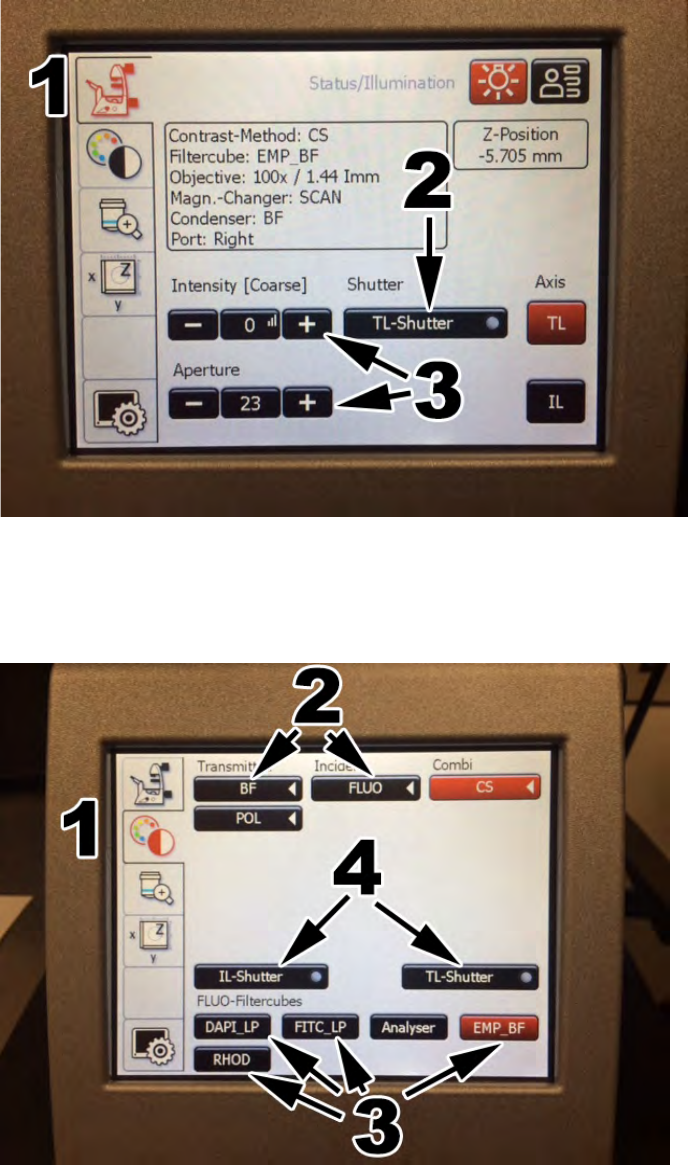
Touchscreenoverview:
Microscopetab(1):Thisscreenhighlightstheapertureopeningandtheintensityofthetransmittedlight.
TL=transmittedlight(2)togglestheshutterbetweenopenandclosedforbrightfieldillumination.Intensityand
Aperture(3)adjustment.
Dichroiccolortab(1)Allowstheusertoswitchbetweenbrightfield(BF)orfluorescence(FLUO)(2).CSand
POLdonothing.Below,youcanpreviewDAPI(blue),FITC(green)orRHOD(red)throughtheeyepiecesby
touchingtheappropriatebuttons(3).IL-ShutteropensandclosesthefluorescenceshutterandtheTL-shutter
(4)opensandclosestheshutterfortransmittedlight.
6
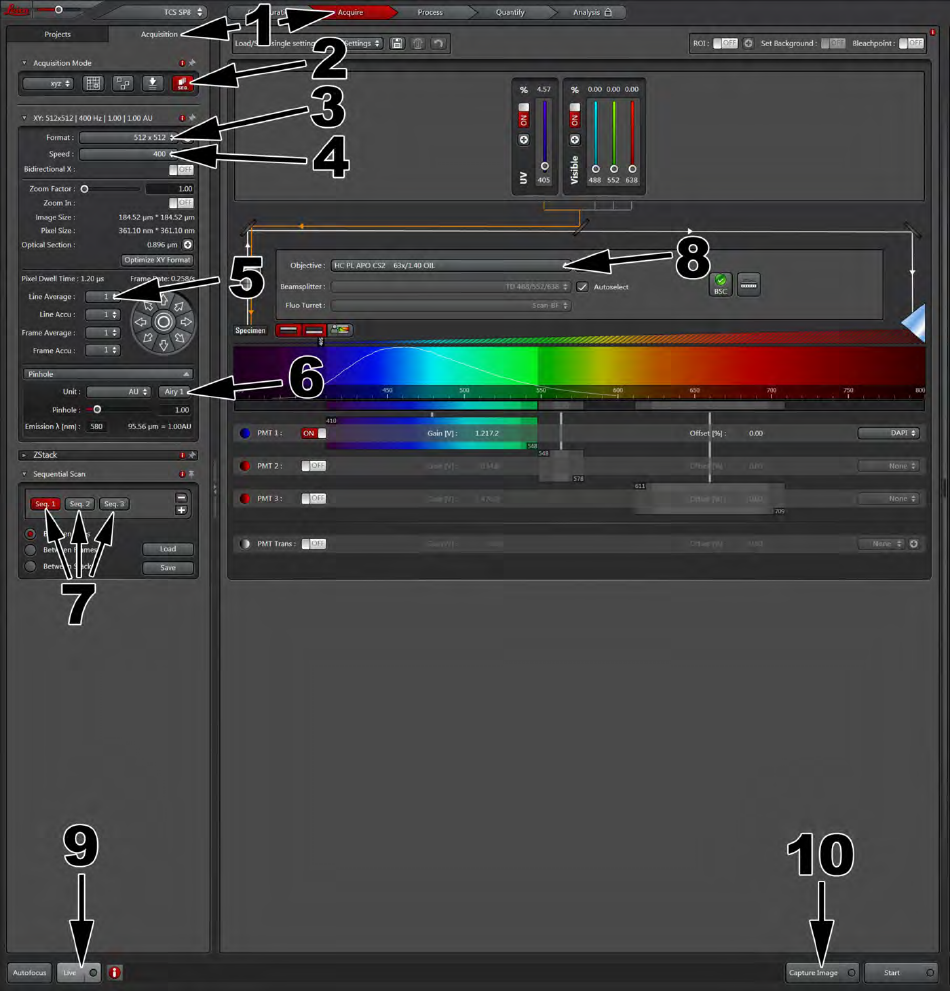
FamiliarizingyourselfwiththeAcquisitionTab:
1)Toacquireanimage,makesureyouhaveselectedtheAcquiretabinthemiddleportionofthescreenand
theAcquisitiontabselectedintheleftportionofthescreen.
2)Ifyouhavemultiplecolorsyouwanttoimage,itisrecommendedtouseasequentialscan.Toperforma
sequentialscan,hittheseqbutton.Forhelpinsettingupyourlightpaths,pleaseseepages10and14.
7
3)Formatreferstohowmanypixelswillbecapturedwhenyouacquireanimage.A512x512pixelformatwill
giveyougoodresolutionatareasonablespeed.Ifyouselect1024x1024,youwillhavebetterresolutionbut
itwilltakelongertoimageandbeamuchbiggerfilesize.
4)Speedreferstothespeedofthescanheadasthelaserspassovereachpixel.Theslowerthescanspeed,the
betteryoursignal-to-noiseratiobecomes.However,slowerscanspeedsincreasethepixeldwelltimewhich
canincreasephotobleachingofyoursample.Thescanspeeddefaultsto400Hz,butbyincreasingthespeed
to600Hz,youlimitbleachingandtheimagequalityisusuallycomparable.Either400or600Hzaregoodscan
speedstoselect.
5)LineAveragingisanothermeanstocleanupthesignal-to-noiseinyourimage.Youwanttohaveline
averagingatatleast4(8isrecommended)toacquirethebestimagewithminimalbackground.Thehigher
theaveraging,thelongeryourscanwilltakebuttheimagequalityshouldimprovesignificantly.Keepinmind
thatwhenscanninginLivemode,thelineaveragingisnotincorporated.OnlywhenyouCaptureanimage
doesthelineaveragingbecomeactive.Note:Frameaveragingisanoptionandaverageseachscannedframe
separately,accumulatingtheaveragingasitaddsthenumberofscansindicated.It’samatterofpreferenceas
towhichaveragingtechniqueyouuse,butwegenerallyrecommendlineaveraging.
6)Pinhole-thisisthesizeoftheopeninginwhichthelaser(s)passthrough.Fortrueconfocalmicroscopy,you
alwayswanttochooseAiry1.WhenyouhitAiry1,theredsliderwilladjustthepinholetotheappropriate
diameterbasedontheobjectiveandlaserwavelengthsyouareusing.However,ifyoursignalisweak,youcan
openupthepinholetoallowmorelaserlightthroughtothesampleandyouwillbeabletodetectastronger
signal.Keepinmindthatthemoreopenapinholeis,thecloseryouareapproachingbasicfluorescence
microscopyandlosingthe“confocalness”ofyourscan.Ifyourgoalistodetermineco-localizationofmultiple
fluorophores,allyourchannelsneedtobesettoAiry1.
7)Ifyouselectedseq(thesequentialbutton,see#2)youcanseeyourseparatelightpathsequenceshere.
Eachsequencecorrespondswiththeproperexcitationsettingsandemissiongatingtovisualizeasingledyein
yoursample.
8)Allowsyoutochangeobjectivesfromthesoftwarescreeninsteadofthetouchpad(seepage12).
9)InitiateaLivescaninordertopreviewyourimageandsetthebrightness(Gain)andcontrast(Offset)levels
accordingly(seepage17).
10)Afteryouhavesetyourimagingsettingsappropriately,hitCaptureImagetoactuallycollectthepicture.By
capturingtheimage,youareincorporatingalltheaveragingsettingsintothefinalpicture.Allcapturedimages
arestoredunderthe“Projects”tab.IfyouaremerelydoingaLivescan,thoseimagesarenotstored.
8
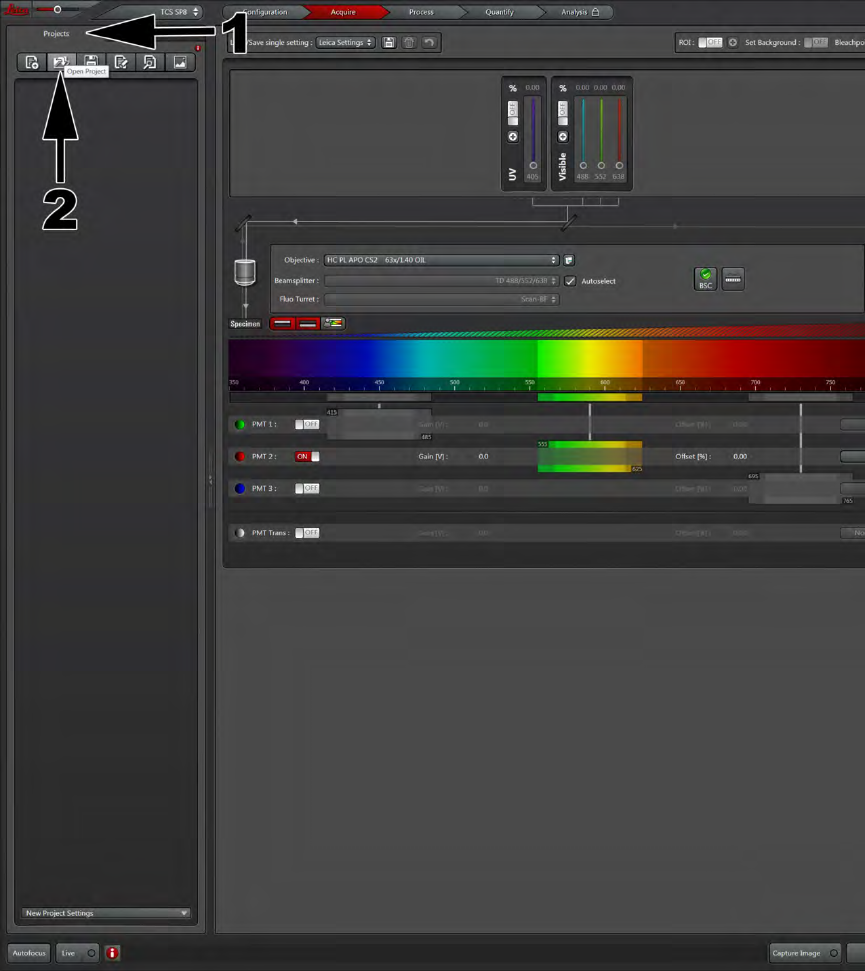
ReuseButton:
Theeasiestwaytosetupalightpathistoreusethesettingsfromaprevioussession.Youwillneedtoloadina
previouslycollectedfile.
1)ToReusethesettingsfromapreviouspicture,gototheProjectsTab(Labeled1).
2)ClicktheOpenbutton(Labeled2).Findyourfilecontainingapictureyouhavealreadycapturedandhit
open.
9
3)Onceyouhaveopenedoneofyourpreviousexperiments,youcanpreviewthepicturesbyclickingthrough
thelist.Thepreviewofthepicturecanbeseenontherightsideofthescreen(labeled3).
4)Whenyoufindthepicturethatyouwanttoreusethesettingsfor,highlightthatpicturesoit’sredthenhit
theapplybuttonontop(labeled4).HittingtheapplybuttonwillsettheLaserPower(labeledA)and
DetectionGating(labeledB)tothesameconfigurationaswasusedforyourpreviousimage.Thereuse
functionalsocallsupthegain,offset,pinholeandzoomfactorsusedinyourpreviouslystoredimage
acquisitionsetup.
10
DyeAssistant:
TheDyeAssistantcanhelpyouselecttheappropriatelightpathsandchannelsetupbasedsolelyonthedyes
youhaveusedinyourexperiment.Ifit’syourfirsttimewithaparticularimagingsetup,thedyeassistantisa
greatplacetostart.
1)ClickontheDyeAssistantbuttonnearthecenterofthepagelabeled#1.
AfterclickingtheDyeAssistantbutton,thewindowhighlightedinwhiteshouldappear.
2)Clickonthe…buttontoselectyourdesireddyes.
3)AfterClickingthe…button,alistofdyeswillappear.Selectyour
dyesoradyethatissimilarinemissionandexcitationasyourown.
11
4)Afteryourdyeshavebeenselected,youwillbegivenseveralexperimentalsetupstochoosefrom.Choose
thesetupwiththeleastamountofcrosstalkthenhittheApplybuttonforthatparticularsetup.
Awordonselectinglightpaths:Yourchoicewillalwaysdependonatradeoffbetweentimeinvestedin
takingyourimagesandthequalityofyourimages.Theindividuallightpaths(separatechannelsper
fluorophore)willalwaysgiveyouthecleanestimagesbutdoestakethemosttime.Ifyourfluorophoresare
significantlyseparate(ie,DapiandTexasRed)youcansavetimebyhavingbothofthosefluorophores
collectedonthesamechannelsimultaneously.Inordertoreduceoreliminatecrosstalk,youcanadjustand
truncateyourgatingwithintheAcquiretab(seepage14).
12
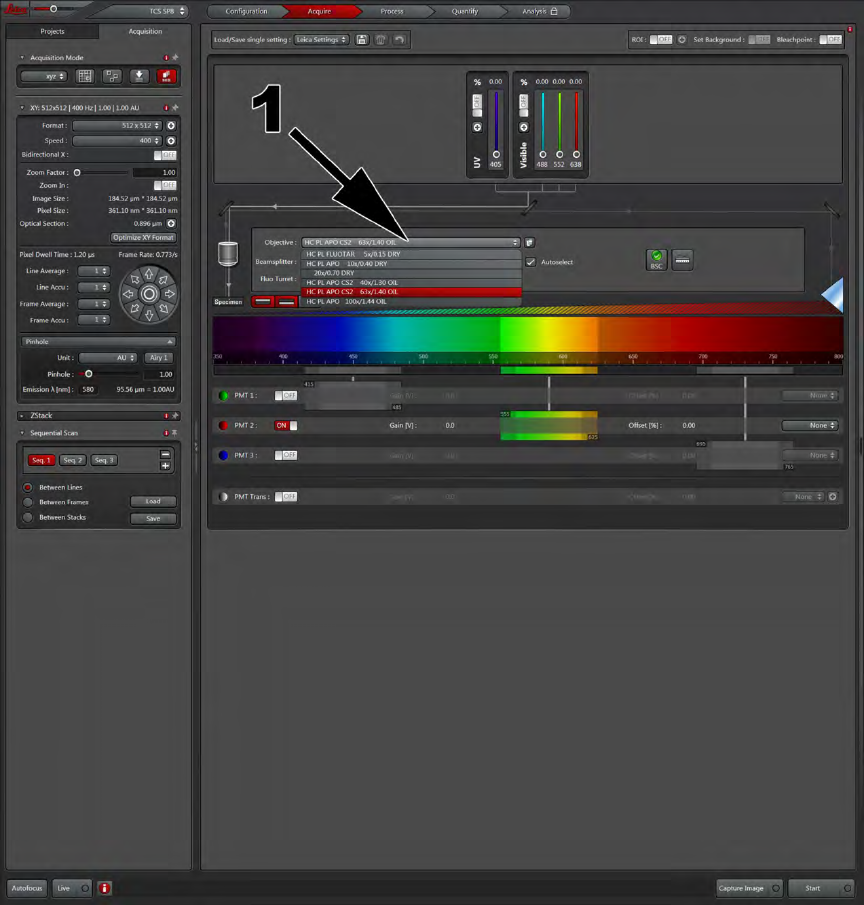
ChangingtheObjective:
1)FromtheAcquiretab,clicktheobjectivepulldownmenuandselectyourdesiredobjective.
2)AlternativelyyoucanalsochangetheobjectivemanuallybyCAREFULLYrotatingtheobjectiveturretor
usingthetouchpadscreenonthefrontofthemicroscope(seepage2).
13
AddingaDICorBrightfieldImage:
1)ClickonthePMTTrans.ItisrecommendedtoturnonthePMTTransinthesequencethatisusingthe488
nmlaser.OncePMTTransisturnedon,whenyoubeginaLIVEscan,youshouldseeanadditionalimagebox
appearontherightwithyourothercolors.Thisimageboxisforthebrightfieldimage.AdjusttheGainand
Offsetthesamewayyouwouldtheotherchannels,usingthecontrolknobsbelowthescreenonthelong
instrumentbar.
14
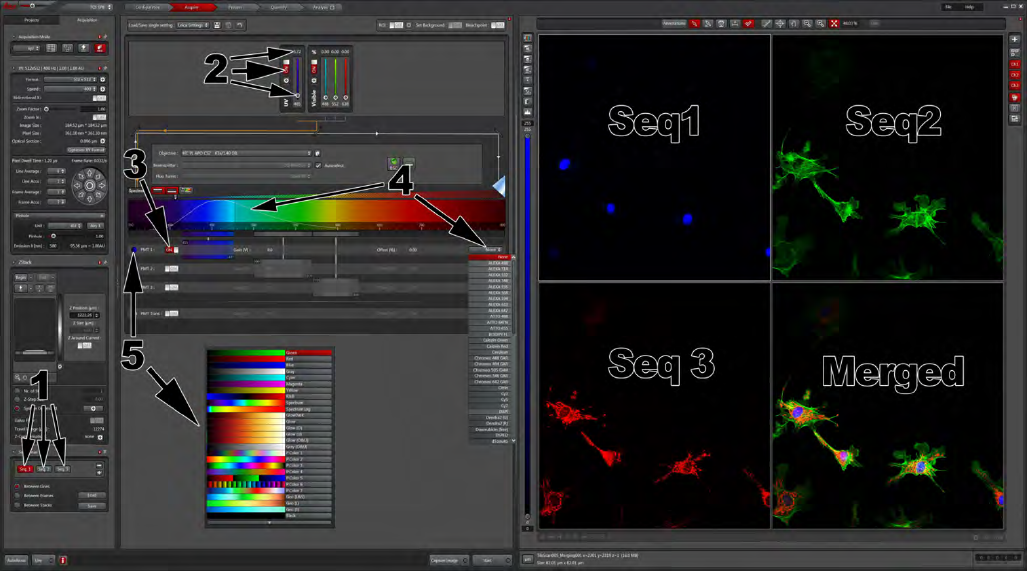
AcquiringBasics:
1) Theseseqbuttonsrepresent3separatesequences,orchannels.Aneasywaytothinkofthisisconsider
eachsequenceitsownimagecaptureforasingledye.Whenyouhavemultipledyes,itisbesttoimage
sequentiallytominimizebleed-throughandcrosstalk.Eachsequenceallowsyoutoadjustexcitationlaser
wavelength,power,gatingparametersandpseudo-colorchoiceindependentlyfromtheothersequences.
Thiscustomizationallowsyoutofullyoptimizethesettingsforeachindividualfluorophore.Itdoesnot
matterwhichdyeisinwhichsequence;theonlyeffectsequencenumberhasisintheorderthepictureis
displayedontheright.Seq1willalwaysbeinthetopleftandproceedthroughinascendingorder.
2)Thislasercontrolpaneliswhereyouchoosewhichlaseryouwouldliketouse(ie,405,488,552,638).
ClicktheONbutton(Labeledbigarrowfor405nmlaser-ONbuttonforotherlasersisslightlymoretothe
rightforthe488,552,638).Thelittlearrowsshowthetwowaysyoucanadjustlaserpower,eitherby
usingthelittleslider(bottomarrow)ordoubleclickingthenumberontopandmanuallytypinginthelaser
power(toparrow).LASERSAREVERYSTRONG!!!PHOTOBLEACHCAUTIONWHENUSINGLASERSAT
POWERSABOVE5%.
3)ShowswheretoclicktoturnonthePMTforcollectingyourimage.Formoreinformationregarding
whichPMTshouldbeused,pleaserefertopage15.
4)Thebigarrowfrom#4showswhereyoucanselectadye.Afterselectingthedyethatyouused,itwill
formtheExcitationSpectrum(littlearrow)ofthatspecificdye.Thisspectrummaybeusefultohelpchoose
appropriatelaserandsettinguppropergatingforimaging.
5)Showsyouwhereyoucanassignpseudocolorwithinyourselectedsequence,ie,blueforDAPI,green
forFITC,etc.Youcanassignanycolortoanydyeyoudesire.
15
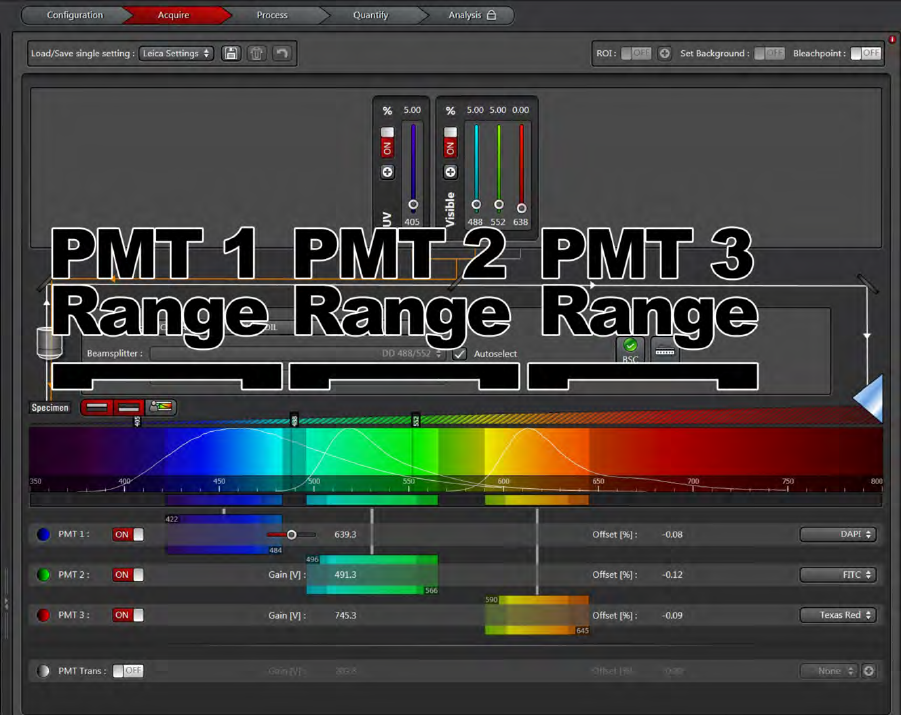
PMTRanges:
PMT1shouldalwaysbeusedforyourBlue-rangedye.
PMT2shouldalwaysbeusedforyourGreen-rangedye.
PMT3shouldalwaysbeusedforyourRed-rangedye.
PMTTransisonlyforbrightfieldimages.
16
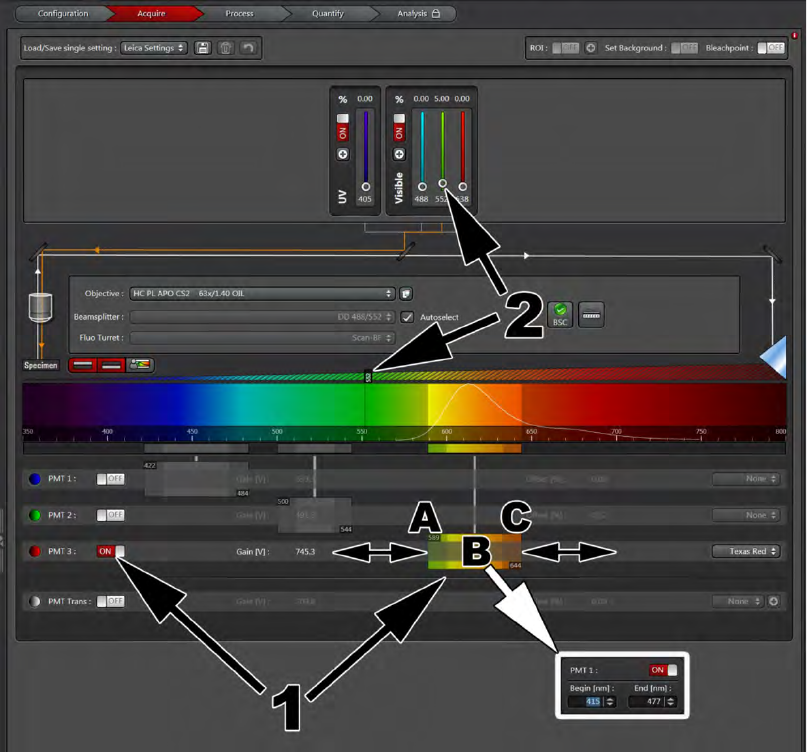
SettingUpGating:
1)TurnontheappropriatePMTforthecolorthatyouwishtoimage.Makesureyouareadjustingthe
appropriategateforthatPMT(eachPMThasitsowngating).
2)Turnontheappropriatelaserlineandadjustthepower.Thebottomarrowshowswhereyourlaserfallson
thespectrum,whichwillhelpyouwithyourgating.
Bisyouractualgate.IfyoudoubleclickonB,thewindowboxedinwhitewillappearthatwillallowyouto
manuallytypeinyourgatingrangeORalternately,youcanclickoneithersideAand/orCanddragthegate
moreopenorclosedasneeded.
Thingstoconsider:theleftsideofyourgateshouldalwaysbeatleast10nmawayfromtheexcitationlaser’s
wavelength.Example:Ifusinga552nmlaser,yourleftgateedgeshouldbenolowerthat562nm.Gating
allowsyoutocontroltheamountofpotentialcross-talkthatmayoccurifyouhavetwofluorophorestooclose
togetherontheemissionspectrum.Butcreatinganarrowergate,youhavetheabilitytoselectonlythepeak
emissioncurveifnoiseisanissuebetweenadjacentchannels.Youcanalsowidenthegateifyoursignalis
weakandyouaretryingtoamplifyit.
17
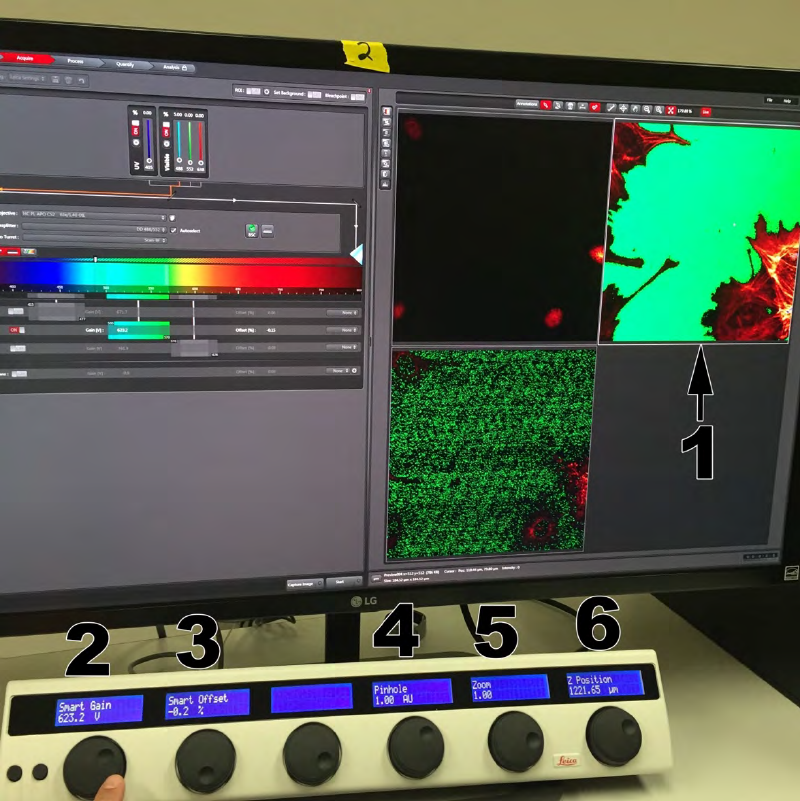
AdjustingBrightnessandContrast:
Makesureyouareinanactivelivescanbeforemakinganyadjustments.TheLIVEbuttonwillbeilluminated.
1)Selectthecoloryouwanttoadjustbyclickingonthatcolorboxontherightsideofscreen.Onlythe
highlightedsquarewillbeaffectedatthetimeofknobadjustment.
2)Thefirstknob,SmartGain,isthecontrolwheelforhowbrighttheimagewillbe.Thehigherthesmartgain,
thebrighteryoursignalwillappear.Optimally,youwouldlikeyourgaininthe700-1100rangedependingon
thestrengthofyoursignal.TheSmartGainmaxesoutat1250andyouwillhearaloudbeepingtoalertyou
thatyouhavereachedthemaximumSmartGain.Ifyoustillhavelowsignal,youcantrytobringupthelaser
poweroropenthepinholetofindsomesignal.Rememberthatlaserpowerabove5%runstheriskof
bleaching.
3)ThesecondknobisthecontrolwheelforSmartOffset.SmartOffsetcanbethoughtofascontrast,
controllingmostlytheblackness(orbackground)oftheimage.YoushouldNOThavetoadjustthisverymuch.
Between-.8and.5isanappropriaterangeforSmartOffsetoryouruntheriskofdistortingthesignaltonoise
ratioofyourimage.
18
4)Pinholecontrolshowthickofanopticalsectionyouarecollecting.Makingthepinholesmallerwillcreatea
thinnersectionbutwillgreatlyreducethesignal.Alternatively,alargerpinholewillgiveyouathickersection
withagreatersignal.Ideally,youshouldleavethepinholeat1.00AU.Thisistheoptimumpinholediameter
thatbestbalancessectionthicknesstosignalattainedandiscriticalforcolocalizationstudies.
5)Zoomallowsyoutozoominyourfieldofview.Thisispre-acquisitionzoomsotheimageyoucollectwillbe
capturedwithmoredetailcomparedtoadigitalzoom(imagingzoomafteracquisition).Itworksbycollecting
thesameamountofpixelsbutoverasmallerarea.Itisnotrecommendedzoomingbeyondafactorof3.5
becauseanyfurtherzoomwouldbeemptymagnificationwithcompromisedresolution.
6)Zpositionisaduplicationofthefocusknob.Itishelpfultotweakthefocusherewhilelookingatthescreen
asyouoptimizeyourGainandOffsetsettings.
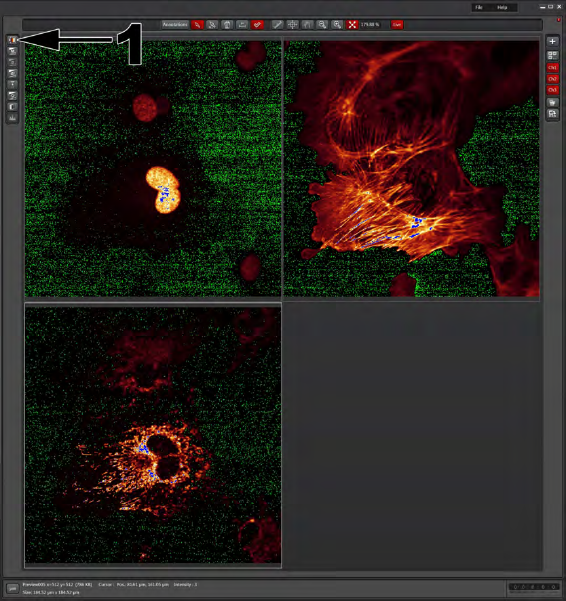
RangeIndicator/QuickLUT:
1)ClickingontheQuickLUTbuttonprovidesyouwithaneasierwaytovisualizewhetheryouhaveany
oversaturated(waytoobright)pixelsaftersettingyourGainandOffset.Theoversaturatedpixelsare
representedasbluewhilethetrueblackpixelsarerepresentedingreen.Theimagebelowshowsanexample
ofwhatyoursettingsshouldlooklikeintheQuickLUTview.Yourbrightestareashouldcontainaspeckleof
bluepixelswhileyourbackgroundshouldbeapepperingofgreen.MakeyouradjustmentswiththeGainand
OffsetknobswhileintheQuickLUTmode.
PushingtheQuickLUTbuttonasecondtimewillgiveyouaBlackandWhiteimageandClickingitathirdtime
willreturnyourimagetothenormalcolorsyouhadassigned.Youcantogglethroughthisbuttontooptimize
yourimageandcheckyoursettingsthroughouttheacquisitionprocess.
19
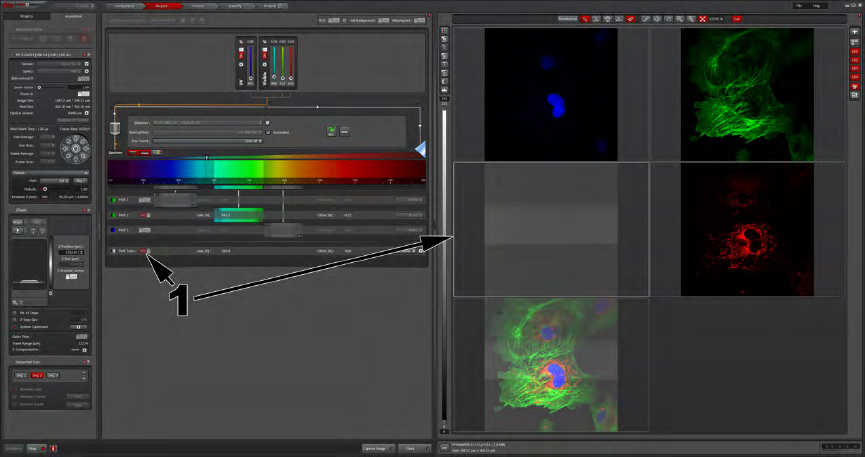
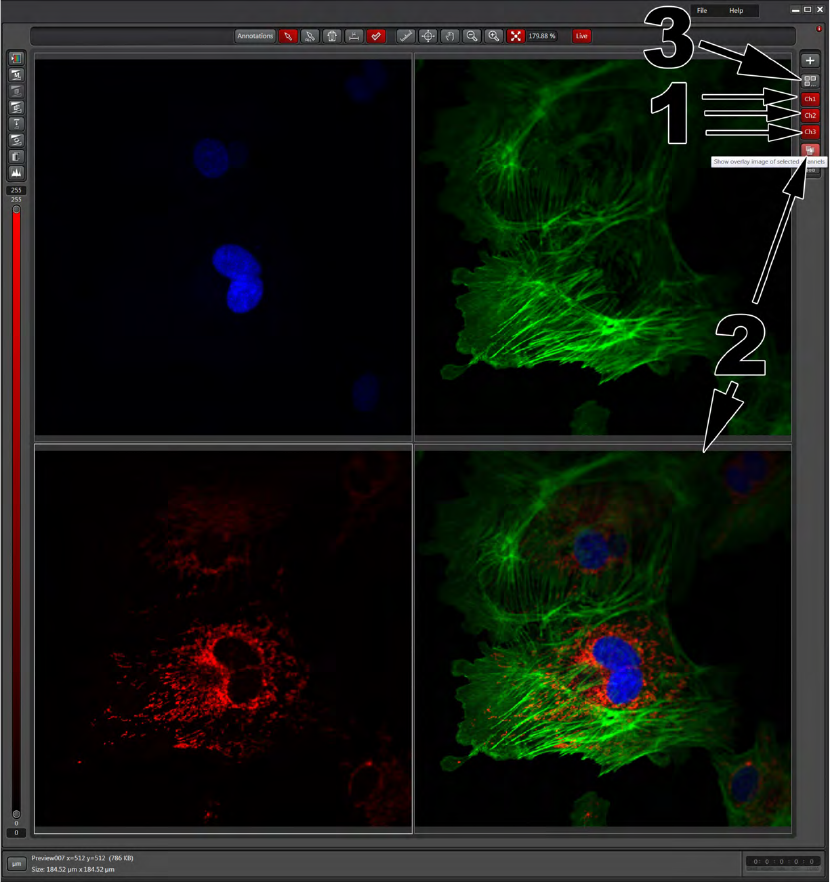
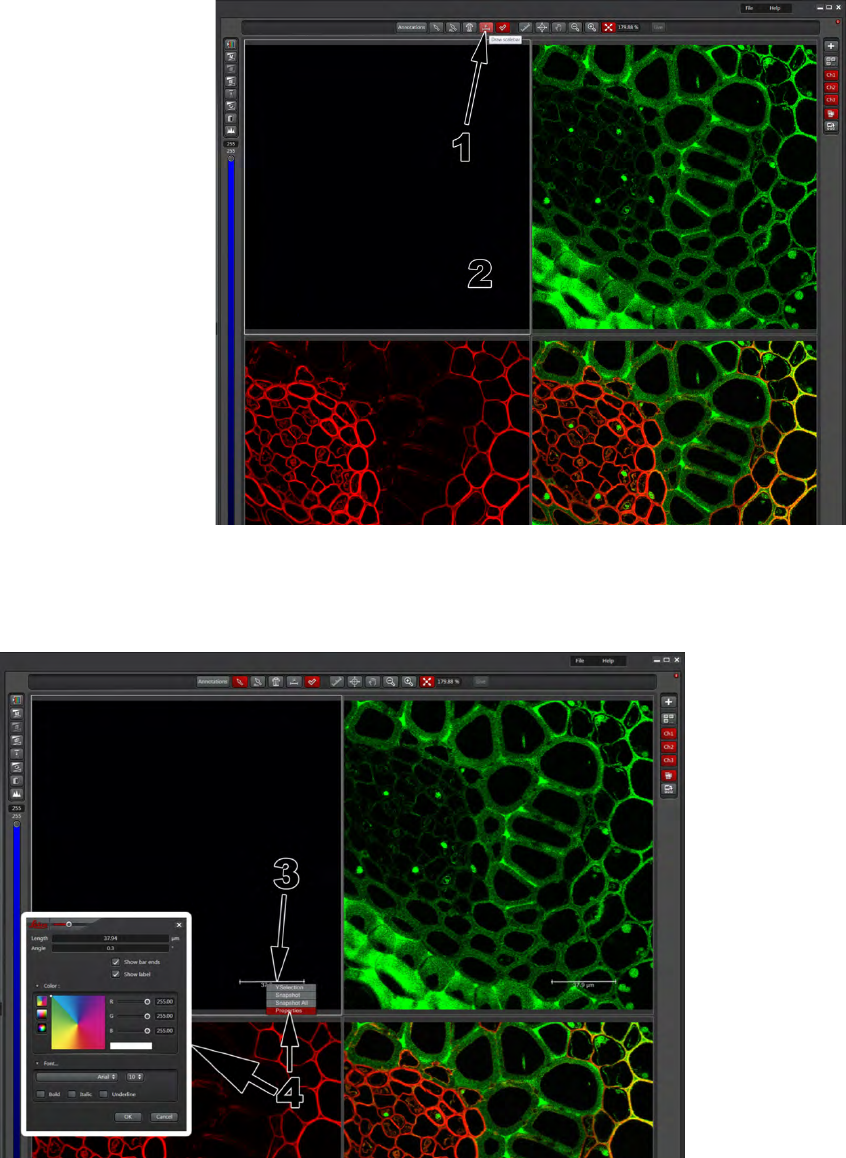
CreatingaMergedOverlayandTurningoffChannelsPostAcquisition:
1)YoucanturnonoroffanygivencolorbyclickinganyoftheCh#buttonsonthetopright.Ch1corresponds
tothefirstsquarebox(upperleft),Ch2correspondstotheupperrightpictureandCh3correspondstothe
lowerleftimage.
2)Ifyoutookamulticolorimage,youcancreateamergedoverlayofthecolorsbyclickingontheMerged
button.
3)Clickhereifyouwantafullscreenshotofyourimage.
20
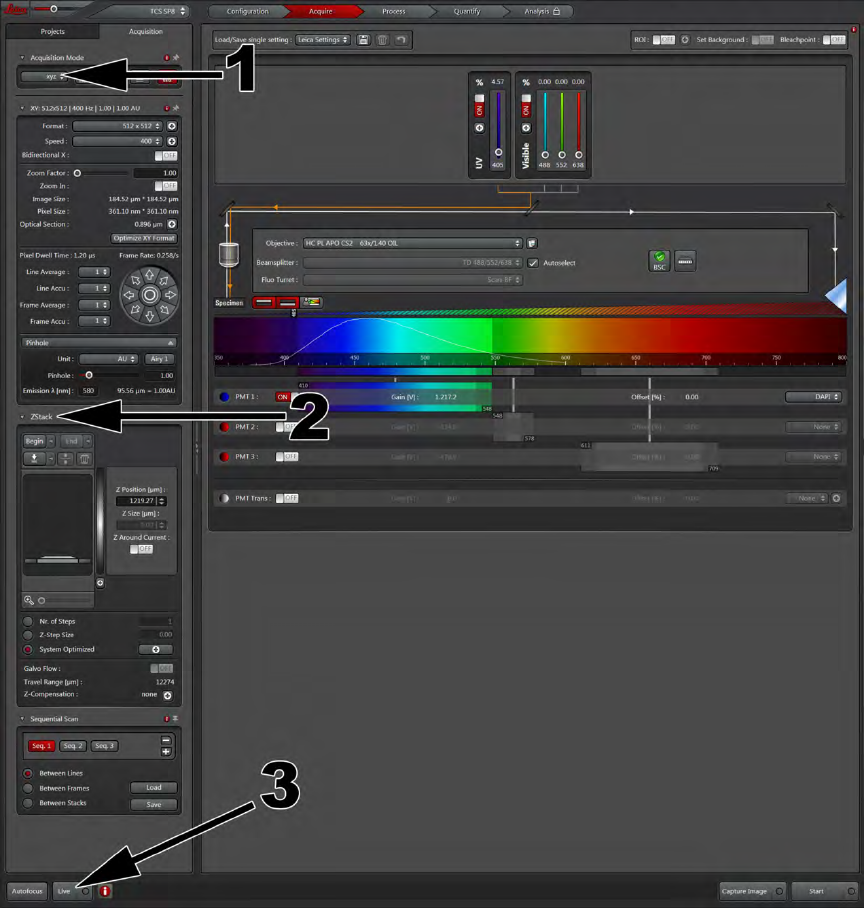
SettingupaZstack:
1)MakesurethatxyzistheselectedAcquisitionMode.
2)YoumayneedtoexpandtheZStackMenu.
3)ClicktheLivebuttontobegintosettheparametersforyourZstack.
21
4)Focusyoursampleontotheplanethatgivesyouthebrightestsignal.Adjustyourgainandoffset
appropriatelyforthisfocalplanesoallcorrespondingplaneswontbeover-saturated.(ForadjustingGainand
Offset,pleaserefertopage17).
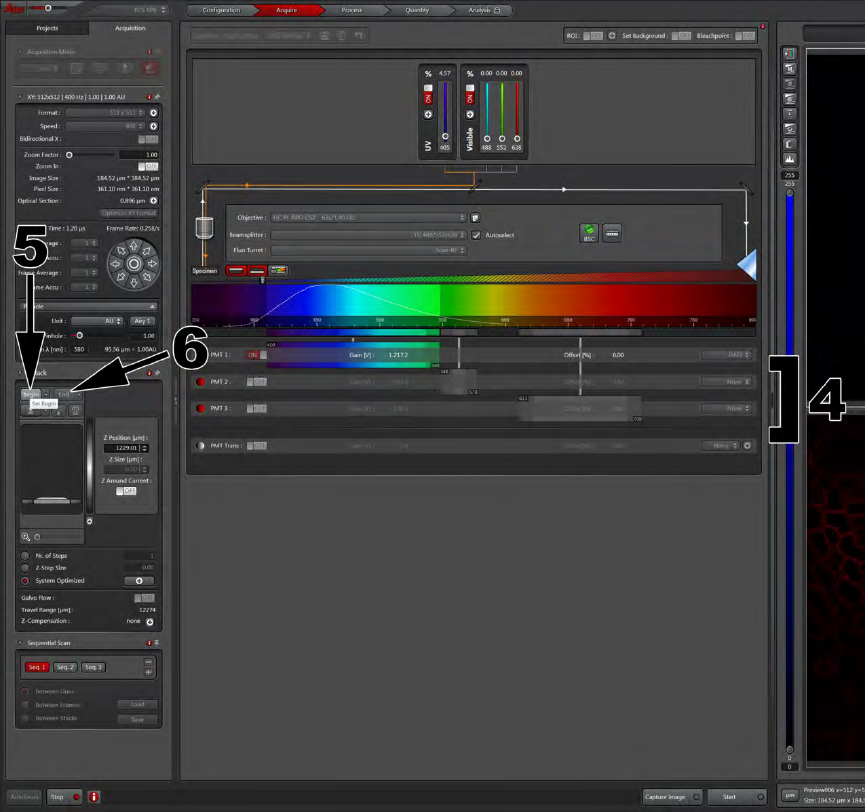
5)Afteryourlevelshavebeenset,youneedtodefinetheZrangethatyouwishtoimage.WhilestillinLIVE
mode,focus(usingeitherthesaltandpeppershakerorthefocusknobsonthescope)tothebottomofyour
sample.HittheBeginbutton.ThiswillsetthebottompointoftheZrangethatyouwishtocollect.
6)Aftersettingthebottompoint,focusbackthroughyoursample(inLIVEmode)totheotherendofwhere
fluorescenceisjustbarelydetectableandhittheEndbutton.WhenZ-stackingmultiplefluorophores,choose
theonemostimportantforyourimagingtosetyourupperandlowerlimits.

22
7)NowthatyouhaveassignedaBeginandEnd,youcanseethethickness(ZRange)inµmoftheareawehave
selectedtoimage.
8)Nr.OfStepsisthenumberofimagesthatwillbecollectedinyourzstack.TheZ-stepsizeistheamountthe
stagewillmovebetweenimages.SystemoptimizedwillsettheNr.ofStepsandtheZstepsizebasedonwhat
itdeemsappropriatebasedontheobjectivethatisbeingusedaswellastheZrangethathasbeendefined.
9)Opticalsectionofyoursample:Ifyoutookasingleimage,theopticalsectionisthethicknessofyoursample
thatisrepresentedintheimage.WhensettingupforaZstack,youalwayswanttomakesurethattheOptical
SectionisatleasttwiceasbigasyourZ-StepSize.Bydoingso,youareappropriatelyoversamplingyour
sampletogetenoughdatatoreconstructa3-dimensionalimagewithoutdistortioninanimageanalysis
software.
10)ClickonStarttobeginacquiringtheZ-stack.

23
DifferentZStackViews:
TheseoptionsareonlyavailableaftercollectingaZ-Stack.
1)ShowGallerybuttonwillallowyoutoviewalltheslicesofyourz-stacksindividually.
2)BypressingthePlaybutton,itcreatesamoviethatwillplaythrougheachsliceofyourZstack.
3)IfyouwantjustasingleslicewithinyourZ-stack,youcansortthrougheachslicebyusingthesliderthat
runsverticallynexttoyourpicture.
4)YoucanCreateaMaximumIntensityProjection,whichusesalltheslicesfromyourZstackandcreatesa2D
imagewitha3Dfeeltoit.
24
AddingScaleBar:
1)ClickontheDrawScaleBarbutton.
2)Afterselectingdrawscalebar,drag
anddropyourscalebarwhereveryou
wouldlikeyourscalebartoappearon
yourimage.
3)Tochangethepropertiesofyourscalebar(ie.color,size,font)RightClickonScaleBar.
4)Selectpropertiesfrompull-downmenu.Afterselectingproperties,thewindowboxedinwhitewillappear.
25
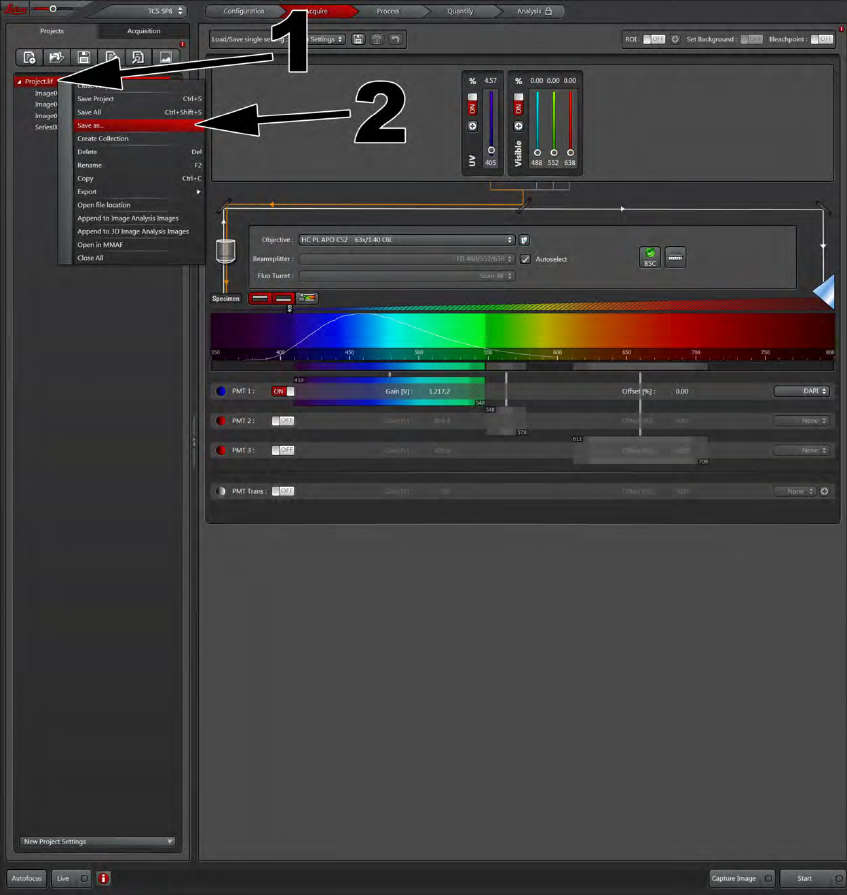
SaveasProject:
1)RightClickontheProjectyouwishtosave(Labeled1).
2)ChooseSaveas..fromthepulldownmenu.
26
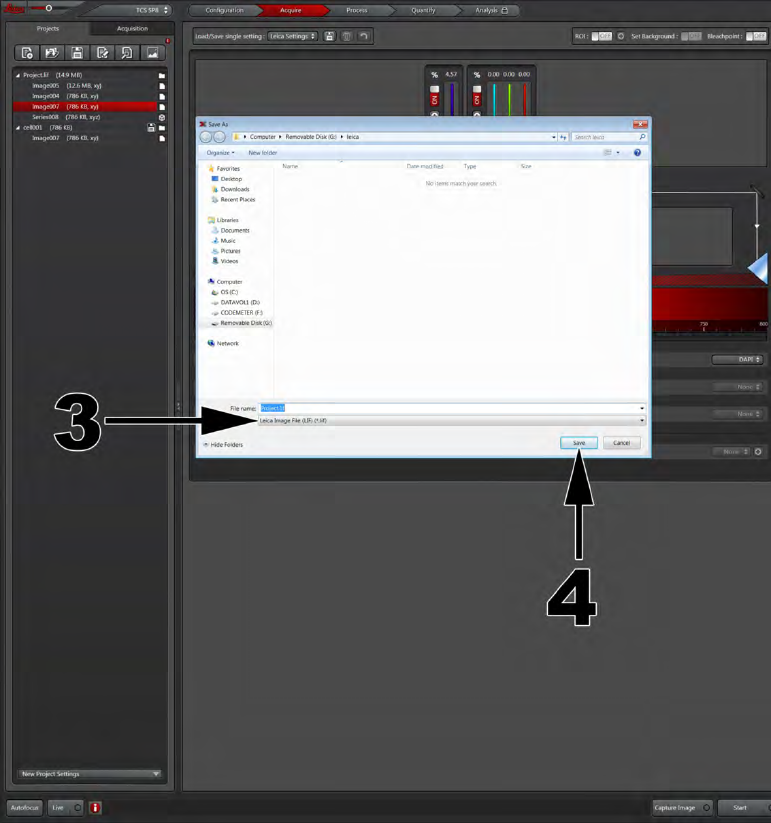
3)AfterclickingSaveas..,awindowwillopenaskingyouwhatwouldyouliketonameyourpicture.Itwillalso
askwhatfiletypewouldyouliketosaveitas.
ALWAYSSAVEASALEICAIMAGEFILE(.lif)Bysavingasa.lif,youstoreallmetadatanecessarytorecallyour
experimentalsetup,acriticalpiecewhenyouarerepeatingtheacquisitioncriteriaorwritingapaperabout
theacquisitionatalaterdate.Youwillneedanimageanalysissoftwareprogramtoviewthisfiletypeona
differentcomputer,though.
Ifyouwantyourimagesin.tiffor.jpeg,pleaseseepage28.
4)Hitthesavebutton.
TheSavingMethoddescribedabovewillsavealltheimagesthatyouacquiredduringyourimagingsession.
Ifyouareinterestedinsavingonlyasingleimagethatyouacquiredduringyoursession,followthesteps
providedbelow(page27).
27
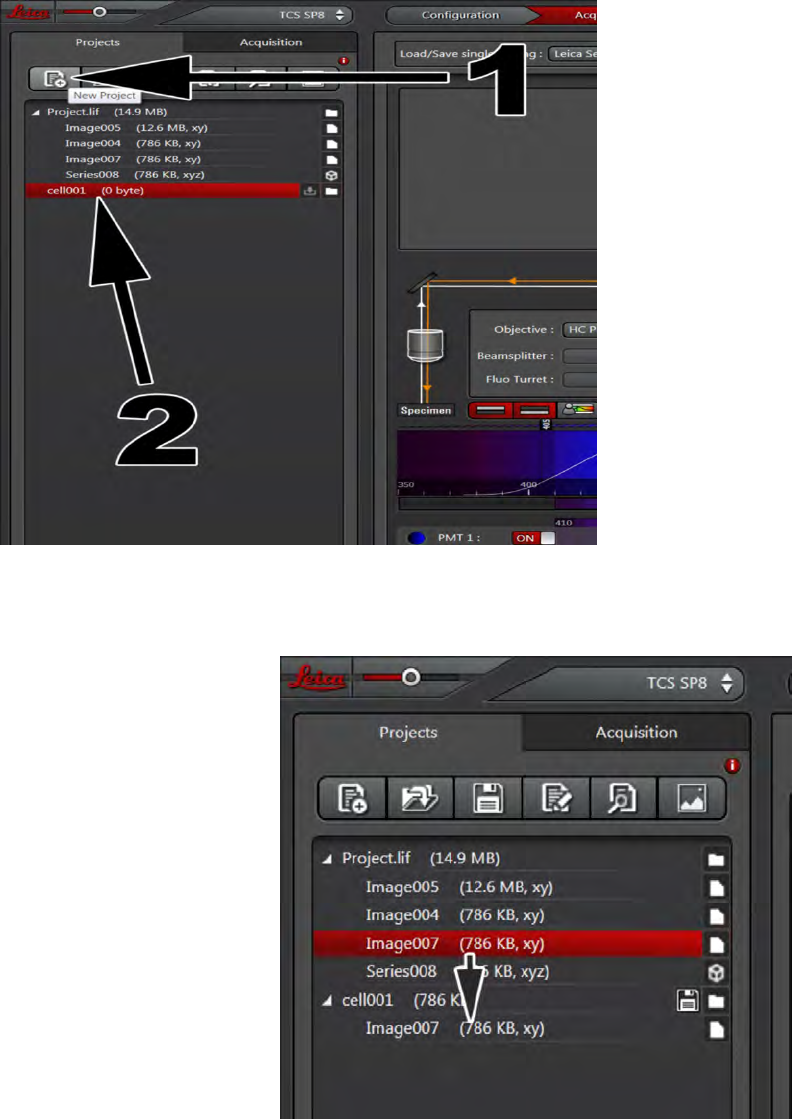
SavingSingleImage:
1)Clickthenewprojectbuttoninthetopleft(Labeled1).
2)Onceanewprojectbuttonhasbeenhit,
youshouldseeanewprojectfoldercreated
onyourlistofimages.(Highlightedinred,
labeled2).
3)Youcannowclickonyourdesiredimageanddragittoyournewlycreatedprojectfolder(labeled3).
Oncetheimageofinterestiswithinthenewprojectfolder,followthesameSaveasprocedureasdescribed
above.
28
SavingImagesas.tiffor.jpeg:
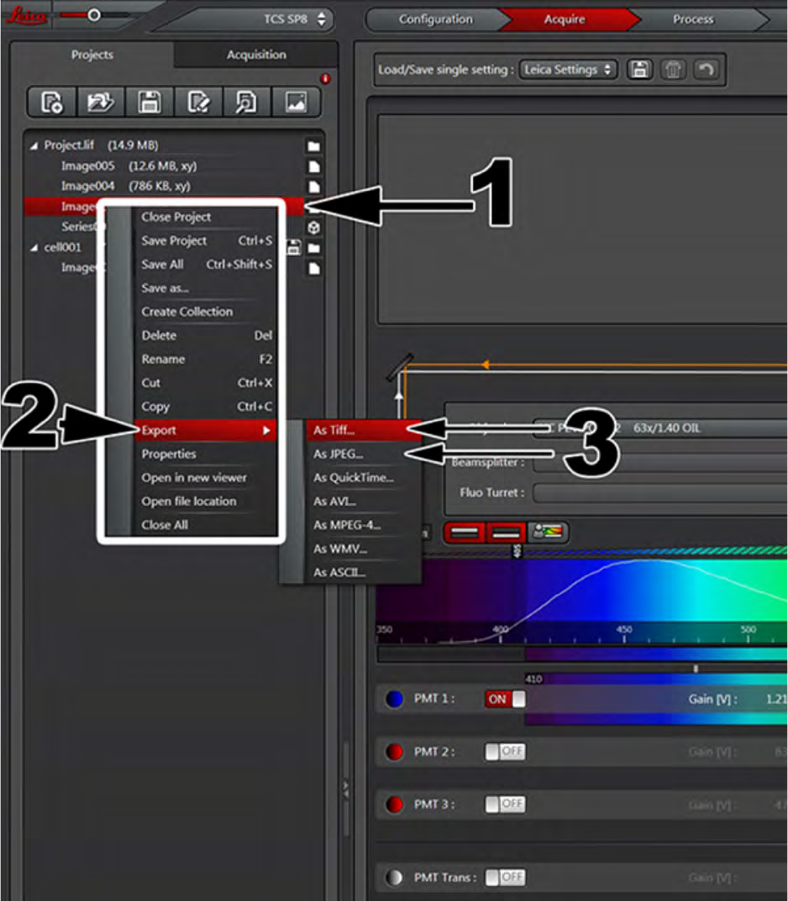
1Selecttheimageyouwouldliketosaveasatiff.Onceselected,rightclickontheimage.
2Afterrightclicking,youwillseeapull-downmenuappear(highlightedwhitebox).SelecttheExportoption.
3Onceyouplacethemouseovertheexporttab,itwillopenanotherdrop-downmenuthatwillaskyouifyou
wanttosaveasTifforasJPEG.Choosetheformatthatyouwishtosavein.
29
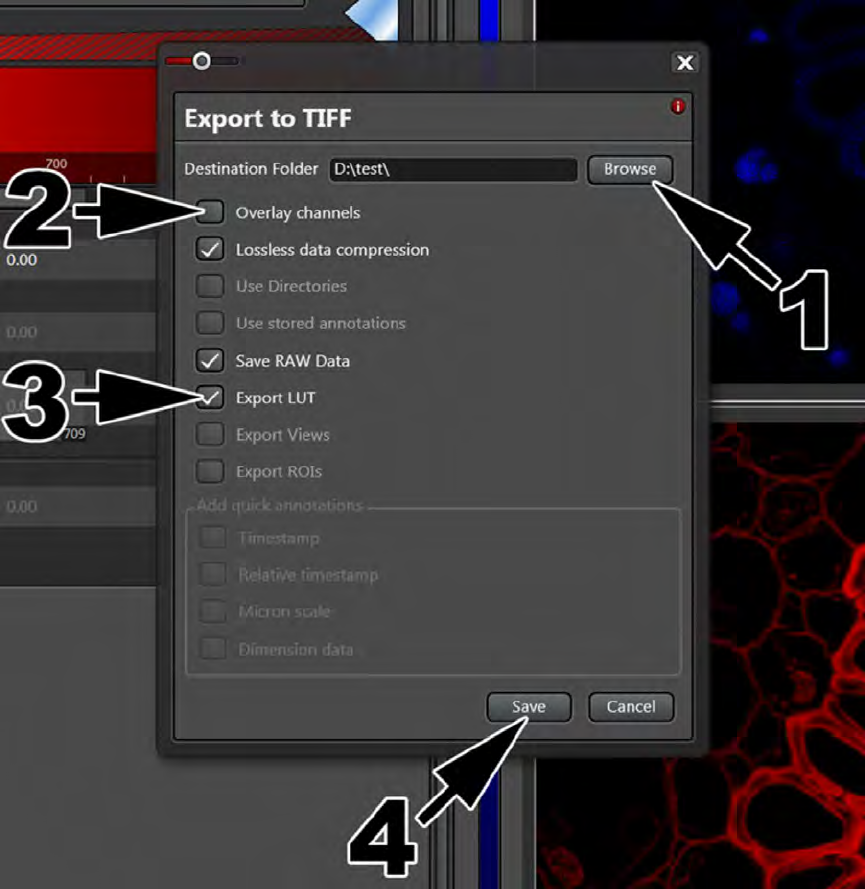
ToSAVECOLORSSEPERATELYas.tiffand.jpeg:
1ClickonBrowsetochoosethefolderthatyouwanttosaveyourimagesinto.
2MakesureOverlaychannelsisunchecked.
3MakesureExportLUTischecked(otherwiseimageswillonlybeinblackandwhite).
4ClickSave.
30
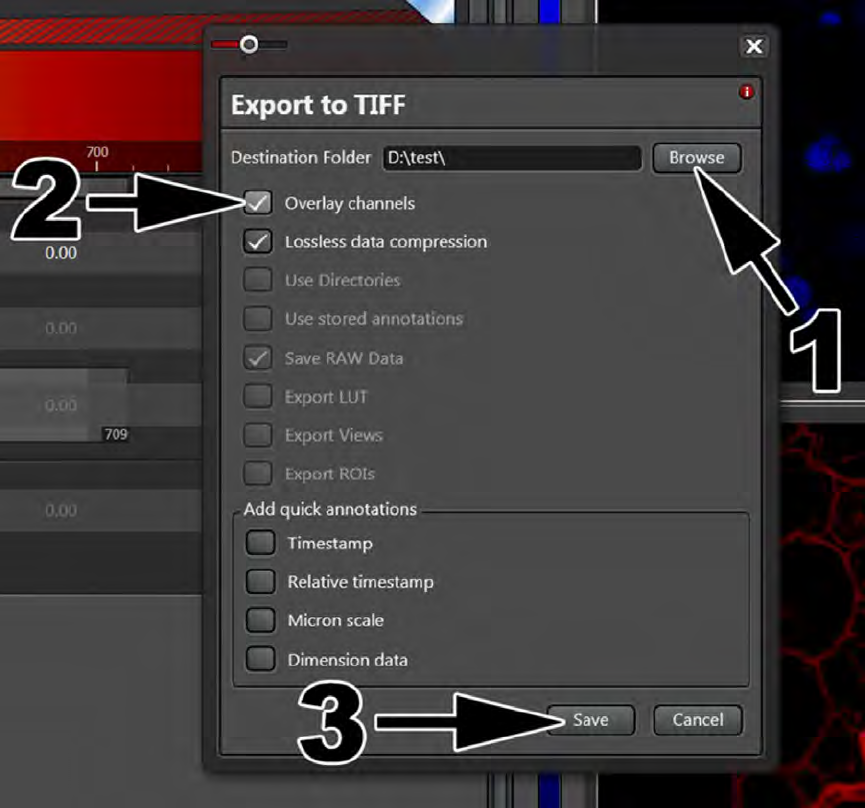
SaveaMergedas.tiffand.jpeg(allcolorstogether):
1ClickonBrowsetochoosethefolderthatyouwanttosaveyourimagesinto.
2ChecktheOverlaychannelsbox.
3ClicktheSavebutton.
31
