
How To Use the Enterprise E2 Shop System
Contents
Overview and Additional Resources ...................................................................................................................................... 1
Configuring The System ......................................................................................................................................................... 3
User Groups ....................................................................................................................................................................... 3
User Codes ......................................................................................................................................................................... 7
Template Maintenance...................................................................................................................................................... 8
User-Defined Maintenance ............................................................................................................................................... 9
Tables ............................................................................................................................................................................... 11
Bank Codes .................................................................................................................................................................. 11
Customers (Core Table) ............................................................................................................................................... 12
Employees (Core Table) ............................................................................................................................................... 14
Parts: Purchased (Core Table) ..................................................................................................................................... 18
Parts: Manufactured (Core Table) .............................................................................................................................. 25
G/L Accounts (Core Table) ........................................................................................................................................... 38
Pay Periods (Core Table) .............................................................................................................................................. 39
Salesmen (Core Table) ................................................................................................................................................. 40
Vendors (Core Table) ................................................................................................................................................... 41
Work Centers (Core Table) .......................................................................................................................................... 43
Attendance Codes (Base Table) ................................................................................................................................... 46
Break Codes (Base Table)............................................................................................................................................. 47
Calculator Codes (Base Table) ..................................................................................................................................... 48
Call Result Codes (Base Table) ..................................................................................................................................... 50
Collection Terminals (Base Table) ................................................................................................................................ 51
Container Codes (Base Table) ...................................................................................................................................... 53
Currency Codes (Base Table) ....................................................................................................................................... 54
Customer Group Codes (Base Table) ........................................................................................................................... 55
Departments (Base Table) ........................................................................................................................................... 56
Description Codes (Base Table – Text Builder Defaults) .............................................................................................. 57
Estimate Codes (Base Table) ........................................................................................................................................ 58
G/L Group Codes (Base Table) ..................................................................................................................................... 59
HotSpots (Base Table) .................................................................................................................................................. 60
Inventory Codes (Base Table) ...................................................................................................................................... 62

How To Use the Enterprise E2 Shop System
Location Codes (Base Table) ........................................................................................................................................ 65
Miscellaneous Charge Codes (Base Table) .................................................................................................................. 66
Operations (Base Table)............................................................................................................................................... 67
Product Code (Base Table) ........................................................................................................................................... 69
Prompt Codes (Base Table) .......................................................................................................................................... 70
Rate Codes (Base Table) .............................................................................................................................................. 73
Reason Codes (Base Table) .......................................................................................................................................... 75
Service Codes (Base Table) .......................................................................................................................................... 75
Shift Codes (Base Table) .............................................................................................................................................. 78
Shipping Codes (Base Table) ........................................................................................................................................ 79
Tax Codes (Base Table) ................................................................................................................................................ 80
Terms Codes (Base Table) ............................................................................................................................................ 81
Territory Codes (Base Table)........................................................................................................................................ 82
Triggers (Base Table) .................................................................................................................................................... 82
Vendor Types (Base Table) .......................................................................................................................................... 85
Work Codes (Base Table) ............................................................................................................................................. 85
Fiscal Years ....................................................................................................................................................................... 87
Company Maintenance .................................................................................................................................................... 89
Company Preferences ...................................................................................................................................................... 90
Auto-numbers .............................................................................................................................................................. 91
Accounting ................................................................................................................................................................... 92
Data Collection............................................................................................................................................................. 98
Forms ......................................................................................................................................................................... 103
Interfaces ................................................................................................................................................................... 104
Inventory .................................................................................................................................................................... 120
Miscellaneous ............................................................................................................................................................ 125
Order Entry ................................................................................................................................................................ 128
Time and Attendance ................................................................................................................................................ 134
Estimating .................................................................................................................................................................. 148
Returns ....................................................................................................................................................................... 149
Quotations ................................................................................................................................................................. 150
Customer Request For Quotation .............................................................................................................................. 151
Vendor Request For Quotation ................................................................................................................................. 152
Report Customization .................................................................................................................................................... 154

How To Use the Enterprise E2 Shop System
Scheduled Report Maintenance .................................................................................................................................... 155
Using The System ............................................................................................................................................................... 157
Record Management ..................................................................................................................................................... 157
Record Searches ........................................................................................................................................................ 157
Running Summary Reports ........................................................................................................................................ 163
Forms and Labels ....................................................................................................................................................... 167
Creating New Records – Overview ................................................................................................................................ 169
Record Creation Options ........................................................................................................................................... 169
Global Features .............................................................................................................................................................. 171
QuickView .................................................................................................................................................................. 171
Common Header / Line Item Objects ........................................................................................................................ 174
Tasks .......................................................................................................................................................................... 175
Documents ................................................................................................................................................................. 176
User Defined Fields .................................................................................................................................................... 178
Audit Trail................................................................................................................................................................... 178
Quoting .......................................................................................................................................................................... 180
Quotations ................................................................................................................................................................. 180
Customer Request For Quotation (RFQ) .................................................................................................................... 192
Orders ............................................................................................................................................................................ 204
Order Entry ................................................................................................................................................................ 204
Job Material Processing (JMP) ................................................................................................................................... 222
Shipments / Packing Lists .......................................................................................................................................... 225
Customer Returns ...................................................................................................................................................... 231
Purchasing ..................................................................................................................................................................... 234
Purchase Orders ........................................................................................................................................................ 234
Outside Service Packing Lists ..................................................................................................................................... 239
Vendor Request For Quotation (RFQ) ....................................................................................................................... 245
Vendor Cost Analysis (Utility) .................................................................................................................................... 249
Receiver ..................................................................................................................................................................... 249
Vendor Returns .......................................................................................................................................................... 252
Inventory ........................................................................................................................................................................ 259
Fill Job Requirements (Utility).................................................................................................................................... 259
Inventory Adjustments (Utility) ................................................................................................................................. 260
Inventory Inspections ................................................................................................................................................ 262

How To Use the Enterprise E2 Shop System
Material Allocation .................................................................................................................................................... 262
Stock Job Transfers .................................................................................................................................................... 264
Shop Floor Control ......................................................................................................................................................... 266
Time And Attendance Tickets .................................................................................................................................... 266
Schedule Codes .......................................................................................................................................................... 268
Internal Rejections ..................................................................................................................................................... 272
Accounts Receivable ...................................................................................................................................................... 274
Customer Billing ......................................................................................................................................................... 274
Cash Receipt .............................................................................................................................................................. 279
Accounts Payable ........................................................................................................................................................... 281
Vendor Invoice ........................................................................................................................................................... 281
Cash Disbursement .................................................................................................................................................... 284
General Ledger .............................................................................................................................................................. 287
Journal Entry .............................................................................................................................................................. 287
Fiscal Years ..................................................................................................................................................................... 290
How To Use the Enterprise E2 Shop System
R. 1.0 Page 1 of 295
Overview and Additional Resources
The purpose of this document is to provide information regarding the creation and general use of records within the
Enterprise Version of the E2 Shop System and is designed as a reference resource that can be used in conjunction with
Shoptech Software’s other educational offerings as a means to learn how to best utilize the software based on your
circumstances.
Configuring the System
This section covers the key elements of setting up and configuring E2 by reviewing System related areas (including
Company Preferences) and Table Items.
Using the System
This section covers basic navigation concepts and the key fields that impact the creation and use of “daily records”
within E2 such as Quotes, Customer Orders, and Purchase Orders. Each area will consider the following topics:
Overview – A synopsis of what the record/utility is used for.
Source Record(s) – A list of potential Sources that could be used to create the record.
Destination Record(s) – A list of records that could use the current record as a Source of information, if not
creation.
Key Values/Points of Consideration – A brief overview of required and otherwise significant fields located on the
record along with observations about the creation and/or use of the record.
Additional Resources
Information on the use of the E2 Shop System can also be found in the following resources:
The E2 Implementation Guide, designed to assist in the creation of a comprehensive Implementation Plan for
customers that are just now setting E2.
Recorded content regarding key features of the System.
Getting Started With E2 Classes, three-day sessions geared toward new users to provide an overview of the System.
Online Virtual Classes, designed to cover specific topics that can be attended at your shop.
How Do I Documents, located throughout E2 that provide general overviews of specified topics.
Onsite Consultations, customized training that takes place in your shop designed to help you decide how to
specifically configure the System to fit your needs.
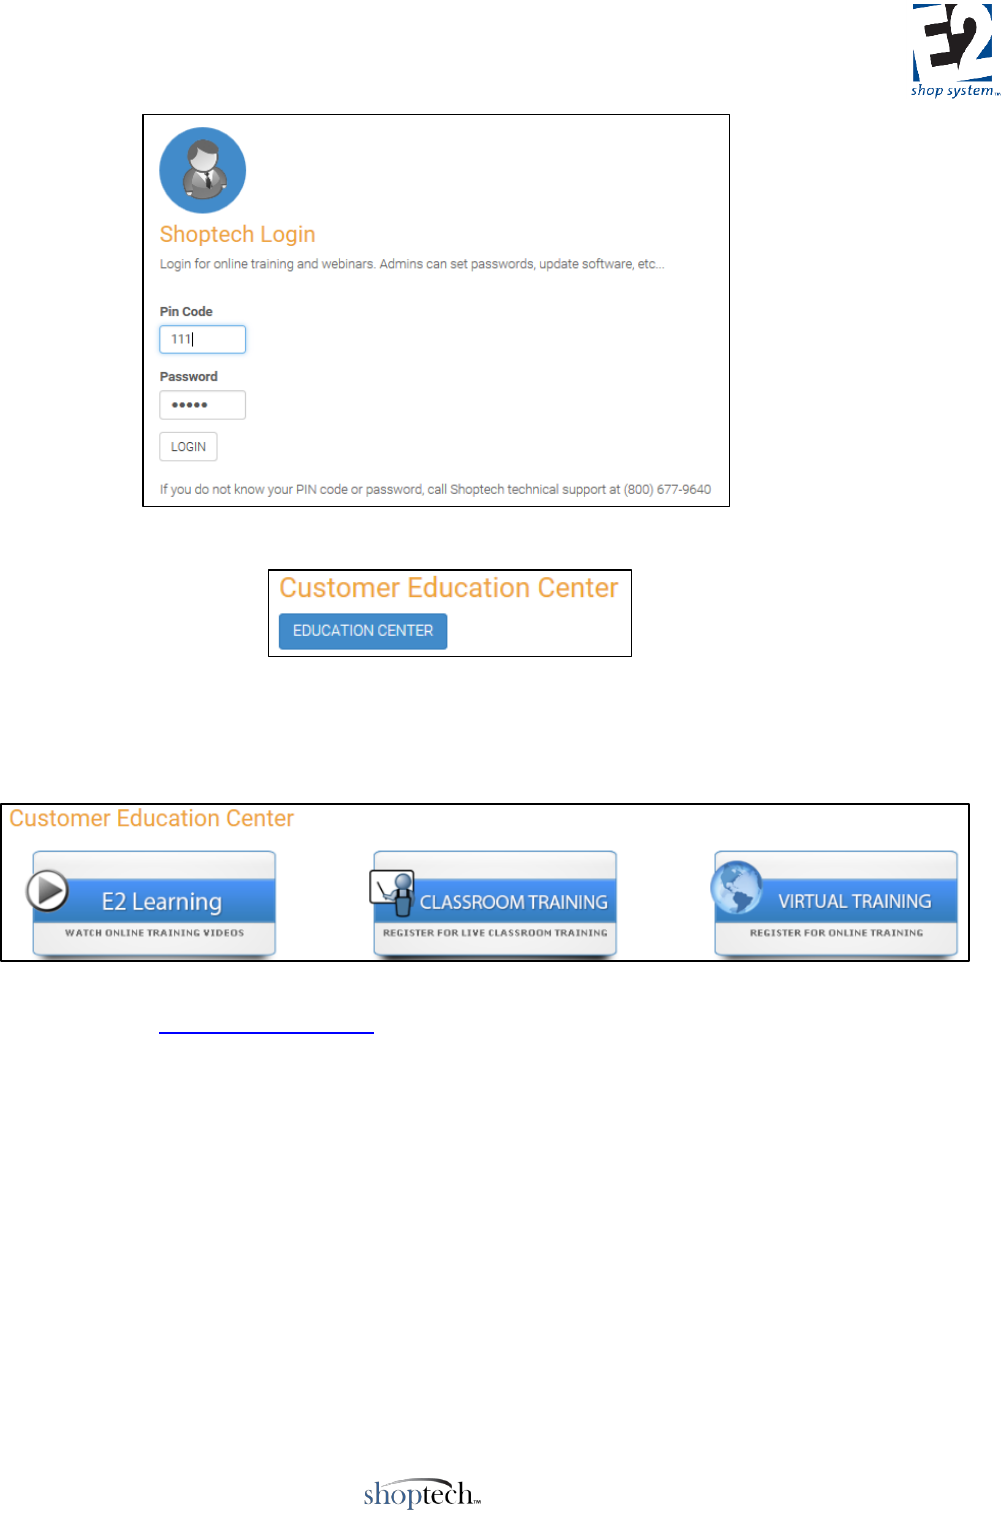
Shoptech Education Center
To view recorded content and register for classes (both classroom and virtual), follow these steps:
1. Go to https://www.shoptech.com/customer-home/
2. Enter your Company’s Pin Code and Password.
3. Click Login.
How To Use the Enterprise E2 Shop System
R. 1.0 Page 2 of 295
4. Click the Education Center Button.
5. To view recordings, click the E2 Learning Button.
6. To register for Classroom Sessions, click the Classroom Training Button.
7. To register for online Virtual Classes, click the Virtual Training Button.
For additional information regarding any of these training options, contact the Shoptech Education Department at 1-
800-525-2143 or email [email protected]m.
For information regarding customized onsite training on the use of the E2 Shop System, contact your Inside Sales
representative at 1-800-525-2143 for details and to check the availability of our Consultants.
How To Use the Enterprise E2 Shop System
R. 1.0 Page 3 of 295
Configuring The System
This portion of the manual covers the System Area and Table Items in order to provide an overview of the key values
associated within each one.
User Groups
Location: System | User Group Maintenance
Overview
Provides a centralized means of managing security rights and permissions by assigning Users to the appropriate
User Group based on their need for access within E2
Create as many User Groups as necessary
Users can only belong to one User Group
Key Values/Points of Consideration (An asterisk [*] indicates a Required Field):
General Tab
*User Group Code can be up to 20 alpha-numeric characters
The ADMIN Group will be present by default and has access to all areas of the software (based on Modules
purchased)
Permissions Tab
Allow (checked) or Prevent (unchecked) associated Users from performing listed operations
Global Sub-tab
Functions found throughout the system, many regarding Searches and Reports
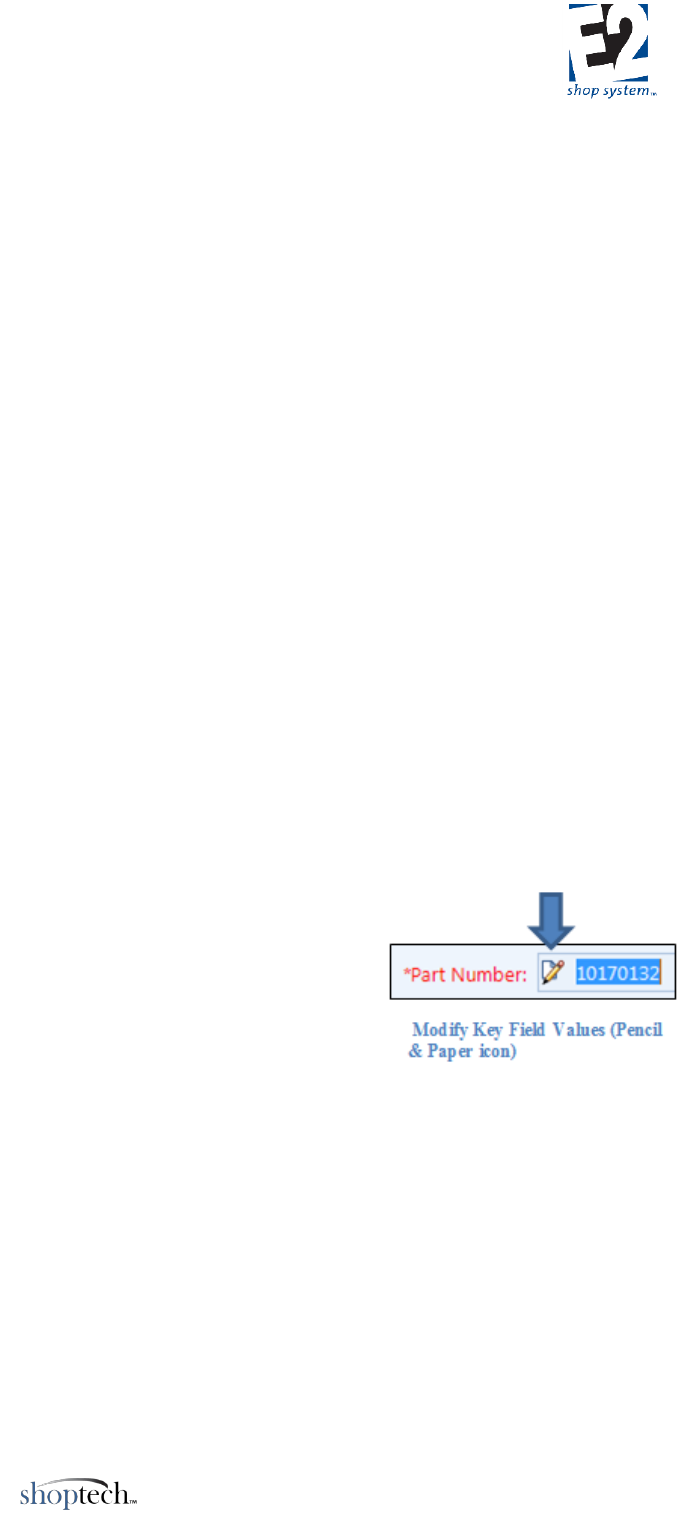
Key Options:
Allow Modifying Key Field Values: Allows Users to edit existing Key
Fields throughout the system that otherwise could not be changed. This
feature is accessible throughout the system wherever the “Pencil and
Paper” icon is found. Examples include Part Numbers, Customer Codes,
Vendor Codes, etc.
This is a very powerful setting and can lead to changes throughout the
entire system, as it changes the selected value on EVERY RECORD where it is present.
Allowed To Apply Software Updates: Allows Users to apply pending updates to E2 when prompted during
login
Documents Sub-tab
Accessibility options regarding attached documents
Applicable wherever Documents are available throughout the system
User-Defined Fields Sub-tab
Accessibility options regarding User-Defined Fields
Applicable wherever User-Defined Fields are available throughout the system
Availability of User-Defined Fields is also dependent on User-Defined Maintenance settings
How To Use the Enterprise E2 Shop System
R. 1.0 Page 4 of 295
NEW User Groups have all Permissions allowed by default with the following exceptions:
Allow Access To Executive Overview
Allowed To Apply Software Updates
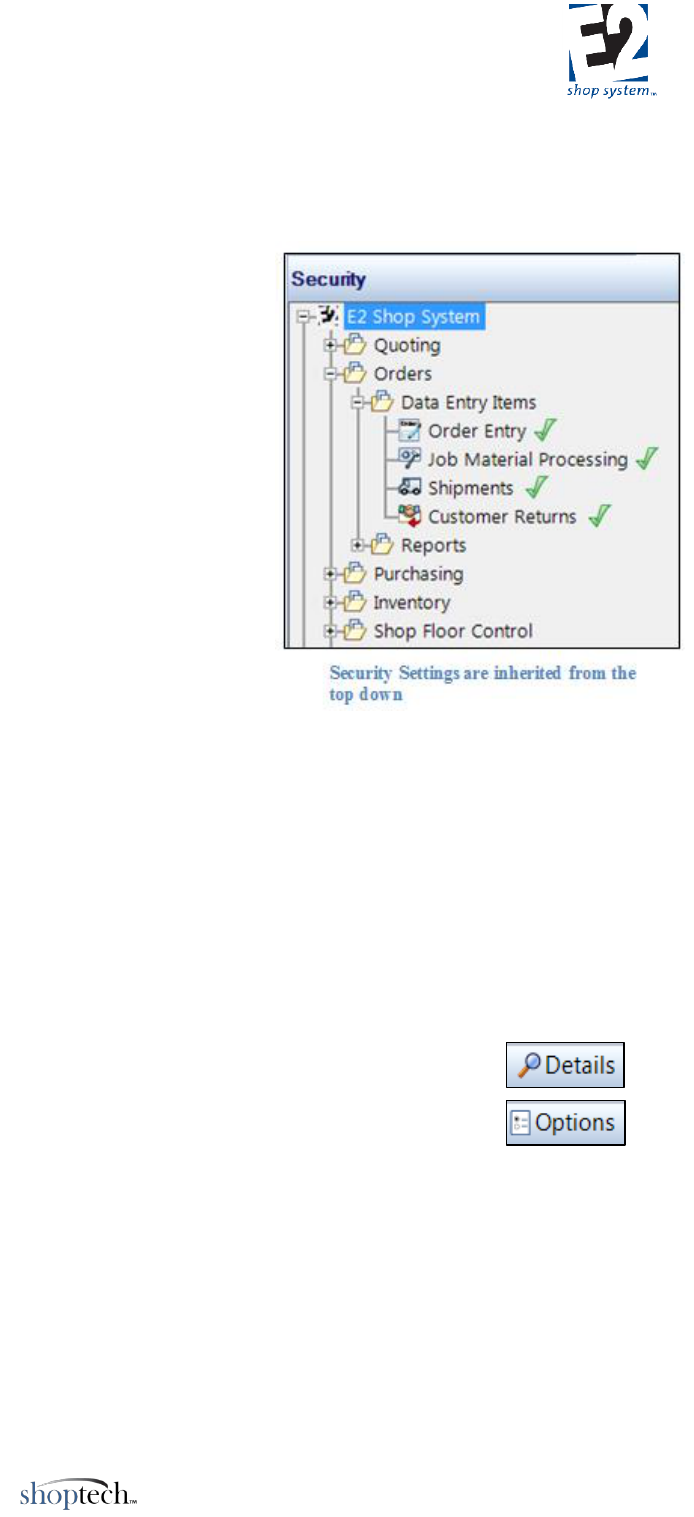
Security Tab
Determine the level of access for every (purchased) Module within
the system for members of the Group
Right click on desired (folder) area to gain access to Command Level
Security options:
Read/Write
View Only
No Access (Will not be visible to User)
Command Level Security settings are inherited from the top down
Security settings selected at the E2 Shop System passes down to
all folders, sub-folders, and options below it
Security settings selected at the Orders (folder) level passes
down to all sub-folders and options below it
Etc.
For each Data Entry Form (Order Entry, Job Material Processing,
etc.)
Security can also be set at the Field Level
Detail Form: Ability to limit access to individual fields in Data Entry Form (e.g. Order Entry Form)
Fields in panels (non-grid portions of Form) can have one of the following settings:
Required (Green/Allows input by User/Cannot be changed)
Read/Write (Green/Allows input by User /Can be changed)
Hidden (Red/Cannot be seen by User/Can be changed)
View Only (Yellow/Can be viewed by User/Can be changed)
Fields that can be changed are edited by (left) clicking on the displayed option
Toggle through by clicking again until the desired security setting is reached
Changes made to these settings cannot be undone by using Restore function
o Each Setting must be set individually
Detail level fields can be edited by clicking the Details Icon
Fields in grids can be edited by clicking the Options Icon and selecting “Edit user group
settings”
Groups Tab: Represents the Groups used to organize like values (Columns) in the Grid
o Group Security can be set to:
None (No Access – Group and related Columns are hidden from User)
Read (View Only – User can see contents in columns but cannot edit them)
Read/Write (Full access to Column contents)
o Grid Groups cannot be given higher security than provided as the system default
Security can be reduced
o These settings apply to the Group as a whole – all Columns affected within the Group
Columns Tab: Represents individual field (Column) Security settings within the Grid
How To Use the Enterprise E2 Shop System
R. 1.0 Page 5 of 295
o If a Column is Required, Security must be Read/Write
There is a distinction between System Required and Required. System Required indicates that E2 itself
requires input from the field; therefore data entry is mandatory in all circumstances. System Required fields
will be marked Required by default. If you (as an Administrator of the system) want to make a field required
that the system does not need, simply mark it Required. Users will be forced to enter a value to save the
record in either case.
o Non-required fields can be set to the following Security levels:
None (No Access)
Read (View Only)
Read/Write (Full Access)
o Columns cannot be given higher security than provided as the system default
Security can be reduced
o All values in a Column will use the designated Security setting
Restoring settings will undo all Security-related changes made in the Grid Tabs only
o Specific to Data Entry Form
o Specific to Detail Form
o Will restore settings on both Tabs (Groups and Columns)
o Will not change or reset access levels to non-grid fields
Navigator Form: Ability to limit access to Navigator Grid fields
Open Navigator Grid by clicking Options button and clicking “Edit user groups settings”
Functions same as Grid Security detailed in Detail Forms
Grid Group Security
Column Security
Restoring settings will undo all Security-related changes made in the Grid Tabs only
Specific to Data Entry Form
Specific to Navigator Form
Will restore settings on both Tabs (Groups and Columns)
Will not change or reset access levels to non-grid fields
Security Settings for like fields DO NOT carry over from one Form area (Detail/Navigator) to the other
If Net Amount is Hidden only in Detail Form it is still visible in Navigator Form
Must Hide in both to prevent from being seen
Do not have the ability to limit access to Navigator Options/Buttons
Actions
Searches
Forms And Labels
Etc.
o These items are controlled by setting Command Level Security Preferences
While it is possible to make changes to Grid Appearance when setting Security for Grid Groups and
Columns, THIS IS NOT THE PLACE TO DO SO. To edit Column size or order of appearance, use the
Customization feature for User Group Level changes, or edit specific records for User Level modifications.

How To Use the Enterprise E2 Shop System
R. 1.0 Page 6 of 295
Reports can only have Command Level Security options designated
NEW User Groups have Read/Write Access to all areas of the software by default
Consider using Copy feature to create new Groups once a base version has been configured
Users that can access User Group Maintenance can edit the Security Settings of any User Group and
effectively have access to the entire system despite what their original Group may allow them to do.
Membership Tab
Add or remove Users to/from the selected User Group
A User Group can consist of a single User
Can move a single User or multiple Users at once
Every User must belong to a User Group
Users can only belong to one User Group
Customization Tab
Edit the appearance of records within E2
Order of Tabs
Location and size of Grid Columns
Etc.
Edits are applicable to all Users in Group
Some changes in system appearance can be User specific
HotSpots Tab
Assign HotSpots that will be accessible to members of the User Group
Applications Tab
Provides access to executable files and specials to members of the User Group

How To Use the Enterprise E2 Shop System
R. 1.0 Page 7 of 295
User Codes
Location: System | User Maintenance
Overview
Creates accounts for employees that will be able to access the E2 Shop System
Security and Permissions are inherited from the User Group the User is assigned to
Users must belong to a User Group but can only belong to one User Group
User records are not the same as Employee records
User accounts provide access to the software
Employee records track availability and labor costs for production purposes
Key Values/Points of Consideration (An asterisk [*] indicates a Required Field):
General Tab
*User Code can be up to 50 alpha-numeric characters
*User Group provides the Security and Permissions settings for the User
Settings Tab
Select default options pertaining to accessibility, viewing, and messaging
Preferences Sub-tab
*Language Code determines the display language for real-time Data Collection devices
Options include English, French, and Spanish
User Interface Skin determines background and font colors used throughout the system
Preview Skins before applying them to see if you want to keep them
Restore will reset the previously applied Skin
Designate the preferred options regarding menu views/placement and tasks/messaging
Login/Logout Sub-tab
*Designate the User’s Password
Encrypted for security reasons
Can force password change by enabling option “Must Change Password At Next Login”
Specific Users can be prompted for a password when accessing the Shop Application
Consider prompting for passwords at the Shop Application for User Codes that have extended access to
the Office Application. In addition to security reasons, accessing E2 Office features will use an Office license
Designate a Default Company Code to log directly into that Company’s data without being prompted
The option “Locked Out Until Date” can be used to secure a User’s account while out of the office
Messaging Sub-tab
Configure the various options located here to allow for emailing or faxing forms and reports from E2
If desired you can also configure E2 to display the inbox contents of email services such as Outlook
Image Tab
Associated images will print on Employee Badges

How To Use the Enterprise E2 Shop System
R. 1.0 Page 8 of 295
Template Maintenance
Location: System | Template Maintenance
Overview
Creates partially populated records that can be used throughout the system
Speeds up record creation
Reduces chances for errors/improves consistency
Creating a Template
Templates can be created for most record types found in the following System Areas:
Base Tables
(Core) Tables
Quoting
Orders
Shop Floor Control
Quality
A/R
A/P
G/L
Contact Management
To create/edit a Template for use in record creation:
Select the appropriate System Area (See list above)
Within the designated System Area select the record type in the Command drop-down
Choose the appropriate Action
Example: To create a Part Template
System Area = Tables
Command = Part Numbers
Action = New Part Number Template
Key Values/Points of Consideration (An asterisk [*] indicates a Required Field):
Since each Template would have different values in it depending on the System Area and Command selected, use the
details in the Table and Record Creation portions of this Guide.
Each Template does have the following fields in common:
*Template Name can be up to 20 alpha-numeric characters
*Template Description can be up to 50 alpha-numeric characters
Using Templates
Once created for a specific System Area/Command combination, the option to create a New Record From Template will
be displayed
This option will not display if there are no Templates for that Area/Record Type
Templates can be very useful for standardizing record creation for Parts

How To Use the Enterprise E2 Shop System
R. 1.0 Page 9 of 295
User-Defined Maintenance
Location: System | User-Defined Maintenance
Overview
Offers customizable data entry fields found throughout the system
Key Values/Points of Consideration (An asterisk [*] indicates a Required Field):
User-Defined Fields are available on over 30 record types within the system. Some of the more commonly used areas
include:
Customers
Vendors
Part Numbers
To configure User-Defined Fields for use on a particular Parent Record:
Select the appropriate System Area/Table combination from the User-Defined Maintenance Grid and click Edit
Within each Parent Record, the following User-Defined Field options are available for use (in User-Defined Values
Grid):
Currency Fields (2)
Limited to numeric values
Date Fields (2)
Limited to date formats
mm/dd/yy
mm/dd/yyyy
Month dd yyyy
Etc.
Memo Field (1)
Alpha-numeric values allowed
Number Fields (4)
Limited to numeric values
Text Fields (4)
Alpha-numeric values allowed
Can create pre-defined drop-down lists (Value List Field):
Each User-Defined Field has the following configuration options:
Field Name: System maintained reference to specific field (Read Only)
*Field Description: Up to 100 alpha-numeric characters
Editable by User
Does not display in form
*Caption: Up to 50 alpha-numeric characters
Editable by User
Displays on form (User-Defined Tab on Parent Record)
Required: Enable if the User will be forced to provide a value prior to saving the Parent Record
Hidden: Disable to allow use of field
All fields are Hidden by default

How To Use the Enterprise E2 Shop System
R. 1.0 Page 10 of 295
User-Defined Tab will not display on the Parent Record unless one or more fields are visible
Default Value: Value will be present by default on new Parent Records
Value List: Drop-down options that Users can select from
Available on four User-Defined text fields ONLY
Use “pipe symbol” | to separate values in list
Do not leave spaces between values (xxx|yyyy|zzz)
List will display in order entered
Presence of list does not prevent different value from being entered manually
Availability of User-Defined Fields
Level of availability of User-Defined Fields depends on Company Preference setting
Miscellaneous | Treat User-Defined Fields As One
If enabled (Yes): User-Defined values will “flow” from the Parent Record to associated records that reference the
Parent Record
Example: User-Defined Field configured for use on Vendors (Parent Record)
User-Defined Values entered for specific Vendor will travel wherever the Vendor is selected
Purchase Orders
Receivers
Etc.
If not enabled (No): User-Defined values remain on the Parent Record only
Purchase Orders would not display User-Defined Tab for Vendor-related info from previous example
User-Defined Field Functionality
User-Defined Fields provide the ability to:
Reference and maintain information for Parent Records
If allowed, information will follow from the Parent Record through the subsequent records
Filter Reports and Summaries
Search for Records
User-Defined Fields WILL NOT display on Reports, Summaries, or Forms by default
Report would need to be edited to display

How To Use the Enterprise E2 Shop System
R. 1.0 Page 11 of 295
Tables
Overview
Tables can be broken down into two categories: Base Tables and Core Tables.
From a general standpoint, Base Tables represent the “foundational building blocks” of the system in the sense they do
not depend on other Tables (or other records) for required information. Base Tables are used throughout E2 to provide
details, often in the form of a required field. There are a few instances where a Base Table calls for another Base Table
as a field value, but not for a required field, with the exception of Currency Codes (see details on Currency Codes for a
full explanation).
Core Tables build on this foundation by providing a means of gathering related information in one spot that can then be
easily passed along to day-to-day business-related records such as Quotes, Orders, Purchase Orders, etc. Much of the
information captured in Core Tables comes from Base Tables (for example: Customer Group Codes, Terms Codes, Tax
Codes, and Work Codes on Customers), some of which may be required.
The Implementation Guide contains a checklist of Table Items and a suggested order of creation.
Bank Codes
Overview
Tracks cash-related transactions through a corresponding (System-generated) Check Register for viewing and
reconciliation purposes
Source Record(s)
This Table relies on/pulls information from the following records (An asterisk [*] indicates a required field on this
Table):
*G/L Account (Cash account)
Currency Code
Destination Record(s)
This Table is used on the following records (An asterisk [*] indicates this Table is a required field on the Destination
Record):
*Cash Receipts
*Cash Disbursements/Checks
Key Values/Points of Consideration (An asterisk [*] indicates a Required Field):
General Tab
*Bank Code can be up to 20 alpha-numeric characters
*G/L Account represents the account you want to associate with this Bank Code for reconciling purposes
This typically represents a cash account but could also represent a credit card/line of credit
The same G/L Account should not appear on multiple Bank Codes
The system will automatically create a Check Register for each Bank Code/ G/L Account
Next Check Number is entered for each Bank Code independently
Not entered in System | Next Number Maintenance

How To Use the Enterprise E2 Shop System
R. 1.0 Page 12 of 295
Check Numbers can overlap between Bank Codes
Currency Code is a Read Only field and displays the Currency associated with the selected G/L Account
To perform a Bank Code reconciliation, select a Bank Code and launch the Reconcile Bank Code Utility.
Customers (Core Table)
Overview
Represents the entities to which you sell Parts or provide services
Stores pertinent information regarding contacts and credit details
Source Record(s)
This Table relies on/pulls information from the following records (An asterisk [*] indicates a required field on this
Table):
Work Codes (Required, if Work Code has been selected to drive A/R Billing in Company Preferences)
NOTE: If using QuickBooks Interface, Product Codes must be selected to drive A/R Billing in Company
Preferences.
Territory Codes
Shipping Codes
*Currency Codes
Terms Codes
Customer Group Codes
Salesmen
Tax Codes
Destination Record(s)
This Table is used on the following records (An asterisk [*] indicates this Table is a required field on the Destination
Record):
*Quotes
*Orders
*Packing Lists
*Customer Returns
*A/R Invoices
*Cash Receipts
Non-Conformances, if associated with Customer-based record (Requires Quality Module)
Corrective Actions, if associated with Customer-based record (Requires Quality Module)
Feedback records, if associated with Customer-based record (Requires Quality Module)
Key Values/Points of Consideration (An asterisk [*] indicates a Required Field):
General Tab
*Customer Code can be up to 20 alpha-numeric characters
*Customer Type provides the ability to distinguish established customers (Customer) from prospective ones
(Prospect)

How To Use the Enterprise E2 Shop System
R. 1.0 Page 13 of 295
Designation changes from Prospect to Customer as Quotes are accepted, items sold, etc.
Available as a filter on various reports
Work Code (when present) will be used to auto-populate Quotes, Orders, and A/R Invoices
Each Line Item “inherits” the Work Code associated with the Customer by default but can be changed
Work Code becomes a Required Field if it has been selected to Drive A/R Billing in Company Preferences
NOTE: If using QuickBooks Interface, Product Codes must be selected to drive A/R Billing in Company
Preferences.
Priority indicates how important a Customer is and is automatically assigned to new Orders
Priority is set to 50 by default on new Customer records
The LOWER the Priority the more important a Customer is deemed to be
While this value is used to initially determine importance for scheduling (if using Forward/Finite), it will be
replaced when the Prioritize Utility is used
Contacts Tab
Contacts that have an email address provided will be available to Users when emailing records from E2
The information for the default A/P Contact designated at the bottom of the screen (if selected) will display on the
A/R Aging Summary for reference
Addresses Tab
Enter as many addresses as required for the Customer
Addresses can be designated as:
SHARED
BILLING
SHIPPING
QUOTATION
You can designate multiple Billing Addresses, but if you need to distinguish between different business
units when running Sales Summaries, etc. you may consider creating multiple Customer Codes for each one.
Territory Code can be used as a filter to search for records and running reports associated with Customers
Associated Shipping Codes will populate Packing Lists
Credit Tab
Miscellaneous Sub-tab
*Currency Code defaults to the one designated in Company Preferences
*Credit Status can be set as:
O (Open) – No restrictions on New Orders
C (Credit Hold) – Prompted to confirm if you want to continue with New Order
H (permanent Hold) – Prohibited from entering New Order
Credit Status is changed manually and is not dependent on other transactions
Terms Code will auto-populate all Sales-related records created for the Customer but can be changed at that level
Customer Group Codes can be changed or removed from Customers as desired

How To Use the Enterprise E2 Shop System
R. 1.0 Page 14 of 295
When a Customer Group Code is assigned to a Customer, the Group Code details override the Billing Rate
and Discount Percent values on the Credit Tab | Miscellaneous Sub-tab of the Customer record. (These fields
will be grayed out and display no values on the Customer record itself even if values had been entered
previously.)
Restocking Percent is used in conjunction with Customer Returns if Parts are deemed acceptable and you place
them back into Inventory
Minimum Order will be used to determine if Orders and Sales-related records are of sufficient dollar value to
proceed
You can choose to Ignore Minimum Order during Order Entry (via prompt)
Credit Limit will be used to alert when the amount of open Orders exceeds the amount designated
New Orders can be entered by answering the prompt accordingly
Private Notes Sub-tab
This information is intended for internal use only
Salesmen Sub-tab
Designate as many Salesmen as necessary that deal with the Customer
The designated Salesmen will auto-populate on Sales-related records but can be edited
Many companies designate a default “HOUSE” account if no specific salesperson is associated with a
Customer for filtering purposes.
The Commission associated with the Salesmen Code will be used on Sales-related records as opposed to any
commission value entered at the estimating level (Sales Sub-tab of Parts, Quotes, etc.)
Taxes Sub-tab
Designate as many Tax Codes as necessary
The designated Tax Codes will auto-populate on Sales-related records but can be edited
Employees (Core Table)
Overview
Represents the people that perform the work in your shop
Stores contact information and details regarding availability, payroll, and work history
Source Record(s)
This Table relies on/pulls information from the following records (An asterisk [*] indicates a required field on this
Table):
Departments
*Rate Codes (Payroll)
*Attendance Codes
*Shift Codes
*User Codes
Break Codes

How To Use the Enterprise E2 Shop System
R. 1.0 Page 15 of 295
Pay Periods
Destination Record(s)
This Table is used on the following records (An asterisk [*] indicates this Table is a required field on the Destination
Record):
Manufactured Parts
Work Centers
Quotes
Orders
Customer Return
Purchase Orders
Vendor Request For Quote
Vendor Return
*Time and Attendance Tickets
Schedule Codes
Internal Rejections
Non-Conformances (Requires Quality Module)
Corrective Actions (Requires Quality Module)
Preventive Actions (Requires Quality Module)
Feedback records (Requires Quality Module)
Documents (Document Control - Requires Quality Module)
Training/Maintenance records (Requires Quality Module)
Key Values/Points of Consideration (An asterisk [*] indicates a Required Field):
General Tab
*Employee Code can be up to 20 alpha-numeric characters
*Employee Number can be a whole numeric value between 1 and 999,999,999
Can be system-generated or entered manually
*Employee Name can be up to 50 alpha-numeric characters
Department Code can be used to filter reports and searches
From a Scheduling perspective it is the Departments associated with Work Centers that is looked at
Addresses Tab
Enter address and contact-related information for the Employee
Human Resources Tab
Miscellaneous Sub-tab
Enter hiring, termination, and review related dates
Enter Tax ID Number (Social Security Number) if desired
Private Notes Sub-tab
This information is intended for internal use only
Payroll Sub-tab

How To Use the Enterprise E2 Shop System
R. 1.0 Page 16 of 295
*Default Pay Rate will auto-populate Attendance Tickets for the Employee
Will be used for Payroll and Job Cost purposes on records created for Jobs
Can be edited on Attendance Ticket
*Pay Rates allow you to set the Hourly Rate paid to the Employee for each Rate Code present
The Default Pay Rate selected above must be present in the Pay Rates Grid
Calculation Method (Overtime) can be either
Daily – Overtime calculated when number of hours listed has been exceeded on a given day
Designate Start Of Day (Time) in Company Preferences
Weekly – Overtime calculated when the number of hours listed has been exceeded in a given week
Designate Payroll Period Begin Day (Start of Week) in Company Preferences
Overtime After (Hours) represents the number of hours that need to pass before E2 will automatically calculate
Overtime pay
Overtime Factor is applied to the Hourly Rate (dollar value) associated with the Time And Attendance Ticket when
Overtime is reached
If you allow E2 to calculate Overtime automatically we do not recommend the creation and use of an
Overtime Rate Code and associated Hourly Rate, as this can lead to more than the anticipated amount of
Overtime pay being calculated.
Time And Attendance Sub-tab
*Default Attendance Code will auto-populate Time And Attendance Tickets for the Employee
Can be edited on the Attendance Ticket
*Default Shift Code will provide default hours on Time And Attendance Tickets for the Employee
Breaks associated with the Shift Code will auto-populate the Employee record (Breaks Grid)
Break Codes assigned in the Breaks Grid will be used by the system in various ways:
Time And Attendance Tickets entered directly in the system for the Employee will use them to “auto-fill” Breaks
into Time Ticket details once information is entered and the record saved
Scheduling capacity will be impacted when the Employee is assigned as the Default Shift Operator of a Work
Center
If enabled to do so (See Data Collection Settings below) the system will automatically clock the Employee on
and off of the Breaks listed (assuming they have clocked in via real-time Data Collection devices)
Data Collection Settings
*User Code provides the security and permissions settings the Employee will have access to when using the
Shop Application
Enable the option to Allow Use Of Batch Entry At Data Collection Clock if you want the Employee to be able to
enter Job-related information “after the fact” without having to do so within Office Application
The Employee would be prompted at the clock for required information (Job Number, Step, Work Center,
Pieces Finished, etc.)
The system would simply place the information into the next available time slot on the Time Ticket details
based on Setup and Cycle Hours provided
Enable the option to Automatically Process Scheduled Breaks if you want the system to clock the Employee on
and off of Breaks (as listed in the Breaks Grid) without going to the clock

How To Use the Enterprise E2 Shop System
R. 1.0 Page 17 of 295
Holidays Sub-tab
Enter the Holidays your Company will be closed for business in the Holidays Grid
Pay Period will auto-populate based upon the date entered
Holidays will be considered as non-work days by Scheduling Codes
Holidays need to be manually entered (or copied)
They do not automatically recur each year
Scheduling Tab
Calendar Sub-tab
Use the Days Of The Week Grid to specify the Employee’s availability for scheduling purposes if it is different than
the Calendar present in Company Maintenance
Use the Specific Dates Grid to specify exceptions to the default Days Of The Week settings
Dispatching Sub-tab
Use the Alternate Employees Grid to list Employees that are able to perform the same work as the Employee if you
want to be able to reallocate work in a Scheduling Code by Employee
Use the Work Centers Grid to list which Work Centers the Employee is able to run
Given the scope of the Scheduling Module the configuration and use of this feature will be covered
independently.
Training and Triggered Training Tabs
The Training Tab provides a means to keep track of training previously provided or scheduled to be provided to the
Employee and the Triggered Training Tab provides a means of tracking and notifying when training is required.
Training and Triggered Training are available only when the Quality Module has been purchased; therefore, the
use of these features is covered independently.
Image Tab
Associated images will display on Employee Badges
Supported image types are .bmp and .jpg

How To Use the Enterprise E2 Shop System
R. 1.0 Page 18 of 295
Parts: Purchased (Core Table)
Overview
Tracks material provided by an outside source
Purchased from Vendor
Provided by Customer
Provides details regarding physical nature of material, along with stocking and purchasing-related information
It is possible to enter Part Numbers on many records in the system without defining them as a Table Item;
however, for purposes of this page, it is assumed they are being entered as Part Table Records with a Part
Number Type = P.
If Parts are not entered as Table Items, you will not be able to track Available (On Hand) quantities or see
them on an Inventory Summary for valuation purposes.
Source Record(s)
This Table relies on/pulls information from the following records (An asterisk [*] indicates a required field on this
Table):
Inventory Codes
G/L Accounts
Product Codes
Calculator Codes
Container Codes
Location Codes
Vendor Codes
Miscellaneous Charge Codes
Destination Record(s)
This Table is used on the following records (An asterisk [*] indicates this Table is a required field on the Destination
Record):
*Purchase Orders (Material to Jobs or Inventory)
*Receivers (Material to Jobs or Inventory)
*Vendor Returns
*Vendor RFQs
*A/P Invoices
*Customer Orders (If Company Preferences configured to allow Purchased Parts on Orders)
*Material Allocations/Fill Job Requirements (Material Requirements Posted To/Removed From Jobs)
*Inspections (If Inspecting Receivers for a Purchased Part)
Quality-related records (If Quality Module present)
Non-Conformances
Corrective Actions
Preventive Actions

How To Use the Enterprise E2 Shop System
R. 1.0 Page 19 of 295
Key Values/Points of Consideration (An asterisk [*] indicates a Required Field):
Where indicated as a required value, Part Number is the Required Field; for purposes of this section it is
assumed they are Purchased Parts.
General Tab
*Part Number can be up to 50 alpha-numeric characters
*Revision Level can be up to 20 alpha-numeric characters
Revision Level and Part Number are viewed together for part identification purposes
Allows for the same Part Number with different Revisions if needed
The combination of the two fields taken together must be unique
Part Number Type determines whether the record will be for Purchased Material or manufactured items
P = Purchased Material
Often referred to as “raw materials” but can also be other manufactured items
Anything you Purchase/Receive from someone else as oppose to make yourself
Purchasing Tab available to capture material cost details
Sales and Manufacturing Tabs hidden
M = Manufactured Items
Items made within your shop
If you alter Purchased Material in any way, the resulting item should be given a different Part Number and
marked as M (Manufactured)
Sales and Manufacturing Tabs available to capture Sales Price Breaks and Production-related details
Purchasing Tab is hidden
For purposes of this section we assume Part Number Type = P.
Description will appear on majority of records, reports, and summaries along with Part Number
Suggested to keep description relatively short to avoid printing large amounts of pages
Part Notes, User-Defined Fields, or attaching documents may be better ways to track large amounts of
information
Part Notes can be selected to print on Purchase Orders
Inventory Tab
General Sub-tab
Inventory Code provides default values for different purchasing and stocking combinations regarding Purchased
Material
Auto-populates several fields when selected; of primary importance are:
Stocking Unit – (General Tab) Cannot be changed if provided by Inventory Code
Purchasing Unit – (Purchasing Tab) Cannot be changed if provided by Inventory Code
Allow Decimal Inventory and related options – (Settings Tab) Cannot be edited on Part
See information regarding Inventory Code (Base Table) for additional details on its function and purpose within
E2.

How To Use the Enterprise E2 Shop System
R. 1.0 Page 20 of 295
*Stocking Unit represents how the material will be referenced and used internally
Displayed in Inventory
Displayed on Receivers (along with Purchasing Unit)
Used on Bills Of Material (Estimating purposes)
Used in Material Allocation records and related utilities
Displayed on Quotes, Customer Orders, and A/R Invoices (If Purchased Parts are re-sold)
Defaults to EA if Inventory Code is not selected
Can be edited in this case
Auto-populates if Inventory Code is selected
Cannot be edited in this case
Stocking Cost represents how much one Stocking Unit of material is expected to cost
Represents Standard Cost if that option is selected in Company Preferences as Inventory Allocation Method
Value entered manually
Make sure this value, and all others on this Tab relating to quantities or weight, are in terms of STOCKING
UNIT if Stocking Unit and Purchasing Unit are different.
Reorder Level represents the point at which additional material should be Purchased
Part displays on Reorder Summary when Available Quantity drops below the listed Reorder Level
Set in terms of Stocking Unit
Reorder Quantity represents how much material should be ordered if Available Quantity drops below Reorder Level
Set in terms of Stocking Unit
Inventory G/L Account represents asset account the material should be associated with if any is available in
Inventory
Product Code provides a way to group material together by a common feature
Material Type is a common example
Calculator Code allows for use of Material Calculator on Bills Of Material for the Part
If a Calculator Code is not associated with the Part the Calculator Utility will not be available on Bill Of Material
Alternate Part Number could be used in two ways
Refer to another part that could be used in lieu of this one
Provide a different name for the same part for internal purposes
Vendor specific Part Numbers can be entered on the Purchasing Tab
Packaging information provides details used by the system for the creation of Packing Lists
Part Weight represents how much one Stocking Unit of material weighs
Becomes required if any Vendors are designated to Price By Weight (Purchasing Tab)
*Weight Unit represents the unit of measure used by the system to calculate shipping weight
Defaults to value designated in Company Preferences
Quantity Per Container is the default value used by the system when determining how many Stocking Units
would fit in the designated Container Code
Would only be applicable if Purchased Parts are re-sold as-is
Container Code represents the default container used on Packing Lists when the Fill Container feature is used

How To Use the Enterprise E2 Shop System
R. 1.0 Page 21 of 295
Settings Sub-tab
Job Material Processing
Automatically Fill Requirements – The system will attempt to fill requirements for Parts using this setting during Job
Material Processing
Works in conjunction with (Inventory) Company Preference Fill Requirements From Bins
If Company Preference not enabled, the option to Automatically Fill Requirements on the Part is ignored
Automatically Use Drops – The system will attempt to use drops (partial quantities) of material if present
System will pull whole units first, even if drops are present
Material cannot be automatically used (Posted by System) if it has two or more Dimensions
Cannot enable this option if Allow Decimal Inventory is not enabled
Automatically Combine Drops – The system will combine drops of the same material in an effort to fill requirements
System will pull whole units first, even if drops are present
Cannot enable this option if Automatically Use Drops is not enabled
Other
Allow Decimal Inventory – Parts using this setting will be eligible to have drops (partial quantities) of material in
Inventory
Drops are in terms of Stocking Units
Allow Decimal Values (In Stocking Unit) On Purchase Orders – Parts using this setting can be purchased in decimal
quantities in terms of their STOCKING UNIT
It is possible to create Purchase Orders with partial Purchasing Units if they are different from the Stocking Unit
even if this option is not selected
Cannot enable this option if Allow Decimal Inventory is not enabled
Decimal and Drop-related Settings are inherited directly from the Inventory Code selected on the General
Sub-tab and cannot be edited directly on the Part.
Use Time Tickets and Incremental Job Costing are available to select but are not really applicable for Purchased
Parts
Inspection
All Inspection options are available to select, but Inspect Incoming Receivers (Material Purchases) is the only one
that would typically be applicable
Must Inspect before material can be Posted to Jobs or placed in Inventory if enabled
The use of Inspections requires access to the Quality Module since adverse dispositions must be dealt with
by the creation of a Non-Conformance Record.
Dimensions Sub-tab
Number Of Dimensions auto-populates from the selected Inventory Code
Determines the number of Dimension Value fields available
Default Dimension Values auto-populate from the selected Inventory Code but can be edited

How To Use the Enterprise E2 Shop System
R. 1.0 Page 22 of 295
Locations Sub-tab
Default Location Code represents the physical location the material is likely to be found
The Available Items Grid displays the list of Available Quantities of the material along with related details
Read Only
Changes to this information must be made through Inventory Adjustments
Purchasing Tab
*Purchasing Unit represents how material will be referenced for Purchasing purposes
Displayed on Purchase Orders
Displayed on Receivers (along with Stocking Unit)
Displayed on Vendor RFQs
Displayed on Vendor Returns
Defaults to EA if Inventory Code is not selected
Can be edited in this case
Auto-populates if Inventory Code is selected
Cannot be edited in this case
*Purchasing Factor converts Purchasing Units into Stocking Units
Value determined by using following equation: Purchasing Unit/Stocking Unit
Example: Purchase BAR, Stock FT; BAR is 12 FT in length
o 1 (BAR)/12 (FT) = 0.08333333 (This is the value you would enter)
Field allows up to 8 decimal places
Auto-populates from Inventory Code selected
Can be edited
Defaults to 1 if no Inventory Code selected
If Stocking and Purchasing Units are different Purchasing Factor CANNOT be 1
If Stocking and Purchasing Units are the same Purchasing Factor MUST be 1
Waiting For Vendor Cost Analysis – Indicates one or more Vendors listed in Grid have RFQ associated with them
that has been updated but Vendor Cost Analysis Utility has not been run
Purchasing G/L Account is the default G/L Account that will auto-populate Purchase Orders for the material
Vendor Pricing Grid
Select as many Vendors as desired from which the material could be purchased
One Vendor must be designated as the Default Vendor
Costs and delivery information used for Estimating purposes
Automatically associates Default Vendor with Job Requirements and new POs for material
Price By Weight indicates the Vendor costs are based upon the weight of the material
Part Weight becomes required if option used by any Vendor in Grid
Allows for association for up to three units of measure
Stocking Unit
Purchasing Unit
Weight Unit
Cost is entered in terms of Weight per STOCKING UNIT

How To Use the Enterprise E2 Shop System
R. 1.0 Page 23 of 295
If Stocking Unit and Purchasing Unit are different and the Vendor Prices By Weight, the weight cost is
entered in terms of Weight Unit per Stocking Unit so you may need to calculate externally what this value is.
Lead Time represents how long you anticipate it to take for material to arrive if it needs to be ordered
Impacts Scheduling
Need Pricing – Must be marked in order to create Vendor RFQ for material
Must be marked for each Vendor to create RFQ but does not have to be
Could create RFQ for one Vendor but not another
Flag marked in various ways
Manually select at Part level for each Vendor desired
Select for price update on BOM where material is present
All Vendors associated with Part are flagged at one time
Automatically resets once RFQ expires
Flag clears once RFQ is created and then updated with current prices
In Details of each Vendor selected:
Set Quantity Breaks
Enter Unit Cost in terms of associated Unit of Measure
If Price By Weight = Yes – Unit will be Weight Unit (per Stocking Unit).
If Price By Weight = No – Unit will be Purchasing Unit
Enter Markup Percent for system to use to determine Sales value of material
Used in Billing Rate Method
Used on Time & Material Jobs
System calculates remaining values
Miscellaneous Charges Tab
Select as many Miscellaneous Charge Codes as necessary to capture additional costs associated with the material
other than shipping and unit cost
Common Miscellaneous Charges include
Document-related fees
Certification fees
Fuel surcharges
Unit Of Measure determines how the Charge Amount will be calculated
Purchasing Unit (EA by Default) – The amount will be charged for each unit purchased
LOT – Amount will be charged as flat amount regardless of quantity
C – Amount is divided by 100 and charged for each unit purchased
M – Amount is divided by 1,000 and charged for each unit purchased
Include In Piece Price determines how the Charge Amount will be displayed
Yes – Amount is rolled into Unit Cost on Purchase Order
No – Amount will display as separate line item on Purchase Order
G/L Account represents the default expense account that will auto-populate Purchase Orders for the material
Pay Tax – Indicates whether tax should be applied against Charge Amount if applicable
Apply Discount – Indicates whether Charge Amount is eligible for discount if A/P Invoices for material are paid
within stated terms

How To Use the Enterprise E2 Shop System
R. 1.0 Page 24 of 295
Maintenance and Triggered Maintenance Tabs
The Maintenance Tab provides a means to keep track of maintenance previously performed or scheduled to be
performed on the Parts set up as Tooling Items (Saw Blades, Drill Bits, etc.) and Triggered Maintenance provides a
means of tracking and notifying when maintenance is required.
Training and Triggered Training are available only when the Quality Module has been purchased, therefore the
use of these features is covered independently.
Image Tab
Supported image types are .bmp and .jpg

How To Use the Enterprise E2 Shop System
R. 1.0 Page 25 of 295
Parts: Manufactured (Core Table)
Overview
Tracks items manufactured in your shop
Provides details regarding physical nature of material along with stocking and purchasing-related information
It is possible to enter Part Numbers on many records in the system without defining them as a Table Item;
however, for purposes of this page, it is assumed they are being entered as Part Table Records with a Part
Number Type = M.
If Parts are not entered as Table Items, you will not be able to track Available (On Hand) quantities or see
them on an Inventory Summary for valuation purposes.
Note Regarding Order of Creation of Manufactured Parts
As noted previously, we recommend the creation of Sub-assembly items prior to the creation of Top Level or Parent
Parts. From an E2 perspective, the only thing that makes a Manufactured Part a Sub-assembly is that it is placed on the
Bill Of Material of another Manufactured Item within the system, therefore we recommend creating them first, but the
functional instructions would be the same for both - with one exception.
Due to the fact Manufacturing Details cannot be added to records created “on the fly” on a Bill Of Material we strongly
encourage Sub-assemblies be entered as actual Part Table records for production purposes, even if you decide not to
do so for Top Level items. (You could create Sub-assembly “proxies” to use on Bills Of Material in order to get the
features of a Manufactured Part, even if you did not populate the details initially.)
Source Record(s)
This Table relies on/pulls information from the following records (An asterisk [*] indicates a required field on this
Table):
*Estimate Codes
Customer Codes
*Rate Codes (Billing Rate)
Parts
Purchased Parts – Material requirements on BOM provided by external source
Manufactured Parts – Material requirements on BOM made in our shop (Sub-assemblies)
Vendor Codes
Work Centers
Operations
Inventory Codes
G/L Accounts
Service Codes
Product Codes
Calculator Codes
Container Codes
Location Codes
Miscellaneous Charge Codes

How To Use the Enterprise E2 Shop System
R. 1.0 Page 26 of 295
Destination Record(s)
This Table is used on the following records (An asterisk [*] indicates this Table is a required field on the Destination
Record):
*Purchase Orders (Outside Services)
*Receivers (to Jobs)
*Vendor Returns
*Vendor RFQs (for Service)
*A/P Invoices (for Service)
*Customer Orders
*Packing Lists/Stock Job Transfers
*Customer Returns
*Material Allocations (If available during Job Material Processing)
*Inspections
Quality-related records (If Quality Module present)
Non-Conformances
Corrective Actions
Preventive Actions
Where indicated as a required value, Part Number is the Required Field; for purposes of this section it is
assumed they are Manufactured Parts.
Key Values/Points of Consideration (An asterisk [*] indicates a Required Field):
General Tab
*Part Number can be up to 50 alpha-numeric characters
*Revision Level can be up to 20 alpha-numeric characters
Revision Level and Part Number are viewed together for part identification purposes
Allows for the same Part Number with different Revisions, if needed
The combination of the two fields taken together must be unique
Part Number Type determines whether the record will be for Purchased Material or manufactured items
P = Purchased Material
Often referred to as “raw materials” but can also be other manufactured items
Anything you Purchase/Receive from someone else as opposed to making yourself
Purchasing Tab available to capture material cost details
Sales and Manufacturing Tabs hidden
M = Manufactured Items
Items made within your shop
If you alter Purchased Material in any way, the resulting item should be given a different Part Number and
marked as M (Manufactured)
Sales and Manufacturing Tabs available to capture Sales Price Breaks and Production-related details
Purchasing Tab is hidden
For purposes of this section assume Part Number Type = M.

How To Use the Enterprise E2 Shop System
R. 1.0 Page 27 of 295
Description will appear on majority of records, reports, and summaries along with Part Number
Suggested to keep description relatively short to avoid printing large amounts of pages
Part Notes, User-Defined Fields, or attaching documents may be better ways to track large amounts of
information
Part Notes will appear on Job Travelers (as Job Notes)
Entering the Inventory Code (located on the Inventory Tab) is recommended before entering other values
as it can auto-populate several fields so we will consider it next.
Inventory Tab
General Sub-tab
Inventory Code provides default values for several fields when selected
Select an Inventory Code that has the same value for both Stocking Unit and Purchasing Unit, as Manufactured
Parts cannot be in different units
Manufactured Parts do not rely on Inventory Codes as heavily as Purchased Parts but they still provide a
convenient way to provide many default values. See information regarding Inventory Code (Base Table) for
additional details on its function and purpose within E2.
*Stocking Unit represents how the material will be referenced throughout the system
Displayed in Inventory
Used on Bills Of Material (if Sub-assembly)
Displayed on Quotes, Customer Orders, A/R Invoices, etc.
Defaults to EA if Inventory Code is not selected
Auto-populates if Inventory Code is selected
EA is most common option even if populated from Inventory Code
Stocking Cost represents how much one Stocking Unit is expected to cost to make
Represents Standard Cost if that option is selected in Company Preferences as Inventory Allocation Method
Value entered manually
Reorder Level represents the point at which additional items should be made
Part displays on Reorder Summary when Available Quantity drops below the listed Reorder Level
Reorder Quantity represents how many items should be made if Available Quantity drops below Reorder Level
Typically the same as Minimum Run Quantity, if designated
Inventory G/L Account represents asset account the items should be associated with if any are Available in
Inventory
Product Code provides a way to group items together by a common feature
Production Process is a common example
Calculator Code allows for use of Material Calculator on Bill Of Material for the Part
Would likely be of limited value on Manufactured Part since they cannot be used in decimal amounts
Alternate Part Number could be used in two ways
Refer to another part that could be used in lieu of this one
Provide a different name for the same part for internal purposes
Packaging information provides details used by the system for the creation of Packing Lists

How To Use the Enterprise E2 Shop System
R. 1.0 Page 28 of 295
Part Weight represents how much one Stocking Unit weighs
Becomes required if any Outside Service Vendors are designated to Price By Weight
Needed to allow system to calculate suggested shipping configuration on Packing Lists and Vendor
Shipments
*Weight Unit represents the unit of measure used by the system to calculate shipping weight
Defaults to value designated in Company Preferences
Quantity Per Container is the default value used by the system when determining how many Stocking Units
would fit in the designated Container Code
Container Code represents the default container used on Packing Lists and Vendor Shipments when the Fill
Container feature is used
Settings Sub-tab
Job Material Processing
Automatically Fill Requirements - The system will attempt to fill requirements for Parts using this setting during Job
Material Processing
Works in conjunction with (Inventory) Company Preference: Fill Requirements From Bins
If Company Preference not enabled, the option to Automatically Fill Requirements on the Part is ignored
Automatically Use Drops and Automatically Combine Drops cannot be enabled on Manufactured Parts
Other
Allow Decimal Inventory and Allow Decimal Values (In Stocking Unit) On Purchase Orders cannot be enabled on
Manufactured Parts
Use Time Tickets To Calculate Quantity Ready To Ship/Transfer determines the initial Order Material Status of Jobs
for the Part
If Yes – Order Material Status = TO MAKE
System assumes Time Tickets will be entered during production process to track progress
Can be used in conjunction with Require Ready To Ship / Transfer settings at the Job or Packing List
level to force the use of Time Tickets and prevent the creation of Packing Lists/Stock Job Transfer
records before items are completed
This setting must be enabled (selected) in order for the options Incremental Job Costing and Require
Ready To Ship / Ready To Transfer to be available
If No – Order Material Status = READY TO SHIP/TRANSFER (Depending on Release Type)
System cannot assume Time Tickets will be entered during production process
Incremental Job Costing determines when material is marked as consumed
If Yes – Material is marked as consumed as pieces are turned in against the first routed step that is marked to
Consume Material
If the first consuming step is skipped, material is not marked as consumed until pieces are turned in against
it
If No - Material is marked as consumed as soon as it is allocated or received to the Job
Material cost is captured to a Job when it is marked as consumed.

How To Use the Enterprise E2 Shop System
R. 1.0 Page 29 of 295
Both the option to Use Time Tickets and Incremental Job Costing can be changed at the Job level.
Inspection
When enabled, Inspection settings REQUIRE the creation of an Inspection Record at the designated event, before
the next expected production process can commence
Inspect Outgoing Orders And Stock Job Transfers
Must Inspect before Packing Lists or Stock Job Transfer records can be created
Cannot be used if option to Inspect Incoming Customer Returns is enabled
Inspect Incoming Receivers (for Outside Service POs)
Must Inspect before returning Parts can be Posted to Jobs
Inspect Incoming Customer Returns
Must Inspect to determine disposition of Returned Parts
Cannot be used if option to Inspect Outgoing Orders/Stock Job Transfers is enabled
Could use option to Inspect Internal Rejections on final routed Step instead
Inspect Internal Rejections
Must Inspect to determine disposition of Suspect Parts
The use of Inspections requires access to the Quality Module since adverse dispositions must be dealt with
by the creation of a Non-Conformance Record.
Dimensions Sub-tab
Number Of Dimensions auto-populates from the selected Inventory Code
Determines the number of Dimension Value fields are available
Typically will be 0 for Manufactured Parts
Default Dimension Values auto-populate from the selected Inventory Code but can be edited
Locations Sub-tab
Default Location Code represents the physical location the material is likely to be found
The Available Items Grid displays the list of Available Quantities of the material along with related details
Read Only
Changes to this information must be made through Inventory Adjustments
Sales Tab
Calculation Method determines how E2 will calculate the suggested sales price (Unit Price) of the Part
1 = Billing Rate Method: System looks at each component of the Part (Routing, Outside Services, Bill Of
Material, and Miscellaneous Charges) and adds together the marked up value of each one
2 = Cost Plus Markup Method: System takes the calculated cost of making the Part and applies the User-
provided Markup Percentage for each Quantity Break
3 = Profit Margin Method: System takes the calculated cost of making the Part and applies the User-provided
Profit Percentage for each Quantity Break
Unit Price can be manually entered but requires User to enable the option to Prevent Automatic Calculation Of
Unit Price to maintain them
Prevent Automatic Calculation Of Unit Price – Prevents Unit Price from recalculating even if costs change
System automatically enables this option if Unit Price is manually adjusted
Commission Percent is used for Estimating purposes only

How To Use the Enterprise E2 Shop System
R. 1.0 Page 30 of 295
Anticipated cost of Sales Commission is added back to Part as a cost and the Sales Price adjusts accordingly
Actual Commission earned/paid determined by Commission of Salesmen Code(s) present on Jobs
Selling Price Breaks Grid
System calculates Unit Cost and Unit Price for each Price Break entered in the Quantity column
Assign Estimate Codes to Price Breaks to determine what production-related costs and prices the system looks at to
determine overall Unit Cost and Unit Price for each quantity
Allows for specific costing and pricing of multiple production run scenarios based on quantities
Example: Assume Quantity Price Breaks of 100, 500, and 1,000
Estimate Codes = LOW (Volume) and HIGH (Volume) in addition to DEFAULT
Could assign LOW to quantities of 100 and 500 and HIGH to quantity of 1,000 and above
For each Estimate Code referenced on the Sales Tab, a complete set of production details needs to be entered
Markup Percent is applied to overall calculated Unit Cost at each Price Break if Calculation Method 2 selected
Profit Percent calculated accordingly
Markup can be different for each Price Break
Unit Price is calculated by system based on Calculation Method selected
Can be manually entered/adjusted
Pricing Unit determines how Unit Price is applied to Quotes and Jobs
EA: Unit Price applied to each unit
LOT: Unit Price applied as flat value for any quantity up to Price Break provided
C: Divides Total Sales amount on Quote or Order by 100
M: Divides Total Sales Amount on Quote or Order by 1,000
If first Price Break is greater than 1, the Unit Cost associated with the first Price Break will be applied to all
quantities between 1 and the second Price Break
Make sure to click the Calculate Button when making changes to any component of a Manufactured Part to
ensure the most accurate and up-to-date Price has been applied (unless they are locked).
Manufacturing Tab
Manufacturing Tab (and associated Sub-tab) features and functionality are found on multiple records
Manufactured Part (Parts Table)
Quote – Line Item Details
Order – Job Details
If defined as a Part Table record, Manufacturing Details auto-populate Quotes and/or Orders when selected
Can be edited on specific Quotes and/or Orders
Change would be unique to that record and would remain permanently, unless deleted/purged
Complete Manufacturing details can be entered directly on Quotes or Orders
Permanent unless the record is deleted/purged
Cannot track available quantity or inventory value if not entered in Part Table
Manufacturing details can be copied to Part Table record
Engineering Sub-tab
Customer Part Number provides an additional way to identify the Part if the Customer has a different name for it
Assumes Part made for specific Customer

How To Use the Enterprise E2 Shop System
R. 1.0 Page 31 of 295
Assign a Customer Code if the Part should be identified with a specific Customer
Assigning one would not prevent making/selling the Part to other Customers
*Billing Rate represents the Billing Rate Code used by the system to pull Billing Rate dollar amounts from Work
Centers when Calculation Method 1 is selected on the Sales Tab
Minimum Run Quantity represents the lowest quantity for which a Job would be created when making the Part
Used as the default Quantity Ordered on Orders created using the Default Stock Customer Code designated in
Company Preferences
Orders for any other Customer Code look to Quotes or first Quantity Break of Part
Used for Estimating purposes to keep anticipated costs for Sub-assemblies consistent on Estimates and Quotes
for Top Level Parts for smaller quantities
Example: Minimum Run for SUB1 is 200
Quote created for Top Level Part that uses SUB1 for quantity of 100
System uses cost to make 200 units of SUB1 for ESTIMATING cost of Top Level Part
Assumes SUIB1 will be made in advance or on separate Stock Run to accommodate Minimum Run as
opposed to simply making 100 units
Part Weight and Weight Unit Of Measure are dynamically linked to values on Inventory Tab
Bill Of Material Sub-tab
Enter Part Numbers for material or other manufactured items used in the production of the Manufactured Part
being defined
Records can be one of two types
Purchased Material (Part Type = P)
Can be defined in Part Table or added “on the fly”
Manufactured items (Part Type = M)
Must be defined in Part Table
If using records defined in Part Table, select them using drop-down menu
If adding records on the fly, manually enter Part Number and related details
Limited information can be provided
Only Purchased Parts can be added in this manner
Associate the appropriate Estimate Code for each item if creating multiple production scenarios
Parts must be listed multiple times if it is common to more than one Estimate Code process
DEFAULT Estimate Code assigned automatically by system
Assigning a Step Number to a material indicates it is not needed until that point of the production process
If Part is not Posted during Job Material Processing:
Order By Date set based on anticipated Start Date/Time of designated Step (Purchased Part)
Due Date of Sub-Job based on anticipated Start Date/Time of designated Step (Manufactured Part)
Defaults to Step 0
Assumes Part is required at beginning of production
Quantity (Stocking) represents how much material is anticipated to be needed to make the Part
Value entered depends on Unit Of Measure (Stocking) selected
If Unit Of Measure (Stocking) is set to the required item’s Stocking Unit (BAR, EA, etc.)
Quantity (Stocking) represents how much material it will take to make one Unit (BARS per Part)
Quantity can be decimal value when dealing with Purchased Parts

How To Use the Enterprise E2 Shop System
R. 1.0 Page 32 of 295
Be aware of material configuration regarding use of decimals, as this an Estimate of what it will take to
make ONE UNIT
Actual amount required will depend on Quantity To Make of Manufactured Item
Quantity must be whole value when dealing with another Manufactured Part (Sub-assembly)
If Unit Of Measure (Stocking) is set to P
Quantity (Stocking) represents how many Parts can be made out of one Stocking Unit’s worth of material
(Pieces or Parts per BAR)
System assumes at least one entire Stocking Unit (BAR, SHEET, etc.) will be Consumed and expensed to Job
for the Part
Cost of one Stocking Unit spread proportionately across Price Breaks up to amount in Quantity (Stocking)
field
Cost of another Stocking Unit is added each time Quantity threshold is reached
Example: Assume 10 Parts (Quantity) can be made from 1 BAR (Unit Of Measure = P)
Price Breaks = 1, 5, 10, and 15 (Sales Tab)
Entire cost of BAR placed in Unit Cost of Price Break = 1
20% of cost of BAR placed in Unit Cost of Price Break = 5
10% of cost of BAR placed in Unit Cost of Price Break = 10 (Optimal use of BAR)
Unit Cost of 15 will increase as another BAR is expensed but not as high as Price Break = 1
The larger the Price Break the less impact each additional BAR has
Calculator Utility will be available for use if Calculator Code was associated with required material
Can be used to determine either Parts per Stocking Unit (Parts per BAR, SHEET, etc.) or Stocking Units per
Part (BARS per Part, SHEETS per Part, etc.)
Formula pulls from Calculator Code assigned to material
Unit Of Measure (Stocking) determines how material cost is distributed
See details of Quantity (Stocking) field immediately above for additional information
Vendor Code represents the supplier from which the material is expected to be Purchased (Part Type = P)
Can select different Vendor if more than one associated with Part
Entire Vendor List will be available if adding “free form” material
There will be no Vendor Code associated with Sub-assembly items (Part Type = M)
Additional fields are available for reference in the Grid
Routing Sub-tab
Step Number represents the order in which work will progress
Defaults to increments of 10
Can edit Step Numbers
Can insert new Steps by entering information on first blank row of Grid and changing Step Number to fit
between existing ones
System will re-sort in correct sequence when record Saved
Can reset in increments of 10 by using the Renumber feature
Step Numbers “shared” by Routing Tab and Outside Services Tab
If a Step Number appears to be skipped, it is likely used on the Outside Services Tab (or vice versa)
Associate the appropriate Estimate Code for each Step if creating multiple production scenarios
Steps must be listed multiple times if it is common to more than one Estimate Code process

How To Use the Enterprise E2 Shop System
R. 1.0 Page 33 of 295
DEFAULT Estimate Code assigned automatically by system
Work Center represents where work is being performed (internally)
Cost and Billing Rate values auto-populate from Work Center selected
Operation Code can be used to specify what is being done at the Work Center
Auto-populates from Work Center if a Default Operation Code was designated
Can be selected or edited manually
Production-related details pull from Operation Code if selected
Operation Code is optional value
Description provides written details regarding the work to be performed
Prints on Job Traveler
Auto-populates from Operation Code selected
Can be manually entered or edited as needed
Setup Time represents the estimated amount of time (in terms of the selected Unit) it will take to prepare the Work
Center
Setup Unit works in conjunction with Setup Time to define how long it is estimated to take to prepare the Work
Center
Options include
Hours
Minutes
Seconds
Setup Time is a fixed value regardless the quantity estimated/worked on
Cycle Time represents the estimated amount of time (in terms of the selected Unit) it will take to perform the work
detailed in the Description
Cycle Unit works in conjunction with Cycle Time to define how long it is estimated to take to perform the work
detailed in the Description
Options include
Hours
Minutes
Seconds
Pieces Per Hour (System uses value to calculate how many pieces it will make in terms of an hour)
Cycle Time will vary depending on the quantity estimated/worked on
Regardless the Unit Selected for estimating purposes the system will convert all values into terms of hours
for calculation and report purposes.
Machines Run (By Operator) represents the number of machines the Employee performing the work is capable of
running at one time
If greater than 1, estimated Labor Costs (Cycle Time only) will be reduced accordingly
Machines Job Run On represents the number of machines the scheduled Job is able to be worked on at the same
time (for a given Step)
If greater than 1:
Estimated Cycle Time is decreased (same number of Machine Hours spread across multiple machines)
Estimated Setup Time is increased (multiple machines must be prepared)

How To Use the Enterprise E2 Shop System
R. 1.0 Page 34 of 295
The Capacity Factor of Work Centers need to match this value in order for scheduling assumptions to be
accurate
Team Size represents the number of Employees it is estimated to take to perform the work detailed in the
Description
If greater than 1, estimated Labor Costs (Cycle Time only) will be increased accordingly
Scheduled Cycle Time will not be impacted
Scrap Percent represents the amount of expected scrap or wasted material that will occur during the Step
If greater than 0, the system will calculate(during Job Material Processing) how many additional units need to
be made to compensate for the anticipated scrapped pieces
At a minimum, you will be required to make one additional unit
Scrap is cumulative, meaning a 1% Scrap Percentage on each of 5 Steps will result in a minimum of 5 additional
units being made
Costs and estimated times are impacted by what Step Scrap is associated with
If Scrap is on the first Step, the system assumes additional work is not required beyond that point for
anticipated “extra” scrap units
If Scrap is on final Step, the system assumes extra work is required throughout the entire production
process and the “extra” units will be dealt with at the end
If Scrap is located “somewhere in between,” additional work is scaled accordingly
Since Scrap Percentages are cumulative, consider placing a single Scrap Percentage for the entire Routing
on a designated Step, but realize scheduled time and associated costs are impacted by the Step selected.
Percent Efficient represents how efficiently the work detailed in the Description can be performed
If less than 100%, Cycle Times (at the Job Level) will be scheduled to take longer to complete than the amount
of time listed here
Example: If Efficiency is 80%, Cycle Time will be increased by 20% FOR SCHEDULING PURPOSES
Estimated Cycle Time itself is not changed, just the amount of time it is expected to take on this particular
Work Center/Step.
G/L Account (Labor) represents expense account actual labor costs will be accumulated against as Time Tickets are
turned in against the Step
Mark a Step as Unattended (checkbox) if the Employee is able to prepare the Work Center and then leave it once
the work process has begun
Unattended Steps will estimate/capture Burden Costs for Cycle Time but NOT Labor
Unattended Steps will estimate/capture BOTH Burden and Labor Costs for Setup Time
Mark the option Consumes Raw Material if material is physically altered during the Step
If Labor G/L Account is left blank at the Job Level, costing reports (Job Cost Summary, WIP Summary,
Margin Summary, etc.) will display dollar amounts with no description or a reference of UNKNOWN.
If Jobs have the Incremental Job Costing option enabled, material is not Consumed until pieces are completed
against the first step configured to do so
Once Consumed in this scenario

How To Use the Enterprise E2 Shop System
R. 1.0 Page 35 of 295
Material Cost captured
Material will not be automatically placed back into Inventory if the Job is subsequently Cancelled
Steps such as Engineering, Inspection, and Shipping would typically not Consume Material
Location Code represents physical location of Work Center
Helps track movement of Material/Jobs
Used if you are requiring the creation of Inventory Transfer records before production can begin
Mark the option (checkbox) Overlap Steps if work can begin on subsequent Steps before all the pieces have been
completed on the current Step
If enabled, the system will schedule work to begin on the next Step once a pre-determined number of pieces
have been completed on the current Step based on the Overlap Method
Overlap Method determines how many pieces must be completed on the current Step before work will be
scheduled to begin on the next Step
Automatic: The system will schedule the next Step to complete its Setup process as soon as the first piece is
completed on the current Step
If the Cycle Time on the next Step is FASTER than the Cycle Time of the current Step, it will build in a “head
start” amount to ensure the next Step does not run out of Parts
There is no additional input required for this option
Hours: The system will wait a specified length of time before scheduling the next Step
If selected, you must also designate the number of hours to wait in the Overlap Quantity field
Percent: The system will wait until a specified percentage of pieces have been completed before scheduling
the next Step
If selected, you must also designate the percent that needs to be completed in the Overlap Quantity field
Pieces: The system will wait until a specified number of pieces have been completed before scheduling the
next Step
If selected, you must also designate the number of pieces that need to be completed in the Overlap
Quantity field
None: Overlapping is disabled and the system will schedule the next Step to begin after all the pieces have
been completed on the current Step
Each Step can have a different option with regards to Overlapping.
Additional fields are available for reference in the Grid
Outside Services Sub-tab
Step Number represents the order in which work will progress
Defaults to increments of 10
Can edit Step Numbers
Can insert new Steps by entering information on first blank row of Grid and changing Step Number to fit
between existing ones
System will re-sort in correct sequence when record is Saved
Can reset in increments of 10 by using the Renumber feature
Step Numbers “shared” by Routing Tab and Outside Services Tab
If a Step Number appears to be skipped, it is likely used on the Outside Services Tab (or vice versa)
Associate the appropriate Estimate Code for each Step if creating multiple production scenarios

How To Use the Enterprise E2 Shop System
R. 1.0 Page 36 of 295
Steps must be listed multiple times if it is common to more than one Estimate Code process
DEFAULT Estimate Code assigned automatically by system
Service Code represents the type of work being provided by the Vendor
Auto-populates Vendor (with Default Vendor) and Vendor-related details (Step Details) when selected
In Outside Services Step Details

How To Use the Enterprise E2 Shop System
R. 1.0 Page 37 of 295
Outside Services - Vendors Sub-tab
List of Vendors available to perform service provided
Can select a different Vendor from list for this specific Step
For each Vendor, the following information is present:
Markup Percent: Determine what the Sales Price should be for the service
Lead Time Days: Anticipated amount of time it will take to receive items back
Price By Weight: Select if the Vendor prices the service based on the weight of the Parts sent to them as
opposed to a per piece or Lot charge
Need Pricing: Mark this option to indicate the need to create a Vendor RFQ for the specific Service Step
Price Breaks and Cost information become available in the bottom of the Grid as each Vendor is selected
Outside Services - Routing Step Details Sub-tab
If Certifications Required is marked:
System places a comment on the PO for the Service to that effect
The PO information is placed in the Certification print spool and is available to select to print
Ignore Vendor Minimum Charge allows a PO to be created for an amount less than the stated Minimum Charge
If not allowed, the PO will be created for the Minimum Amount if the service cost is less than that value
Description prints on the PO created for the Service Step
Auto-populates from the Service Code selected
Can be manually entered or edited
Miscellaneous Charges Tab
Select as many Miscellaneous Charge Codes as necessary to represent additional charges to be passed on to the
Customer other than shipping and Unit Price
Common Miscellaneous Charges include
Document-related fees
Certification fees
Fuel surcharges
Unit Of Measure determines how the Charge amount will be calculated
Purchasing Unit (EA by Default) – The amount will be charged for each unit Purchased
LOT – Amount will be charged as flat amount regardless of quantity
C – Amount is divided by 100 and charged for each unit Purchased
M – Amount is divided by 1,000 and charged for each unit Purchased
Include In Piece Price determines how the Charge amount will be displayed
Yes – Amount is rolled into Unit Price on Quote/Order
No – Amount will display as separate line item on Quote/Order
G/L Account represents the default income account that will auto-populate on Orders
Pay Commission – Indicates whether Charge amount should be included in Sales Commission
Option must be selected if Include In Piece Price is used
Pay Tax – Indicates whether tax should be applied against Charge amount if applicable
Apply Discount – Indicates whether Charge amount is eligible for discount if A/R Invoices for Part are paid
within stated terms

How To Use the Enterprise E2 Shop System
R. 1.0 Page 38 of 295
Maintenance and Triggered Maintenance Tabs
The Maintenance Tab provides a means to keep track of maintenance previously performed, or scheduled to be
performed, on Parts that are set up as Tooling Items (Saw Blades, Drill Bits, etc.). Triggered Maintenance provides a
means of tracking and notifying when maintenance is required.
Training and Triggered Training are available only when the Quality Module has been purchased, therefore
the use of these features is covered independently.
Image Tab
Image will display in Scheduling Whiteboard if selected to do so
Supported image types are .bmp and .jpg
G/L Accounts (Core Table)
Overview
Lists the Chart of Accounts
Tracks costs and Sales to specific profit and loss centers throughout the production process
Required on all Accounting-related records
Source Record(s)
This Table relies on/pulls information from the following records (An asterisk [*] indicates a required field on this
Table):
*G/L Group Code
*Currency Code
*Division (Defaults to 0; Divisions defined in Company Maintenance)
G/L Accounts (Accumulation Account)
Destination Record(s)
This Table is used on the following records (An asterisk [*] indicates this Table is a required field on the Destination
Record):
*Fiscal Year
*Invoices (A/R and A/P)
*Cash Receipts
*Cash Disbursements (Checks)
*Journal Entries
Purchase Orders
Work Centers (Quotes, Orders, Manufactured Parts, etc.)/Routing Steps (Labor Costs)
Purchased Parts (Asset and Purchase Order designation)
Manufactured Parts (Asset Designation)
Service Codes/Outside Service Steps (Quotes, Orders, Manufactured Parts, etc.)
Miscellaneous Charge Codes (Quotes, Orders, Manufactured Parts, etc.)
Miscellaneous Job Costs (Orders)

How To Use the Enterprise E2 Shop System
R. 1.0 Page 39 of 295
Key Values/Points of Consideration (An asterisk [*] indicates a Required Field):
If you are not using the Accounting Module, G/L Accounts are still required on Fiscal Year records, which in
turn is required in Company Maintenance. It is possible to leave the G/L Account field blank throughout the
Shop Floor portion of the system, but this is discouraged. If left blank, you will not be able to view accurate
Job Costing values, determine the value of Inventory, or see the profitability on Jobs.
General Tab
*G/L Account can be up to 20 alpha-numeric characters
Create and assign the same Accumulation G/L Account to like G/L Accounts you would like to see as a combined
value when printing Consolidated Financial Reports
*G/L Group Code determines the financial report on which the G/L Account will appear
*Currency Code defaults to the one selected in Company Preferences
*Exchange Rate allows the system to convert foreign currencies to an equivalent value in your native currency
*Divisions allow for divisional Profit and Loss Statements
Divisions can be assigned to Balance Sheet-related G/L Accounts, but you cannot print divisional Balance Sheets
so there is no real value in doing so
Divisions are defined in Company Maintenance
Division will default to 0 (Consolidated) unless otherwise specified
Activity Tab
Activity Sub-tab/Grid
Activity Window displays net activity in the G/L Account for each listed Period in terms of a Debit (“positive” value)
or a Credit (“negative” value) balance
Budget Sub-tab
Set a budget value for the Current Year for each G/L Account
Manually enter
Use the Budget Calculator Utility
Current Year Sub-tab
Displays the Beginning Balance of the current Fiscal Year
Automatically populates from last year’s ending balance
Can be entered manually
Debits are displayed/entered as positive values
Credits are displayed/entered as negative values
Last Year Sub-tab
Displays the Beginning Balance of the previous Fiscal Year (if present)
Automatically populates when year is processed
Can be manually entered, if desired
Pay Periods (Core Table)
Overview
Defines time frames used for payroll purposes

How To Use the Enterprise E2 Shop System
R. 1.0 Page 40 of 295
Source Record(s)
This Table does not rely on/pull from any other record
Destination Record(s)
This Table is used on the following records (An asterisk [*] indicates this Table is a required field on the Destination
Record):
Employees
*Time And Attendance Tickets
Key Values/Points of Consideration (An asterisk [*] indicates a Required Field):
General Tab
*Pay Period Code can be up to 20 alpha-numeric characters
*Start Date represents the first day of the defined Pay Period
*End Date represents the last day of the defined Pay Period
Pay Periods allow for:
Exporting payroll-related information by defined time frames
Filtering time-related reports and records by defined time frames
The Automatic Pay Periods Utility allows for the creation of multiple Periods at one time, as opposed to
creating each one manually.
Automatic Pay Periods Utility
Last defined Pay Period Code and related dates are referenced automatically (if present)
Payroll Frequency can be set as
Weekly
Bi-Weekly
Monthly
Start Date for Next Pay Period Code represents the first day of the next Pay Period you want to create
Typically this will be the “next day” following the previous Pay Period’s End Date
End Date for Pay Period Creation Range represents the point in the future through which you want the system to
create Pay Periods
If this date does not exactly match the “true” End Date for the final Pay Period based on the Payroll Frequency
selected, the system will create Pay Periods up to the closest date possible that match the criteria provided
Make sure to click Process before Finish in order to actually create the Pay Periods.
Salesmen (Core Table)
Overview
Tracks total Sales by Salesperson
Calculates and tracks commissions for each Salesperson
Source Record(s)
This Table relies on/pulls information from the following records (An asterisk [*] indicates a required field on this
Table):

How To Use the Enterprise E2 Shop System
R. 1.0 Page 41 of 295
G/L Account (Commission)
Destination Record(s)
This Table is used on the following records (An asterisk [*] indicates this Table is a required field on the Destination
Record):
Customers
Quotes
Orders
A/R Invoices
Key Values/Points of Consideration (An asterisk [*] indicates a Required Field):
General Tab
*Salesmen Code can be up to 20 alpha-numeric characters
Commission G/L Account represents the G/L Account paid commissions will be entered against
The following reports contain a Salesmen Code Breakdown Report for commission purposes:
Sales Summary (Commissions would be based off of total sales)
Deposit Summary (Commissions would be based off of payments received, not just sales)
The Commission Summary displays the amount of commission paid to each Salesperson
Addresses Tab
Enter the Salesperson’s contact information for reference
Multiple Salesmen can be associated with each line item of a record.
Vendors (Core Table)
Overview
Represents the entities from which you Purchase Parts or Services
Stores pertinent information regarding contacts and credit details
Source Record(s)
This Table relies on/pulls information from the following records (An asterisk [*] indicates a required field on this
Table):
Vendor Types
Shipping Codes
Location Codes
*Currency Codes
G/L Accounts
Terms Codes
Tax Codes
Destination Record(s)
This Table is used on the following records (An asterisk [*] indicates this Table is a required field on the Destination
Record):

How To Use the Enterprise E2 Shop System
R. 1.0 Page 42 of 295
*Vendor Request For Quote
*Purchase Orders
*Outside Service Packing Lists
*Vendor Returns
*A/P Invoices
*Cash Disbursements
Non-Conformances (If associated with Vendor-based record – Quality Module Required)
Corrective Actions (If associated with Vendor-based record – Quality Module Required)
Feedback records (If associated with Vendor-based record – Quality Module Required)
Key Values/Points of Consideration (An asterisk [*] indicates a Required Field):
General Tab
*Vendor Code can be up to 20 alpha-numeric characters
Vendor Type provides the ability to group Vendors together by products sold or services provided
Provides default Expense G/L Account when selected
Available as a filter on various reports
Contacts Tab
Contacts that have an email address provided will be available to Users when emailing records from E2
The information for the default A/R Contact designated at the bottom of the screen (if selected) will display on the
A/P Aging Summary for reference
Addresses Tab
Enter as many addresses as required for the Vendor
Addresses can be designated as
SHARED
PURCHASING
SHIPPING
REMITTANCE
Purchasing Tab
Lead Time Days represents the amount of time it typically takes to receive Parts from the Vendor
This information will impact scheduling
Restocking Percent is used in conjunction with Vendor Returns
When greater than zero, Minimum Order will be used to determine if Purchase-related records are of sufficient
dollar value to proceed
You can choose to Ignore Minimum Order during Order Entry via prompt
Markup Percent will be applied as the default Markup to the Purchasing details of Parts when the Vendor is
selected
Default Shipping Code will populate Purchase Orders, Receivers, and Outside Service Packing Lists
Location Code is the default used for Purchase Orders/Receivers when the Part does not have one associated with
it
Used as default on Outside Service Purchase Orders/Receivers

How To Use the Enterprise E2 Shop System
R. 1.0 Page 43 of 295
Credit Tab
Miscellaneous Sub-tab
*Currency Code defaults to the one designated in Company Preferences
Expense G/L Account will auto-populate on Purchase-related records if the Part/Service selected does not have one
associated with it
Terms Code will auto-populate all Purchase-related records created for the Vendor
Credit Limit will prohibit the creation of Purchase Orders if the total of open POs exceeds the amount designated
Private Notes Sub-tab
This information is intended for internal use only
Taxes Sub-tab
Designate as many Tax Codes as necessary
The designated Tax Codes will auto-populate on Sales-related records but can be edited
Work Centers (Core Table)
Overview
Represents areas where work is performed in your Shop
Individual Machines
Groups of similar Machines
Groups of different Machines (Work Cell)
Personnel (Shipping, Inspection, etc.)
Tracks associated costs, provides suggested “sale price” of work, and defines availability (Capacity)
Source Record(s)
This Table relies on/pulls information from the following records (An asterisk [*] indicates a required field on this
Table):
Departments
G/L Accounts
Attendance Codes
Calculator Codes
Location Codes
*Rate Codes
Operations
Destination Record(s)
This Table is used on the following records (An asterisk [*] indicates this Table is a required field on the Destination
Record):
Routing Grids (Examples):
Quotes
Manufactured Parts
Jobs
*Time And Attendance Ticket Details

How To Use the Enterprise E2 Shop System
R. 1.0 Page 44 of 295
Key Values/Points of Consideration (An asterisk [*] indicates a Required Field):
General Tab
*Work Center Code can be up to 20 alpha-numeric characters
*Work Center Number can be a whole numeric value between 1 and 999,999,999
Can be system-generated or entered manually
Department Code allows for grouping of Work Centers by function/Department
Available as a filter on reports and searches
Used by Scheduling Codes when sorting Whiteboard by Department (as opposed to Department associated
with Employees)
Labor G/L Account represents expense account actual labor costs will be accumulated against as Time Tickets are
turned in on Steps where Work Center is present
If Labor G/L Account is left blank at the Job Level, costing reports (Job Cost Summary, WIP Summary,
Margin Summary, etc.) will display dollar amounts with no description or a reference of UNKNOWN.
Default Attendance Code determines whether time entered against Steps where the Work Center is present is
considered Productive or not
Calculator Code must be present if you want to be able to launch Calculator Utility on Routing Steps where Work
Center is present
Can be used to determine throughput of material to calculate estimated Cycle Times
Location Code represents physical location of Work Center
Helps track movement of Material/Jobs
Used if you are requiring the creation of Inventory Transfer records before production can begin
Mark the option Consumes Raw Material if the Work Center physically alters material when work is performed on
Steps where it is present
If Jobs have the Incremental Job Costing option enabled, material is not Consumed until pieces are completed
against the first step configured to do so
Once Consumed in this scenario:
Material Cost captured
Material will not be automatically placed back into Inventory if the Job is subsequently Cancelled
Steps such as Engineering, Inspection, and Shipping would typically not Consume Material
Quoting Tab
Billing Rates Sub-tab
Billing Rates represent various scenarios/conditions you can use to determine how much to charge for the Labor
component of manufacturing your Parts or providing a service
Common Examples include (but create as many as you need):
STANDARD or REGULAR
RUSH
For each Billing Rate selected, enter a dollar amount for each of the following:
Setup Rate – Hourly charge for preparing the Work Center
Cycle Rate – Hourly charge for running the Work Center
Setup and Cycle Rates do not have to be the same

How To Use the Enterprise E2 Shop System
R. 1.0 Page 45 of 295
Set independently on each Work Center
Would take into account Labor Cost, Burden Cost, and desired Profit
Burden/Labor Rates Sub-tab
*Select the Rate Codes you designated as the Company BURDEN Rate and the Company LABOR Rate
You are required to assign values to both Rate Codes in the Grid.
Designated Burden Rate Code represents the indirect (hourly) cost of running the Work Center
Typically takes into consideration items such as:
Depreciation
Insurance
Utilities
Etc.
Should be calculated using information covering at least one year (minimum) and preferably longer
Designated Labor Rate Code represents estimated hourly Labor Cost of work performed on the Work Center
May consider using a weighted average if multiple people run the Work Center
Estimated Cost will be replaced by Actual Cost (Pay Rate) of Employee that performs the work
Operations Sub-tab
Default Operation Code will auto-populate Routing Grid when Work Center selected
If Work Center performs one Operation more frequently than any other, it would make sense to designate it as
the Default
If the Work Center performs multiple Operations and none are more likely than any other, it may make sense
to leave the Default blank and select it on the Routing Grid
If a Default Operation Code is designated, it must be listed in Operation Code Grid located below the field
List the various Operations applicable to the Work Center in the Grid
Select as many, or as few, Operations as applicable
If Operations are selected, only the ones present in the Grid will be available to select on a Routing Grid
If no Operations are selected, the entire list will display on a Routing Grid
Scheduling Tab
Miscellaneous Sub-tab
Utilization Percent represents how much of the Work Center’s defined Capacity (Calendar Tab) can actually be used
When less than 100%, the system will create “Pad Time” for the un-utilized time
When Loading method is Finite, Work Centers will not be scheduled for work that exceeds the Capacity that can
be utilized
Capacity Factor represents the number of machines in the Work Center available to perform work
Needs to equal the value present on Machines Job Being Run On in Routing Details
If greater than 1:
Capacity for scheduled Cycle Time is multiplied by this value
The various machines need to be able to perform the same type and amount of work to avoid scheduling
issues
Loading method must be Infinite
Loading Method represents how the system will assign work to the Work Center for scheduling purposes

How To Use the Enterprise E2 Shop System
R. 1.0 Page 46 of 295
Finite – Work will not be assigned beyond the Work Center’s Capacity
Once loaded to Capacity, additional work is scheduled for the next available time slot large enough to
accommodate it
Capacity may be reduced by a Utilization Percentage of less than 100
Suggested method if you want the system to assign Start and End Dates for scheduling
Infinite – Work will be assigned to the Work Center regardless of Capacity or any restrictions
Once loaded to Capacity, additional work continues to be scheduled to the Work Center
Would require manual adjustment to get work to fit within defined Capacity
Must be the method used if Capacity Factor is greater than 1
Assign Break Codes to the Work Center if it will not be in use during breaks
Calendar Sub-tab
Use the Days Of The Week Grid to specify the Work Center’s availability for scheduling purposes if it is different
than the Calendar present in Company Maintenance
Use the Specific Dates Grid to specify exceptions to the default Days Of The Week settings
Dispatching Sub-tab
Use the Operator Dispatching Grid to list Employees that are capable of running the Work Center
Use the Work Center Dispatching Grid to list other Work Centers that are able to perform the same work as the
current Work Center if you want to be able to reallocate work in a Scheduling Code to a different Work Center
Use the Shift Dispatching Grid to indicate the default operator (Employee) for each Shift the Work Center is
available
Given the scope of the Scheduling Module the configuration and use of this feature will be covered independently
Maintenance and Triggered Maintenance Tabs
The Maintenance Tab provides a means to keep track of maintenance previously performed or scheduled to be
performed on the Work Center and Triggered Maintenance provides a means of tracking and notifying when
maintenance is required.
Training and Triggered Training are available only when the Quality Module has been purchased, therefore the
use of these features is covered independently.
Image Tab
Associated images will display in Scheduling Codes (Whiteboard Tab) if desired
Supported image types are .bmp and .jpg
Attendance Codes (Base Table)
Overview
Determines how time will be tracked from a productivity standpoint
Source Record(s)
This Table relies on/pulls information from the following records (An asterisk [*] indicates a required field on this
Table):

How To Use the Enterprise E2 Shop System
R. 1.0 Page 47 of 295
G/L Accounts
Destination Record(s)
This Table is used on the following records (An asterisk [*] indicates this Table is a required field on the Destination
Record):
*Employees
*Time and Attendance Tickets
Work Centers
Key Values/Points of Consideration (An asterisk [*] indicates a Required Field):
General Tab
*Attendance Code can be up to 20 alpha-numeric characters
*Attendance Number can be a (whole) numeric value between 1 and 999,999,999
Can be system-generated or entered manually
G/L Account represents the labor account used for payroll purposes for time entered at the Attendance Ticket level
Looks to Attendance Code assigned to Employee clocking in
Time Ticket (Job Costing) labor G/L Account is provided by the Work Center
Enable the Productive checkbox for time that should considered productive on Attendance Summary
Report will look to Attendance Code on Work Center (if present)
Non-productive Attendance Codes may be associated with Work Centers such as Cleaning or Inspection
Cycle Hours entered against a Step flagged as Unattended will display as Non-Productive.
Break Codes (Base Table)
Overview
Provides default Break information used by Data Collection and Scheduling
Source Record(s)
This Table relies on/pulls information from the following records (An asterisk [*] indicates a required field on this
Table):
G/L Accounts
Destination Record(s)
This Table is used on the following records (An asterisk [*] indicates this Table is a required field on the Destination
Record):
Employees
Work Centers
Schedule Codes
Key Values/Points of Consideration (An asterisk [*] indicates a Required Field):
General Tab
*Break Code can be up to 20 alpha-numeric characters
*Break Number can be a whole numeric value between 1 and 999,999,999

How To Use the Enterprise E2 Shop System
R. 1.0 Page 48 of 295
Can be system-generated or entered manually
Mark the Productive checkbox if you want time associated with the Break Code to display as Productive on
Attendance Summaries
Mark the Paid Break checkbox if you want the system to include time associated with the Break Code in payroll
calculations
G/L Account would be used for breaks that are designated as Paid Breaks
Break Begin Time indicates the time at which the system will automatically log Employees associated with the Break
Code off of their Jobs and onto Break
This field will be left blank if the Break Code is designated as a Manual Break
Break Duration indicates the amount of time that will pass before the system automatically logs Employees
associated with the Break Code off of Break and back onto the Jobs they were previously working on
If the Break is associated with a Work Center/Scheduling Code, this represents the amount of time the
Scheduling Engine will consider the Work Center to be offline for scheduling purposes
Mark the Manual Break checkbox if this is the Break Code you want the system to use when Users click the Break
Button on Data Collection devices
Manual Breaks would not have a Break Begin Time and would have a Duration of 0
Users remain on Break until they click the Break Button again
NEW Systems come with a default Shift Code marked as a Manual Break
Break Codes are typically created and used in environments where Auto Breaks are enabled for Employees,
but can be assigned directly to Work Centers and/or Schedule Codes if desired. If Break Codes are associated
with Employee records, the system will automatically insert the Breaks onto manually created Time and
Attendance Tickets when they are saved. This allows for Time Ticket details to be entered without having to
work around the Breaks; E2 will insert the Breaks in the correct time frames automatically.
Calculator Codes (Base Table)
Overview
Determines how to most efficiently use material to make Parts
Determines throughput of Work Centers for routing purposes
Source Record(s)
This Table does not rely on/pull from any other record
Destination Record(s)
This Table is used on the following records (An asterisk [*] indicates this Table is a required field on the Destination
Record):
Work Centers
Purchased Parts
Key Values/Points of Consideration (An asterisk [*] indicates a Required Field):
General Tab
*Calculator Code can be up to 20 alpha-numeric characters

How To Use the Enterprise E2 Shop System
R. 1.0 Page 49 of 295
Spreadsheet Filename would be populated if you wanted to utilize a formula located on an (external) Excel
Spreadsheet
Spreadsheet Tab becomes available when populated for reference
This option typically reserved for extensive formulas or ones already created external to E2
Calculator Detail Grid contains the variables and related information used in the Formula field
Variable Name is the value used in the Formula field
To make formula creation easier consider using short simple values as Variable Names
Caption is the “long name” associated with the Variable for ease of reference
Mark the Required field if you want to force the user to enter a value for a Variable when using the Calculator
Default Value is the value that will auto-populate in the Calculator Utility when launched on the Bill of Material
or Routing (as appropriate)
*Formula is the calculation the system will perform to yield results when the Calculator Utility is launched on the
Bill of Material or Routing
Variables must be listed in brackets: [VARIABLE NAME]
Place parentheses around portions of the formula that should be calculated together: ([VARIABLE ONE] +
[VARIABLE 2]) – [VARIABLE 3]
The system will follow the standard Order of Operations when performing calculations
Sample Formula (taken from System Default BAR Calculator Code):
([Part Length] + [Cut-Off Allowance] + [Stock Allowance] + [Facing Allowance])/([Bar Length] - [Bar End
Loss])
Instructions Tab
Enter instructions and/or explanations about the use of the Calculator Code for reference
This information will be visible when launching the Calculator Utility on the Bill of Material or Routing
Spreadsheet Tab (Present only if Spreadsheet Filename is provided)
Direct connection to spreadsheet referenced on General Tab (Spreadsheet Filename path)
User able to enter values in spreadsheet
Values on spreadsheet can be used as Variables in the Formula (General Tab)
Reference to Column and Row location become available when spreadsheet present
Must reference at least one Variable from spreadsheet, even if entire calculation performed externally
Variable would represent final result and the “Calculation” is merely the means to get the result into the
Calculator Code so it can be used in the system elsewhere
Example: Assume a spreadsheet calculation allows multiple inputs and the result determines the Weight of
the material
Could create a Variable Name of “W” with Caption of “Weight” in Calculator Detail Grid
o Reference Cell Address (Column & Row) in Grid
Formula could simply be: [W] * 1
This allows system to “see” the result as a Formula that can be calculated when the Utility is launched
Create Calculator Code (if a new one is needed)
In order to use the Calculator Utility, the Calculator Code must be associated with a Purchased Part or Work
Center (depending on where the Code is to be used.)

How To Use the Enterprise E2 Shop System
R. 1.0 Page 50 of 295
For use on Bill Of Material:
Associate Calculator Code with Purchased Part(s)
When the Purchased Part is placed on a Bill Of Material the Calculator Utility will be available to use
For use on Routing:
Associate Calculator Code with Work Center
When the Work Center is placed on a Routing the Calculator Utility will available to use
Default Records
New Systems come with three Calculator Codes already present:
BAR
COIL
SHEET
The Formulas for these Calculator Codes can be edited or used as they are
Call Result Codes (Base Table)
Overview
Indicates result of Calls entered as Tasks
Source Record(s)
This Table does not rely on/pull from any other record
Destination Record(s)
This Table is used on the following records (An asterisk [*] indicates this Table is a required field on the Destination
Record):
Tasks (Contact Management)
Key Values/Points of Consideration (An asterisk [*] indicates a Required Field):
General Tab
*Call Result Code can be up to 20 alpha-numeric characters
General Notes
New Systems come with the following Call Result Codes already present:
CALL THEM BACK LATER
LEFT MESSAGE
NO ANSWER
NOT AVAILABLE
OTHER
SUCCESSFUL
WAITING ON THEM
WAITING ON US
WILL CALL BACK LATER

How To Use the Enterprise E2 Shop System
R. 1.0 Page 51 of 295
Collection Terminals (Base Table)
Overview
Provides operating instructions for Real-Time Data Collection devices
Source Record(s)
This Table relies on/pulls information from the following records (An asterisk [*] indicates a required field on this
Table):
*Prompt Codes
User Codes
Required if Terminal Type = TOUCHSCREEN
Destination Record(s)
This Table is used on the following records (An asterisk [*] indicates this Table is a required field on the Destination
Record):
*E2 Shop Application (Real-time Data Collection application)
Key Values/Points of Consideration (An asterisk [*] indicates a Required Field):
General Tab
*Terminal Code can be up to 20 alpha-numeric characters
* Terminal Type indicates the type of physical device being used
TOUCHSCREEN: Represents a PC with monitor and keyboard
Provides the most functionality and greatest access to system from Shop Floor
IP: Represents a wall-mounted clock that connects directly to network via patch cable to data jack
Often referred to as Ethernet Clocks or Ethernet Terminals
Examples include (model types) ET205, ET214, ET215
Requires IP Address and Port Number designation on Collection Terminal
POCKETPC: Represents a mobile device that connects to network via Terminal Services
Requires IP Address and Port Number designation on Collection Terminal
TNET: Represents a wall-mounted clock that connects to network via TNET Box to PC COM Port
Often referred to as Trans-Terminal devices
Examples include (model types) TT4C, TT5A
The PC connected to the TNET Box needs to be set up as a TOUCHSCREEN Terminal (running Shop
Application)
Use E2 Configuration Manager to designate COM Port used on PC connected to TNET Box
Given constant changes in technology, physical specifications on configuration instructions are provided in
a separate hardware White Paper.
*Terminal Number can be a whole numeric value between 1 and 99
Can be system-generated or entered manually
*Prompt Code determines behavior of Collection Terminal
What Prompts Employees see?
Are Prompts required or optional

How To Use the Enterprise E2 Shop System
R. 1.0 Page 52 of 295
The following Prompts are always required:
Employee Number
Action Number
Job Number
Work Center Number
Is a Password required for every person using Collection Terminal?
IP Address – Static IP address used for devices connected directly to network
Required for the following Terminal Types
IP
POCKETPC
Not available for other Terminal Types
They use IP Address of associated PC
Port Number – Network Port used by devices connected directly to network
Required for the following Terminal Types:
IP
POCKETPC
Not available for other Terminal Types
Use E2 Configuration Manager to designate COM Port used on PC connected to TNET Box
User Code provides default security and language display settings for Data Collection Device
Required on TOUCHSCREEN Terminals
Each TOUCHSCREEN Terminal must have its own, unique User Code.
Will be overridden by User Code associated with Employee using Collection Terminal
Settings Tab
Allow operator to clock on to more than one job
If enabled, Employees using Collection Terminal will be allowed to clock onto as many Jobs as desired
Labor Cost is split equally between the number of Jobs clocked onto
Terminal Work Center/Operation defaults override bar codes on traveler
If enabled, system will look first to Default Response Values (on Prompt Codes) for input values for the
following prompts when Starting Job:
Job Number
Step Number
Work Center (Number)
Operation (Number)
If not available as Default Response Values, it will then use values on Bar Code associated with specific Step (on
Job Traveler)
Not required to use Traveler Bar Codes; can enter values manually if not in Default Values
If not enabled (left blank), system will use values provided by Bar Code on Traveler first and only use Default
Response Values as “last resort”
This is the most typical configuration option

How To Use the Enterprise E2 Shop System
R. 1.0 Page 53 of 295
Events Tab
Events represent alerts provided by Data Collection Devices
Typically used to indicate Break Time or Shift Change
Configure Events in Terminal Events Grid
Event Type determines nature of alert
BELL: Audible alert
Device must be equipped with and configured for speakers/buzzer/bell
MESSAGE: A written (text) alert displayed on (Touchscreen) Clock Emulation screen or clock keypad display
Description – Brief description for purpose of Event
Examples: Morning Break, 2
nd
Shift, etc.
Event Time Begin determines when the Event should be launched
Enter in 12 HR format
Use AM and PM to designate morning or afternoon
Duration represents how long (in terms of Duration Unit) the alert should be broadcast
Duration Unit determines whether Duration value is in terms of
H (Hours)
M (Minutes)
S (Seconds)
Message is the text that will display on the Collection Device monitor/keypad display
Only for Event Type = MESSAGE
General Notes
If changes are made to Collection Terminal records, each Collection Terminal application needs to be re-started in
order to apply the new settings
New Systems come with the following Collection Terminals already present:
Terminal #65
Terminal #66
Terminal #67
Terminal #68
Each Terminal uses the following values:
Terminal Type = TNET (No IP Address or Port Number provided)
Prompt Code = DEFAULT (present by in New Systems)
All Settings options enabled
Container Codes (Base Table)
Overview
Defines Containers (size and weight) commonly used for the shipping of Parts to Customers or Service Vendors
Source Record(s)
This Table does not rely on/pull from any other record
Destination Record(s)
This Table is used on the following records (An asterisk [*] indicates this Table is a required field on the Destination
Record):

How To Use the Enterprise E2 Shop System
R. 1.0 Page 54 of 295
Parts (Manufactured and Purchased)
Packing Lists
Vendor Returns
Vendor Shipments
Key Values/Points of Consideration (An asterisk [*] indicates a Required Field):
General Tab
*Container Code can be up to 20 alpha-numeric characters
Assigning Container Codes to Parts allows the system to use the related details when creating Packing Lists as
opposed to relying on the default Container Code assigned in Company Preferences
Unit Of Measure Weight is a required field
Used by the system (along with the Empty Container Weight value) to determine total weight of items being
shipped
Currency Codes (Base Table)
Overview
Designates what Currencies your Company uses for financial transactions
Provides default exchange rate information if foreign currency transactions occur
Source Record(s)
This Table relies on/pulls information from the following records. (An asterisk [*] indicates a required field on this
Table):
*G/L Codes (Gain/Loss Account) [See Points of Consideration below for additional details]
Destination Record(s)
This Table is used on the following records. (An asterisk [*] indicates this Table is a required field on the Destination
Record):
*Customers
*Vendors
*G/L Codes
*Quotes
*Orders
*Purchase Orders
*Invoices (A/R & A/P)
Key Values/Points of Consideration (An asterisk [*] indicates a Required Field):
General Tab
* Currency Code can be up to 20 alpha-numeric characters
*Gain/Loss G/L Account is used to track any increase or decrease in value of a transaction based on differences in
listed Exchange Rates on an Invoice and the related cash instrument (deposit or check)
Buy Rate/Sell Rate represents the Exchange Rate used by the system on records associated with the Currency Code

How To Use the Enterprise E2 Shop System
R. 1.0 Page 55 of 295
New records will auto-populate using the rates present on the Currency Code at the time of their creation but
can be edited if needed
Rates are entered in terms of the Foreign Currency value relative to the Native Currency
Example: If a Canadian Company is setting up United States as a Foreign Currency Code
Assume Exchange Rate is 1 US Dollar = 0.975 Canadian Dollars
Both Rates are entered as 0.975
The same exchange rate is used in both fields. E2 will automatically determine which way the calculation
should proceed based on whether it is a Sale or Purchase.
Exchange rates are set to 1 by default
Decimal Places Extended Amount represents the number of decimal places Invoice and Purchase Order Totals will
display
Can be a whole value between 0 and 6
Decimal Places Unit Price represents the number of decimal places allowed when entering unit costs/prices for
material
Can be a whole value between 0 and 6
These settings apply only to dollar values as indicated. Quantity-related decimal settings are dealt with in
Company Preferences (Inventory Settings).
General Notes
The system comes with three Currency Codes already populated by default:
USA (Dollar)
CANADA (Dollar)
MEXICO (Peso)
The Default Currency Code (Company Preferences) is automatically set to USA (Dollar)
These three Currency Codes can be used (and even Edited/Saved) WITHOUT a Gain/Loss Account being
designated to allow for the creation of G/L Accounts and other records. Any NEW Currency Code will require
the selection of a Gain/Loss Account.
Customer Group Codes (Base Table)
Overview
Provides tiered pricing to blocks of Customers that have a unifying connection
Source Record(s)
This Table relies on/pulls information from the following records (An asterisk [*] indicates a required field on this
Table):
Rate Codes (Billing Rate)
Product Codes

How To Use the Enterprise E2 Shop System
R. 1.0 Page 56 of 295
Destination Record(s)
This Table is used on the following records (An asterisk [*] indicates this Table is a required field on the Destination
Record):
Customers
Key Values/Points of Consideration (An asterisk [*] indicates a Required Field):
General Tab
*Customer Group Code can be up to 20 alpha-numeric characters
Customers associated with a Customer Group Code will automatically receive the designated Discount Percent on
Quotes/Orders/Invoices
The discount is calculated automatically and the discounted price displays as the Unit Price
Discounts can be customized further by providing exceptions based on Product Code
When Product Codes are added to the Product Code Discount Grid, the Discount Percentage associated with
the specified Product Codes take precedence over the “standard” Discount Percentage entered above
These Discounts will only be applied against Line Items that have the specified Product Codes listed
Product Codes will populate automatically if associated with a Part or can be entered/changed manually
Customer Group Codes can be changed or removed from Customers as desired
When a Customer Group Code is assigned to a Customer, the Group Code details override the Billing Rate
and Discount Percentage values on the Credit Tab | Miscellaneous Sub-tab of the Customer record. (These
fields will be grayed out and display no values on the Customer record itself, even if values had been entered
previously.)
Departments (Base Table)
Overview
Provides a means of grouping Employees and Work Centers for filtering and report purposes
Source Record(s)
This Table does not rely on/pull from any other record
Destination Record(s)
This Table is used on the following records (An asterisk [*] indicates this Table is a required field on the Destination
Record):
Employees
Work Centers
Key Values/Points of Consideration (An asterisk [*] indicates a Required Field):
General Tab
*Department Code can be up to 20 alpha-numeric characters
Various reports can be filtered based on the Department associated with Employees and/or Work Centers
Scheduling Codes display Departments associated with these Resources and can be used as a means of viewing
Jobs on the Whiteboard
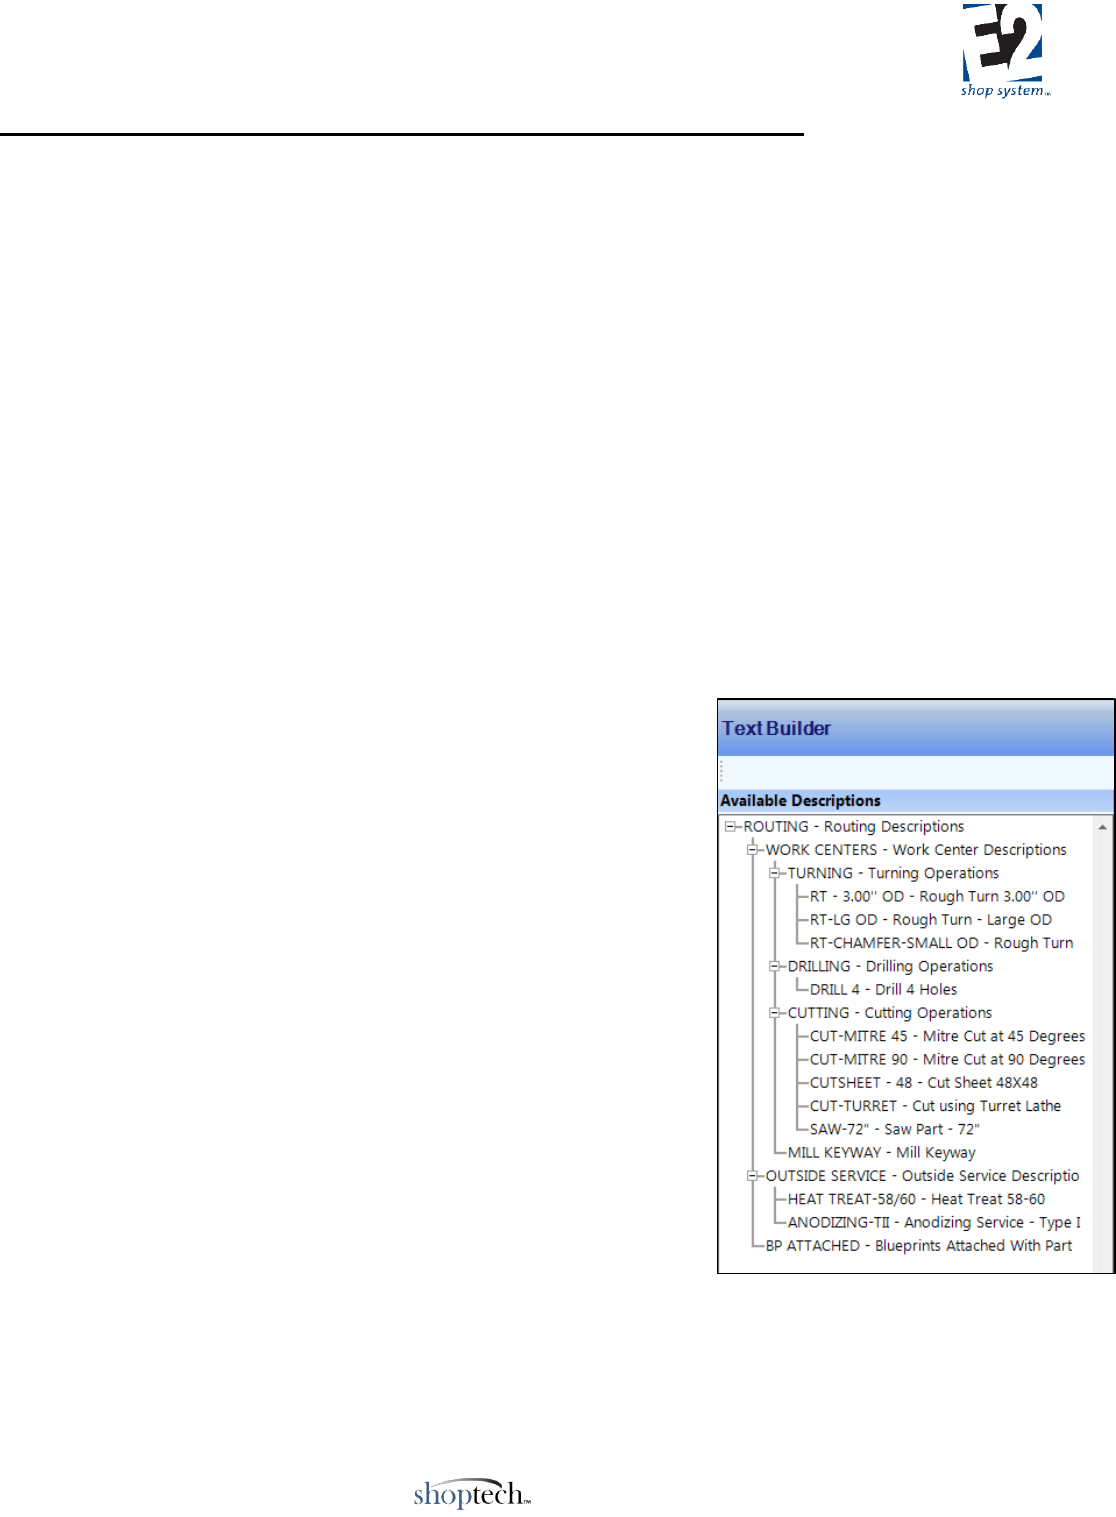
How To Use the Enterprise E2 Shop System
R. 1.0 Page 57 of 295
Description Codes (Base Table – Text Builder Defaults)
Overview
Provides default information available throughout system when using Text Builder
Configures records to create Explorer-type “tree” menu
Source Record(s)
This Table relies on/pulls information from the following records (An asterisk [*] indicates a required field on this
Table):
Description Codes (Builds tree menu)
Destination Record(s)
This Table is used on the following records (An asterisk [*] indicates this Table is a required field on the Destination
Record):
Anywhere Text Builder Utility is available
Common examples:
Notes
Description fields
Key Values/Points of Consideration (An asterisk [*] indicates a Required Field):
General Tab
*Description Code can be up to 20 alpha-numeric characters
Short Description used for reference
Parent Description Code is used to create hierarchy of Description Code
associations to create Explorer-type menu
Top-most Description Codes would not reference a Parent Code
Menu tree can go as deep as desired
Example: Assume creation of Description Code tree for Routing Tab
use
Create Description Code = ROUTING (No Parent Code association;
Makes it top level item)
Create Description Code = INTERNAL (Parent Code =
ROUTING)
Create Description Code = OUTSIDE (Parent Code = ROUTING)
o Both display immediately under ROUTING Code
Create Description Code = TURNING (Parent Code = INTERNAL)
Create Description Code = ROUGHTURN (Parent Code =
TURNING)
Create Description Code = FINISHTURN (Parent Code =
TURNING)
Etc.
You could accomplish much the same using Operations, but this serves the purpose of explaining
functionality of Description Codes

How To Use the Enterprise E2 Shop System
R. 1.0 Page 58 of 295
Can create multiple top level Description Codes
Use anywhere in system where Text Builder Utility is available for use
Will have access to ALL Description Codes when Utility opened
Important to have good organization to locate desired Description information
Long Description is the information that can be pulled onto Notes/Description fields through the Text Builder Utility
Use of Text Builder
When Text Builder Utility is launched, Users will have ability to navigate custom-defined menu tree of Description
Codes
Expand & Collapse the menu tree to locate the desired Description Code
When selected, the Long Description auto-populates the Source Text field of the Text Builder Utility
Source Text can be manually entered/edited
Text To Return represents the information that will be used to populate the Notes or Description field of the
selected record
Displays any text already present by default
Overwrite Text To Return With Source Text – Information in Source Text field simply replaces anything present in
Text to Return field
Append Source To Text To Return – Source Text is added to the end of Text To Return
Click OK to update record
Estimate Codes (Base Table)
Overview
Allows for multiple production run details (Routing, BOM, etc.) based on quantities
Source Record(s)
This Table does not rely on/pull from any other record
Destination Record(s)
This Table is used on the following records (An asterisk [*] indicates this Table is a required field on the Destination
Record):
Manufacturing Details throughout the system (Examples):
Bills Of Material
Routing Steps (internal)
Outside Service Steps
Miscellaneous Charges
Sales Tab
In each instance above, these records can be found on
Quotes
Manufactured Parts
Jobs
Key Values/Points of Consideration (An asterisk [*] indicates a Required Field):
Sample Menu Tree

How To Use the Enterprise E2 Shop System
R. 1.0 Page 59 of 295
General Tab
*Estimate Code can be up to 20 alpha-numeric characters
Examples of Estimate Codes include:
HIGH (Quantity)
LOW (Quantity)
New systems come with an Estimate Code of DEFAULT
When used, complete information needs to be entered for each Estimate Code even if it is the same for each Code
Example:
Estimate Code = LOW
BOM = 1 Purchased Part (1018 Steel Bar)
Routing = 2 internal Steps (SAW and CNC LATHE)
No Outside Service Steps
No Miscellaneous Charges
Estimate Code = HIGH
BOM = 1 Purchased Part (1018 Steel Bar) – Same as LOW Estimate Code
Routing = 1 internal Step (SAW) – Same Work Center and details on SAW as LOW Estimate Code
Outside Services = 1 Service Step (DEBURRING) – Send to Vendor when quantity reaches certain amount
No Miscellaneous Charges
Define what HIGH and LOW values by assigning Estimate Codes to quantity breaks on Sales Tab
If all production details are not included for each Estimate Code, costs and suggested Sales prices will not
be correct.
G/L Group Codes (Base Table)
Overview
Determines whether a G/L Code belongs on the Balance Sheet or Income Statement
Determines what order the G/L Codes will appear on the appropriate report
Provide sub-totals on each report
Source Record(s)
This Table does not rely on/pull from any other record
Destination Record(s)
This Table is used on the following records (An asterisk [*] indicates this Table is a required field on the Destination
Record):
*G/L Codes
Key Values/Points of Consideration (An asterisk [*] indicates a Required Field):
General Tab
*G/L Group Code can be up to 20 alpha-numeric characters
*Classification determines which financial report associated G/L Codes will appear on
Balance Sheet Classifications
A (Asset)

How To Use the Enterprise E2 Shop System
R. 1.0 Page 60 of 295
L (Liability)
O (Owner’s Equity, also known as Capital)
Income Statement Classifications
E (Expense)
I (Income)
S (Sales)
The Classification list is hard-coded and cannot be edited
The system comes with a default list of G/L Group Codes that can be edited as desired
10 – Current Assets (A)
20 – Fixed Assets (A)
30 – Current Liabilities (L)
45 – Capital (O)
50 – Sales (S)
60 – Cost of Goods Sold (E)
70 – Selling and Administrative (E)
G/L Codes appear on the appropriate financial report based on the numerical order of the Group Code
Each Group Code prints a sub-total on the appropriate financial report
A Group Code can have as many (or as few) G/L Codes associated with it as needed
HotSpots (Base Table)
Overview
Pulls information from specified areas of the system
Can be customized or use pre-defined statements
Source Record(s)
This Table does not directly rely on/pull from any other record
However, SQL Statements will pull from records throughout the system
Destination Record(s)
This Table is used on the following records (An asterisk [*] indicates this Table is a required field on the Destination
Record):
My Stuff Tab (Office Application)
My Stuff Tab (Shop Application)
Key Values/Points of Consideration (An asterisk [*] indicates a Required Field):
General Tab
*HotSpot Code can be up to 20 alpha-numeric characters
*Area represents the System Area the HotSpot looks to for values
*SQL Statement – The SQL command carried out by the system when a HotSpot is launched
Using HotSpots
HotSpots can be configured for use within the Office Application as well as the Shop Application

How To Use the Enterprise E2 Shop System
R. 1.0 Page 61 of 295
Select/create HotSpots eligible for use (Designate as Table Records)
HotSpots can be created in multiple ways
Use a default HotSpot that comes with the System
New HotSpot From Template
Select from existing list
Covers most areas of the system and provides information most commonly requested
Edit an existing HotSpot
Edit a Template HotSpot by modifying SQL Statement
Manually edit
Click HotSpot Wizard icon to use query wizard
Cannot edit Area
Copy a HotSpot in the Table List (regardless how it got there)
Both SQL Statement and Area can be edited
Manually create HotSpot (New HotSpot button)
When Area is selected, system automatically launches HotSpot Wizard
Select fields to query and set parameters
Can enter SQL Statement “from scratch”
Verify HotSpot will yield results by clicking Verify Icon
Results will display if any records exist that match the HotSpot
Assign Access to HotSpots
Edit User Group(s) that should have access to HotSpots
On HotSpots Tab
Select HotSpot Code(s) that members of the User Group should be able to launch
Will only have access to HotSpots designated as Table Records
Can designate different HotSpots to each User Group, as appropriate
Ability to launch HotSpots depends on how access to User Group is assigned
Within E2 Office Application
User Code selected when logging into system determines which HotSpots can be launched
Within E2 Shop Application
User Code assigned to Employee Number selected when accessing Shop Application determines which
HotSpots can be launched
It is possible for the same User to have different levels of Security and HotSpot accessibility, depending on
the User Code associated with an Employee Record.
Launch the HotSpot
Open the My Stuff Tab
Open the HotSpots Tab
Click the desired HotSpot
Results will display in a Grid
This works the same in the Office and Shop Applications
As noted above, HotSpots available will be determined on User Code assignment

How To Use the Enterprise E2 Shop System
R. 1.0 Page 62 of 295
Inventory Codes (Base Table)
Overview
Provides details regarding Purchase, use, inspection, and storage of material
Associates with Purchased and Manufactured Parts
Must be used to provide details on Purchased Parts if using decimal values
Source Record(s)
This Table relies on/pulls information from the following records (An asterisk [*] indicates a required field on this
Table):
Calculator Codes
Location Codes
Product Codes
G/L Accounts
Destination Record(s)
This Table is used on the following records (An asterisk [*] indicates this Table is a required field on the Destination
Record):
Parts (Purchased and Manufactured)
While not a required field, per se, Inventory Codes will auto-populate many values (all values present) on
Parts when selected and are highly recommended for use. With regards to Purchased Parts, Inventory Codes
must be used on Parts you want to set up using decimal values.
Key Values/Points of Consideration (An asterisk [*] indicates a Required Field):
General Tab
*Inventory Code can be up to 20 alpha-numeric characters
Consider using Codes that indicate how the material is used for easy reference
If purchased, you may include the Purchasing and Stocking Unit (BAR/BAR, BAR/FT, etc.)
*Stocking Unit Of Measure represents how the material associated with the Inventory Code will be stocked and
used
Cannot be edited on Part if Inventory Code is present
* Purchasing Unit Of Measure represents how the material associated with the Inventory Code will be purchased
Cannot be edited on Part if Inventory Code is present
*Purchasing Factor converts Purchasing Units Of Measure into Stocking Units Of Measure
Value determined by using following equation: Purchasing Unit/Stocking Unit
Example: Purchase BAR, Stock FT; BAR is 12 FT in length
o 1 (BAR)/12 (FT) = 0.08333333 (This is the value you would enter)
Field allows up to 8 decimal places
Can be edited on Part
Notes Regarding Units Of Measure
If Stocking and Purchasing Units are different (BAR & FT) Purchasing Factor CANNOT be 1

How To Use the Enterprise E2 Shop System
R. 1.0 Page 63 of 295
Select the most commonly used conversion value
Edit on Parts that do not use the same value
If Stocking and Purchasing Units are the same (BAR & BAR) Purchasing Factor MUST be 1
Calculator Code allows for use of selected Material Calculator on Bills Of Material for Parts where the Calculator
Code is present
Location Code represents the default physical location where material associated with the Inventory Code would be
found
Product Code would be selected if all/the majority of material associated with the Inventory Code share the same
common feature
Inventory G/L Account would be selected if all/the majority of material associated with the Inventory Code belong
in the same asset account of the Balance Sheet
Purchasing G/L Account would be selected if all/the majority of material associated with the Inventory Code would
use the same G/L Account on Purchase Orders
Settings Tab
Manufactured Parts Sub-tab
Values entered here would only auto-populate Manufactured Parts (Part Type = M)
Job Material Processing
Automatically Fill Requirements is the only option that can be selected for Manufactured Parts
The system will attempt to fill demand for Parts using this setting during Job Material Processing
Works in conjunction with (Inventory) Company Preference Fill Requirements From Bins
If Company Preference not enabled, the option to Automatically Fill Requirements on the Part is ignored
Other
Allow Decimal Inventory and Allow Decimal Values (In Stocking Unit) On Purchase Orders cannot be enabled on
Manufactured Parts
Use Time Tickets To Calculate Quantity Ready To Ship/Transfer determines the initial Order Material Status of Jobs
for the Part
If Yes – Order Material Status = TO MAKE
System assumes Time Tickets will be entered during production process to track progress
Can be used in conjunction with Require Ready To Ship / Transfer settings at the Job or Packing List
level to force the use of Time Tickets and prevent the creation of Packing Lists/Stock Job Transfer
records before items are completed
This setting must be enabled (selected) in order for the options Incremental Job Costing and Require
Ready To Ship / Ready To Transfer to be available
If No – Order Material Status = READY TO SHIP/TRANSFER (Depending on Release Type)
System cannot assume Time Tickets will be entered during production process
Incremental Job Costing determines when material is marked as consumed
If Yes – Material is marked as consumed as pieces are turned in against the first routed step that is marked to
Consume Material

How To Use the Enterprise E2 Shop System
R. 1.0 Page 64 of 295
If the first consuming step is skipped, material is not marked as consumed until pieces are turned in against
it
If No - Material is marked as consumed as soon as it is allocated or received to the Job
Material cost is captured to a Job when it is marked as consumed.
Both the option to Use Time Tickets and Incremental Job Costing can be changed at the Part level and the Job level.
Inspection
When enabled, Inspection settings REQUIRE the creation of an Inspection Record at the designated time before the
next expected production process can commence
Inspect Outgoing Orders And Stock Job Transfers
Must Inspect before Packing Lists or Stock Job Transfer records can be created
Cannot be used if option to Inspect Incoming Customer Returns is enabled
Inspect Incoming Receivers (for Outside Service POs)
Must Inspect before returning Parts can be Posted to Jobs
Inspect Incoming Customer Returns
Must Inspect to determine disposition of Returned Parts
Cannot be used if option to Inspect Outgoing Orders/Stock Job Transfers is enabled
Could use option to Inspect Internal Rejections on final routed Step instead
Inspect Internal Rejections
Must Inspect to determine disposition of Suspect Parts
The use of Inspections requires access to the Quality Module since adverse dispositions must be dealt with
by the creation of a Non-Conformance Record.
Purchased Parts Sub-tab
Values entered here would only auto-populate Purchased Parts (Part Type = P)
Job Material Processing
Automatically Fill Requirements - The system will attempt to fill requirements for Parts using this setting during Job
Material Processing
Works in conjunction with (Inventory) Company Preference Fill Requirements From Bins
If Company Preference not enabled the option to Automatically Fill Requirements on the Part is ignored
Automatically Use Drops – The system will attempt to use drops (partial quantities) of material if present
System will pull whole units first, even if drops are present
Material cannot be automatically used (Posted by System) if it has two or more Dimensions
Cannot enable this option if Allow Decimal Inventory is not enabled
Automatically Combine Drops – The system will combine drops of the same material in an effort to fill requirements
System will pull whole units first, even if drops are present
Cannot enable this option if Automatically Use Drops is not enabled
Other
Allow Decimal Inventory – Parts using this setting will be eligible to have drops (partial quantities) of material in
Inventory

How To Use the Enterprise E2 Shop System
R. 1.0 Page 65 of 295
Drops are in terms of Stocking Units
Allow Decimal Values (In Stocking Unit) On Purchase Orders – Parts using this setting can be Purchased in decimal
quantities in terms of their STOCKING UNIT
It is still possible to create Purchase Orders with partial Purchasing Units if they are different from the Stocking
Unit even if this option is not selected
Cannot enable this option if Allow Decimal Inventory is not enabled
Neither Use Time Tickets nor Incremental Job Costing areoptions for Purchased Parts
Inspection
Inspect Incoming Receivers (Material Purchases) is the only option that can be selected for Purchased Parts
Must Inspect before material can be Posted to Jobs or placed in Inventory
Dimensions Tab
Number Of Dimensions represents the number of variables to use to define size and shape of material
Determines the number of Dimension Values (below) that will be available for definition
Only the designated Number Of Dimensions will display on Part records
Material with two or more Dimensions cannot be automatically used by the System even if the option to do so
is selected (Purchased Part Setting)
Dimension 1 – 5 fields represent the description of each dimension variable
The number of Dimension fields available depends on the Number Of Dimensions entered (above)
Examples of common Dimension descriptions include
Length
Width
Height/Thickness
Dimension descriptions cannot be edited on destination records
Default Dimension Values represent the standard numeric value for each Dimension defined
Dimension Values will auto-populate but can be edited on destination records
Location Codes (Base Table)
Overview
Represents physical location in your shop
Source Record(s)
This Table does not rely on/pull from any other record
Destination Record(s)
This Table is used on the following records (An asterisk [*] indicates this Table is a required field on the Destination
Record):
Parts
Work Centers
Vendors
Key Values/Points of Consideration (An asterisk [*] indicates a Required Field):

How To Use the Enterprise E2 Shop System
R. 1.0 Page 66 of 295
General Tab
*Location Code can be up to 20 alpha-numeric characters
Location Codes are used to track physical movement/location of material or finished goods
Location Codes represent Bin Locations when associated with Parts
Associate Location Codes with Work Centers if you expect to create Inventory Transfer records prior to production
Miscellaneous Charge Codes (Base Table)
Overview
Tracks additional charges applied against Sales and/or Purchasing-related records
Source Record(s)
This Table relies on/pulls information from the following records (An asterisk [*] indicates a required field on this
Table):
*G/L Accounts
Destination Record(s)
This Table is used on the following records (An asterisk [*] indicates this Table is a required field on the Destination
Record):
Quotes
Purchase Orders
Parts (Purchased and Manufactured)
Jobs
Invoices (A/R and A/P)
Key Values/Points of Consideration (An asterisk [*] indicates a Required Field):
General Tab
*Miscellaneous Charge Code can be up to 20 alpha-numeric characters
Description information will auto-populate on destination records when the Miscellaneous Charge Code is selected
*G/L Account represents the Income Statement account the dollar value of the Miscellaneous Charge will be
applied to
Consider creating different Codes for the same type of transaction if you expect to be charged for an item
(Expense G/L Account) that you will then pass along as a charge to the Customer (Sales G/L Account).
Amount is the dollar value associated with the Miscellaneous Charge if it is a standard charge
If the amount varies widely it can be left at $0.00 and edited on the destination record
Include In Piece Price – Allows the charge to be rolled into the overall price on the record
If selected, the Miscellaneous Charge is effectively hidden
If not selected, the Miscellaneous Charge will appear as a separate line item
Unit Of Measure determines how the charge will be calculated
LOT – Flat fee added to record
Amortized across quantity breaks if Included In Piece Price
MIN – Behaves same as LOT

How To Use the Enterprise E2 Shop System
R. 1.0 Page 67 of 295
C – Divides listed Amount by 100 and applies result as the charge
Increases Price/Cost of each quantity by same amount if Included In Piece Price
M – Divides listed Amount by 1,000 and applies result as the charge
Increases Price/Cost of each quantity by same amount if Included In Piece Price
Operations (Base Table)
Overview
Provides default information for internal work processes
Source Record(s)
This Table does not rely on/pull from any other record
Destination Record(s)
This Table is used on the following records (An asterisk [*] indicates this Table is a required field on the Destination
Record):
Work Centers
Routing Grids (Examples):
Quotes
Manufactured Parts
Jobs
Key Values/Points of Consideration (An asterisk [*] indicates a Required Field):
General Tab
*Operation Code can be up to 20 alpha-numeric characters
*Operation Number can be a whole numeric value between 1 and 999,999,999
Can be system-generated or entered manually
Description information will auto-populate the description field of a Routed Step when the Operation Code is
present
All values listed here will auto-populate a Routing Step when the Operation Code is present and will serve
the same purpose as detailed below.
Settings Tab
Default Setup Time represents the estimated amount of time it will take (in terms of the selected Unit) to prepare a
Work Center associated with the Operation Code
Default Setup Unit works in conjunction with Default Setup Time to define how long it is estimated to take to
prepare a Work Center associated with the Operation Code
Options include
Hours
Minutes
Seconds
Setup Time is a fixed value regardless the quantity estimated/worked on
Default Cycle Time represents the estimated amount of time (in terms of the selected Unit) it will take to perform
the work detailed in the description of the Operation Code

How To Use the Enterprise E2 Shop System
R. 1.0 Page 68 of 295
Default Cycle Unit works in conjunction with Default Cycle Time to define how long it is estimated to take to
perform the work detailed in the description of the Operation Code
Options include
Hours
Minutes
Seconds
Pieces Per Hour (System uses value to calculate how long it will take to make one unit in terms of an hour)
Cycle Time will vary depending on the quantity estimated/worked on
Regardless of the Unit Selected for estimating purposes, the system will convert all values into terms of
hours for calculation and report purposes.
Mark an Operation as Unattended (checkbox) if the Employee is able to prepare the Work Center and then leave it
once the work process has begun
Unattended Operations/Steps will estimate/capture Burden Costs, but NOT Labor, for Cycle Time
Unattended Operations/Steps will estimate/capture BOTH Burden and Labor Costs for Setup Time
Percent Efficiency: How efficiently the work detailed in the description of the Operation Code can be performed
If less than 100%, Cycle Time (at the Job Level) will be scheduled to take longer to complete than the amount of
time listed
Example: If Efficiency is 80%, Cycle Time will be increased by 20% FOR SCHEDULING PURPOSES
Estimated Cycle Time itself is not changed, just the amount of time it is expected to take on this particular
Work Center/Step.
Scrap Percentage: The amount of expected scrap or wasted material that will occur during the Operation
If greater than 0, the system will calculate(during Job Material Processing) how many additional units need to
be made to compensate for the anticipated scrapped pieces
At a minimum, you will be required to make one additional unit
Since Scrap Percentages are cumulative on completed Routings, it is typically suggested to leave the value
at 0 at this level and assign a single Scrap Percentage to each Routing as appropriate.
Team Size: The number of Employees it is estimated to take to perform the work detailed in the description of the
Operation
If greater than 1, estimated Labor Costs (Cycle Time only) will be increased accordingly
Scheduled Cycle Time will not be impacted
Machines Run By Operator: The number of machines the Employee performing the work is capable of running at
one time
If greater than 1, estimated Labor Costs (Cycle Time only) will be reduced accordingly
Machines Job Being Run On: The number of machines the scheduled Job can be worked on at the same time for a
given Step
If greater than 1
Estimated Cycle Time is decreased (same number of Machine Hours spread across multiple machines)
Estimated Setup Time is increased (multiple machines must be prepared)
How To Use the Enterprise E2 Shop System
R. 1.0 Page 69 of 295
The Capacity Factor of Work Centers need to match this value in order for scheduling assumptions to be
accurate
Mark the option (checkbox) Eligible To Overlap With Other Routing Steps if work can begin on subsequent Steps
before all the pieces have been completed on the current Step
If enabled, the system will schedule work to begin on the next Step once a pre-determined number of pieces
have been completed on the current Step based on the Overlap Method
Overlap Method: Determines how many pieces must be completed on the current Step before work will be
scheduled to begin on the next one.
Automatic: System will schedule the next Step to complete its Setup process as soon as the first piece is
completed on the current Step
If the Cycle Time on the next Step is FASTER than the Cycle Time of the current Step, it will build in a “head
start” amount to ensure the next Step does not run out of Parts
There is no additional input required for this option
Hours: System will wait a specified length of time before scheduling the next Step
If selected, the number of hours to wait must also be designated in the Hours Completed field that will
appear
Percent: System will wait until a specified percentage of pieces have been completed before scheduling the
next Step
If selected, the percent that needs to be completed must be designated in the Percent Completed field that
will appear
Pieces: System will wait until a specified number of pieces have been completed before scheduling the next
Step
If selected, the number of pieces that need to be completed must be designated in the Pieces Completed
field that will appear
None: Overlapping is disabled and the system will schedule the next Step to begin after all the pieces have
been completed on the current Step
Each Step can have a different option with regards to Overlapping.
Product Code (Base Table)
Overview
Groups Parts together based on a common point (material type, type of work required to make, etc.)
One of two options available to drive A/R Billing details
REQUIRED if using QuickBooks Interface
Source Record(s)
This Table relies on/pulls information from the following records (An asterisk [*] indicates a required field on this
Table):
*G/L Account (multiple)
Destination Record(s)
This Table is used on the following records (An asterisk [*] indicates this Table is a required field on the Destination
Record):

How To Use the Enterprise E2 Shop System
R. 1.0 Page 70 of 295
*Customers (Required only if selected to drive A/R Billing)
*Quotes (Required only if selected to drive A/R Billing)
*Orders (Required only if selected to drive A/R Billing)
*A/R Invoices (Required only if selected to drive A/R Billing)
Key Values/Points of Consideration (An asterisk [*] indicates a Required Field):
General Tab
*Product Code can be up to 20 alpha-numeric characters
Product Code provides the following default G/L Accounts on A/R Invoices, if selected to drive A/R Billing in
Company Preferences. NOTE: Product Code must be used to drive A/R Billing if using QuickBooks Interface.
*A/R Account
*Cash Discount Account
*Sales Account
*Freight (Income) Account)
Of the default G/L Accounts provided, Sales is the one value that would not pull from Fiscal Year defaults if a
Product Code was not present
It is possible that a source record was created without a Product Code if not originally selected to drive A/R
Billing, but was later designated to do so
If selected to drive A/R Billing, Sales information is driven by default based on what work is performed/what Parts
are sold (each line items “inherits” the Product Code associated with the Part(s) assigned to the record)
Product Code becomes a required field on other records when selected to drive A/R Billing in Company
Preferences. Product Codes provide a valuable way of sorting and filtering production reports even if not
selected to drive A/R Billing.
Prompt Codes (Base Table)
Overview
Determines the behavior of Collection Terminals regarding Prompts received and information required
Source Record(s)
This Table does not rely on/pull from any other record
Destination Record(s)
This Table is used on the following records (An asterisk [*] indicates this Table is a required field on the Destination
Record):
*Collection Terminals
Key Values/Points of Consideration (An asterisk [*] indicates a Required Field):
General Tab
*Prompt Code can be up to 20 alpha-numeric characters
Prompts Grid
Prompt Sequence determines in which order Employees will receive Prompts at a Collection Terminal
Cannot edit sequence

How To Use the Enterprise E2 Shop System
R. 1.0 Page 71 of 295
Required – System requires a value to be entered for the Prompt when enabled
If value does not pull from Bar Code, Employee will be forced to enter one
Should also enable option to Show Prompt for Required Prompts unless a Default Response Value will be
passed along
Would be only option ever possible if configured this way
The following Prompts are always required (Cannot disable option):
Employee Number
Action Number
Job Number
Work Center Number
All other Prompts can be optional or required as desired
Show Prompt – Employee will be Prompted for input when enabled
Can be skipped without entering a value if not marked as Required
Operation Number is the exception to this rule if Bar Codes are not being used.
If Step selected has an Operation Code associated with it, that value is used (No Prompt)
Step Operation Code is used even if a different Work Center is selected that has a Default Operation Code
If Operation Code does not come from Step (none present or Step is skipped if not Required), the system will
use the Default Operation Code of the Work Center selected if present
If Operation Code does not come from Step or Work Center, Employee will be Prompted
As with any Prompt, a Default Response Value will be used automatically (in place of any of the above
scenarios) if one provided and Bar Codes are not used.
Prompt Caption provides a reference as to what information the system is Prompting for
Can be edited, but does not change the nature of the expected input
Prompt At – Only applicable if Custom Prompts are created (See below for details)
When available, Custom Prompts can be set to Prompt at Start (Start Job) or Stop (Stop Job)
Standard Prompts list N/A and display as programmed (Cannot edit value)
Default Response Value is value used by system if a specific value should always be used
Employee will not see Prompt, even if marked Show Prompt
Time Records entered on Collection Terminals associated with Prompt Code will use selected Value
In Prompt Details:
Default Text for Prompt Messages displayed for each Language Code
Can edit text for any Language Code
Prompt Message (Long) – Display message for Shop Application (PC Monitor)
Prompt Message (Short) – Display message for wall-mounted clocks
Use of Bar Codes
As indicated above, it is possible to utilize Bar Codes to provide input for certain Data Collection transactions
Employee Badges:
Scan Bar Code for initial Prompt to Enter Employee Number
Job Travelers:

How To Use the Enterprise E2 Shop System
R. 1.0 Page 72 of 295
If work being performed on a Routed Step is proceeding as listed on Traveler
Scan Bar Code located at the appropriate Step when Prompted for Job Number (after Start Job)
Step Level Bar Code contains the following information (if provided in Step Details)
Job Number
Step Number
Work Center (Number)
Operation (Number)
Scanning this Bar Code provides all four inputs at one time (if all are present)
Employee will not be Prompted for any other values at Start Job unless Custom Prompts have been
created
If any of the four inputs are missing, the system will look for Default Response Values
If the input cannot be found in either location, the Employee will be Prompted for a value
If the Collection Terminal Settings call for Work Center/Operation Defaults to override Bar Code
information, the system will look first to any Default Response Values for these inputs and then use the Bar
Code if needed
As above, if the input cannot be found in either location, the Employee will be Prompted for a value
If work being performed is not following the expected process
Scan Bar Code located at the top of the Traveler when Prompted for Job Number (after Start Job)
Scanning this Bar Code provides Job Number only
Employee will then be Prompted for Step Number, Work Center, and (possibly) Operation Number
Would not be Prompted if Default Response Value is present
Consider making Bar Coded lists of Work Centers and “standard” Step Numbers (10, 20, 30, etc.) available
by Collection Terminals if you would like Employees to have the ability to scan individual values (if needed), as
opposed to selecting them from drop-downs or entering them via keyboard.
Use of Passwords
For security purposes, it is possible to require Employees to enter a password when accessing a Data Collection
Terminal
If required, Password comes from the User Code associated with the Employee record
If multiple Employees “share” the same User Code, they would all use the same Password
To have unique Passwords for everyone, each Employee would need their own User Code
Universal Password Requirement
Make Employee Password Prompt a Required value on Prompt Code(s) used on all Data Collection Terminals
Every Employee would be Prompted for a Password before they could perform any transactions of any kind
Collection Terminal-Specific Password Requirement
Make Employee Password Prompt a Required value on Prompt Code(s) used on specific Data Collection
Terminals
Some Collection Terminals could require all Employees using it to enter a Password while other Terminals may
not
User-Specific Password Requirement
Enable option on User Code Settings (Login/Logout) to Prompt For Password at Clock
Only Employees associated with User Code(s) configured this way would be Prompted for Password
How To Use the Enterprise E2 Shop System
R. 1.0 Page 73 of 295
Example: ADMIN and Manager-Related User Codes may be Prompted but not “standard” Shop Users
Useful way to prevent accidental use of E2 Office Seat Licenses
As noted above, if multiple Employees “share” the same User Code they would all use the same Password
Custom Prompts
Custom Prompts can be created to capture information not already available as a Prompt, if desired
Go to System | User-Defined Maintenance
Edit Operation Code
Remove the check from the Hidden option for any value you would like to use as a Custom Prompt
If Prompting for Text fields, Employees will need access to a keyboard
Value Lists will not be available to select from as a drop-down
Edit any Prompt Code(s) the Custom Prompts should be available on
Enable the Show Prompt option for the Custom Prompts if Employees are to enter values
Set Prompt At Start in order to receive Prompt when Starting Job
Set Prompt At End in order to receive Prompt when Stopping Job
Customer Prompt input values can be seen on Time Ticket Details
They will not print on any report, as they are pulling from User-Defined fields
To allow Employees to enter information that can be viewed on the Time Ticket Summary, show the Notes Prompt
Appears when Stopping Job and allows ability to type notes about that Step
General Notes
If changes are made to Prompt Codes, each Collection Terminal application, needs to be re-started in order to apply
the new settings
New Systems come with a Prompt Code of DEFAULT already present
Rate Codes (Base Table)
Overview
Defines rates used for costing and sales price calculations
Source Record(s)
This Table does not rely on/pull from any other record
Destination Record(s)
This Table is used on the following records (An asterisk [*] indicates this Table is a required field on the Destination
Record):
*Employees (Payroll)
*Work Centers (Burden/Labor/Billing)
*Manufactured Parts (Billing)
Key Values/Points of Consideration (An asterisk [*] indicates a Required Field):
General Tab
*Rate Type determines where the Rate Code will be used
Billing Rates are used on Work Centers and Manufactured Parts

How To Use the Enterprise E2 Shop System
R. 1.0 Page 74 of 295
If the Billing Rate is marked to be the Company Labor Rate (checkbox) it is used on Work Centers to capture
estimated labor costs (Required)
If the Billing Rate is marked to be the Company Burden Rate (checkbox) it is used on Work Centers to
capture estimated burden costs (Required)
If the Billing Rate is NOT marked as either “Company Rate”
It can be used on Work Centers to determine the Sales value of Setup and Cycle Times
It is used (Required) on Manufactured Parts to designate which Sales value to pull from. It is associated
with Work Centers (on Routing Tab) to utilize in the calculation of a suggested sales price of the Part if
the Billing Rate option (Option 1) has been selected on the Sales Tab of that Part
Payroll Rates are used on Employee records to track actual labor costs
*Rate Code can be up to 20 alpha-numeric characters
*Rate Number can be a whole numeric value between 1 and 255
Can be system-generated or entered manually
Cannot have duplicate Rate Number and Rate Type combinations
How To Use the Enterprise E2 Shop System
R. 1.0 Page 75 of 295
Default Records
New Systems come with the following Rate Codes already present (for use on Work Centers)
BURDEN
LABOR
Reason Codes (Base Table)
Overview
Defines codes used to note why Parts are marked as Suspect or to explain why an Inventory Adjustment is made.
Source Record(s)
This Table does not rely on/pull from any other record
Destination Record(s)
This Table is used on the following records (An asterisk [*] indicates this Table is a required field on the Destination
Record):
Time and Attendance Records
Internal Rejections
Inventory Adjustments
Non-Conformance Forms (requires Quality Module)
Key Values/Points of Consideration (An asterisk [*] indicates a Required Field):
General Tab
Reason Code provides information to help explain Suspect Parts or why an Inventory Adjustment is being made
Suspect Parts are turned in on a Time and Attendance Ticket, either manually or through a Data Collection
device entry
Inventory Adjustments are made when Inventory is added or subtracted outside of Purchasing, such as:
When setting up E2, there is Inventory on hand that needs to be added to the records
A physical count reveals more or less of an item than is currently reflected in E2
Etc.
*Reason Code can be up to 20 alpha-numeric characters
*Reason Number is system-generated, but can be edited (Minimum Value = 1)
Can be system-generated or entered manually
Cannot have duplicate Reason Numbers
Default Records
New E2 Systems do not come pre-loaded with defined Reason Codes.
Service Codes (Base Table)
Overview
Provides default information for Outside Service routing Steps
Source Record(s)
This Table relies on/pulls information from the following records (An asterisk [*] indicates a required field on this
Table):

How To Use the Enterprise E2 Shop System
R. 1.0 Page 76 of 295
Vendor Codes
G/L Accounts
Destination Record(s)
This Table is used on the following records (An asterisk [*] indicates this Table is a required field on the Destination
Record):
Outside Service Grids (Examples):
Quotes
Manufactured Parts
Jobs
While not a required field, per se, Service Codes will auto-populate key values on Outside Service Steps
when selected and are highly recommended for use.
Key Values/Points of Consideration (An asterisk [*] indicates a Required Field):
General Tab
Service Sub-tab
*Service Code can be up to 20 alpha-numeric characters
*Service Number can be up to 10 numeric characters
Scrap Percent represents the amount of expected scrap or wasted material that will occur during the service
process
If greater than 0, the system will calculate(during Job Material Processing) how many additional units need to
be made to compensate for the anticipated scrapped pieces
At a minimum, you will be required to make one additional unit
Since Scrap Percentages are cumulative on completed Routings, it is typically suggested to leave the value
at 0 at this level and assign a single Scrap Percentage to each Routing as appropriate.
Unit Of Measure Weight is the default unit the system will use when determining how heavy items are
The system will use the Part Weight associated with the items being made in conjunction with this value to
create Outside Service Packing Lists if you choose to use them
Description information will appear by default on Purchase Orders created for Outside Service Requirements
Waiting For Vendor Cost Analysis – Indicates the need to run the Vendor Cost Analysis as a result of one or more
Vendor RFQs being created from the Service Code
Given the wide variety of shapes and sizes of Parts, it is more likely that Vendor RFQs would be created for
specific Outside Service Steps
Consumes Raw Material – Indicates whether material will be physically altered during the service process
Material Consumption determines when material cost is applied to Jobs
The option to perform Incremental Job Costing impacts when material is seen as Consumed
Incremental Job Costing = Yes: Material Consumed as time entered/PO created for first Routed Step
marked to Consume Material
Incremental Job Costing = No: Material Consumed immediately upon being Posted to Job
Certifications Required – Makes notation on PO for Service if Certifications are required for the work performed

How To Use the Enterprise E2 Shop System
R. 1.0 Page 77 of 295
Also allows printing of Certification for Customer Order
Ignore Vendor Minimum Charge – Allows for the creation of PO for service even if it falls below the Vendor’s stated
minimum order amount
Vendors Sub-tab
Select Vendors that provide the service detailed on the Service Code
One Vendor must be marked as the Default service provider
The Default Vendor and associated details will auto-populate Outside Service Grids when the Service Code
is selected
Markup Percent is used by the system to determine what the Sales Price should be for the service
Used in Billing Rate Method of determining suggested Sales Price of Manufactured Parts
Used on Job Cost Summary when viewing Time & Material costs and suggested Sales values
G/L Account (Purchasing) – Default G/L Account that will be used on POs for the service
Lead Time is used by Scheduling Codes to determine how long it will take for Parts to be returned from service
Vendors
Price By Weight – Select if the Vendor prices the service based on the weight of the Parts sent to them, as
opposed to a per piece or Lot charge
Vendor Part Number represents the Part Number (name) the Vendor uses to refer to the service being offered
or the Part being serviced, if different than the information already in the system
Need Pricing - Mark this option to indicate the need to create a Vendor RFQ for the Service
Enter Quantity Breaks and related cost information in the Sub-details of each Vendor listed if possible
Unless a service is being priced by weight, it may be difficult to list specific quantities and costs due to the
potentially wide variety of sizes and shapes of items that could be sent. This is the same reason most RFQs for
services will likely be generated from a specific Routed Step.
Scheduling Sub-tab
Eligible To Overlap With Other Routing Steps – Allows Service Step to Overlap with the next Routed Step
Most Service Steps would likely not be eligible for Overlapping given the fact Parts would need to be delivered
in many “batches” to keep scheduling correct
If enabled, select the desired Overlap Method
Overlap Method determines how many pieces must be completed on the current Step before work will be
scheduled to begin on the next Step
Automatic: The system will schedule the next Step to complete its Setup process as soon as the first piece is
completed on the current Step
If the Cycle Time on the next Step is FASTER than the Cycle Time of the current Step, it will build in a “head
start” amount to ensure the next Step does not run out of Parts
There is no additional input required for this option
Hours: The system will wait a specified length of time before scheduling the next Step
If selected, you must also designate the number of hours to wait in the Hours Completed field that will
appear
Percent: The system will wait until a specified percentage of pieces have been completed before scheduling
the next Step

How To Use the Enterprise E2 Shop System
R. 1.0 Page 78 of 295
If selected, you must also designate the percent that needs to be completed in the Percent Completed field
that will appear
Pieces: The system will wait until a specified number of pieces have been completed before scheduling the
next Step
If selected, you must also designate the number of pieces that need to be completed in the Pieces
Completed field that will appear
None: Overlapping is disabled and the system will schedule the next Step to begin after all the pieces have been
completed on the current Step
Shift Codes (Base Table)
Overview
Sets up default shifts during which work is expected to be completed
Source Record(s)
This Table relies on/pulls information from the following records (An asterisk [*] indicates a required field on this
Table):
Break Codes
Destination Record(s)
This Table is used on the following records (An asterisk [*] indicates this Table is a required field on the Destination
Record):
*Employees
*Scheduling Codes
Work Centers
(Outside Service) Vendors
Company Code (Company Maintenance)
Key Values/Points of Consideration (An asterisk [*] indicates a Required Field):
General Tab
*Shift Code can be up to 20 alpha-numeric characters
*Shift Begin Time represents the time of day the shift is scheduled to start
*Shift End Time represents the time of day the shift is scheduled to end
Entered in non-military format
Use AM or PM to designate morning from evening
If Breaks (Break Codes) are assigned to the Shift Code:
Employee records will auto-populate with the Breaks (along with the defined Start and End Times) if the Shift
Code is assigned to them
Result of Break Code on Employee depends on whether Auto Breaks are enabled
Scheduling Codes will auto-populate with the Breaks (along with defined Start and End Times) if assigned to
them
Scheduling Engine will assume no work is being performed during break(s) and will extend the length of the
schedule by the length of the break(s)

How To Use the Enterprise E2 Shop System
R. 1.0 Page 79 of 295
Rollback Calculation provides the system with the logic of how to handle time past midnight on shifts that are
scheduled to span two days
Example: Shift Starts at 09:00 PM and Ends at 04:00 AM the following day
Rollback Calculation would be set as follows:
Begin Time: 12:00 AM
End Time: 04:00 AM
Time worked between midnight and 4:00 AM will be associated with the day the shift began
Time worked after 4:00 AM will be associated with the day the shift ended
NEW Systems will have a default Shift Code of 1
st
Shift from 09:00 AM to 05:00 PM
Shifts that will be used in conjunction with each other should not overlap one another. For example, if you
run two “standard” shifts all week long, the Begin Time of the second shift should be the same as (or after)
the End Time of the first shift (no overlap). If you work varying shifts throughout the week (weekdays vs.
weekends for example) create additional Shift Codes to use as defaults for each time frame. With this
functionality it is possible to create a unique default set of shifts for each day of the week, if desired.
Shipping Codes (Base Table)
Overview
Provides details regarding options of getting material and Parts delivered to or from your shop
Source Record(s)
This Table relies on/pulls information from the following records (An asterisk [*] indicates a required field on this
Table):
Vendor Codes
Destination Record(s)
This Table is used on the following records (An asterisk [*] indicates this Table is a required field on the Destination
Record):
Packing Lists
Outside Service Packing Lists
Vendor Returns
Customer Records
Vendor Records
Key Values/Points of Consideration (An asterisk [*] indicates a Required Field):
General Tab
*Shipping Code can be up to 20 alpha-numeric characters
Description information prints on Job Traveler Ship Via field
Does not change based on Shipping Service selected (UPS & FedEx only)
Mark Add Insurance checkbox if Declared Value should be used to determine cost of carrier insurance
Shipping Service is available for UPS and FedEx only
Hard-coded options based on services offered by these carriers

How To Use the Enterprise E2 Shop System
R. 1.0 Page 80 of 295
Description does NOT change based on selection made
Container Weight Maximum represents the maximum weight of a single container the carrier will transport in
terms of Weight Unit of Measure
If a Container exceeds this weight, the system will prompt the User to edit the Packing List (or appropriate
record)
Must select a different Shipping Code or re-distribute weight in Containers
*Unit Of Measure Weight – Determines how heavy a Container can be in relation to Maximum Weight value
Values are hard-coded and cannot be edited
Enter information useful for tracking deliveries in Shipment Tracking Website fields
URL used on Containers Tab to connect to carrier’s tracking page
General Notes
New Systems come with the following Shipping Codes already present:
FEDEX (FedEx Ground)
UPS (UPS Ground)
USPS (USPS Priority)
Tax Codes (Base Table)
Overview
Calculates sales tax on Sales or Purchases
Can represent one or more taxing authority on a given record
Source Record(s)
This Table relies on/pulls information from the following records (An asterisk [*] indicates a required field on this
Table):
*G/L Accounts (Tax Liability)
G/L Accounts (Taxable items)
Destination Record(s)
This Table is used on the following records (An asterisk [*] indicates this Table is a required field on the Destination
Record):
Customers
Vendors
Quotes
Orders
Purchase Orders
Invoices (A/R and A/P)
Key Values/Points of Consideration (An asterisk [*] indicates a Required Field):
General Tab
*Tax Codes can be up to 20 alpha-numeric characters
*Tax Liability G/L Account represents the G/L Account that calculated tax amounts are entered against
This would typically be a liability account on A/R Invoices

How To Use the Enterprise E2 Shop System
R. 1.0 Page 81 of 295
This would typically be a Sales account on A/P Invoices
Given the fact Tax Codes can be associated with both Sales and Expense-related transactions, we suggest
creating separate Tax Codes for Vendors and Customers to avoid charging taxes against the incorrect Liability
Account by mistake.
If the option “All G/L accounts are taxable” is selected, the listed Tax Percent will be applied to every item on the
record
If the option “All G/L accounts are taxable” is not selected, the listed Tax Percent will be applied only to items on
the record that correspond to a G/L Account listed as taxable in the Grid “Taxable G/L Accounts”
Multiple Tax Codes can be assigned to records as needed
Terms Codes (Base Table)
Overview
Provides billing details regarding due date and discounts (if offered)
Interchangeable for both Sales (Customer) and Purchase (Vendor) transactions
Required with use of Accounting Module
Source Record(s)
This Table does not rely on/pull from any other record
Destination Record(s)
This Table is used on the following records (An asterisk [*] indicates this Table is a required field on the Destination
Record):
*Invoices (A/R and A/P)
Vendors
Customers
Quotes
Purchase Orders
Orders
Key Values/Points of Consideration (An asterisk [*] indicates a Required Field):
General Tab
*Terms Code can be up to 20 alpha-numeric characters
Discount Percent represents the discount being offered if the associated invoice is paid within the defined terms
Late Charge Percent would only be applicable for A/R Invoices and is currently for reference purposes only. Late
Charges must be manually calculated and applied.
Discount Period represents the amount of time available in which an invoice can be paid and still receive the stated
discount
See Method of Calculation below for additional information on how this value is used
Net Due Period represents the amount of time an invoice can remain unpaid before it is considered to be past due
See Method of Calculation below for additional information on how this value is used
*Method of Calculation Options
How To Use the Enterprise E2 Shop System
R. 1.0 Page 82 of 295
Method of Calculation 1
Discount Period value represents the number of days (from the Invoice Date) the stated Discount
Percentage can be applied by
If an invoice is paid within the stated number of days (from the Invoice Date), the system will
automatically calculate and apply the discount accordingly
Net Due Period value represents the number of days (from the Invoice Date) the invoice can be paid prior
to being considered Past Due
Method of Calculation 2
Discount Period value represents the specific day of the following month the stated Discount Percentage
can be applied by
If an invoice is paid by the specific day of the month specified, the system will automatically calculate
and apply the discount accordingly
Net Due Period value represents the specific day of the following month that the invoice can be paid prior
to being considered Past Due
The system loads several Terms Codes by default, which can be edited as desired
Territory Codes (Base Table)
Overview
Allows for tracking of Sales by customized Territories
Source Record(s)
This Table does not rely on/pull from any other record
Destination Record(s)
This Table is used on the following records (An asterisk [*] indicates this Table is a required field on the Destination
Record):
Quotes
Orders
A/R Invoices
Key Values/Points of Consideration (An asterisk [*] indicates a Required Field):
General Tab
*Territory Code can be up to 20 alpha-numeric characters
Salesmen – Default Salesmen associated with the Territory
Triggers (Base Table)
Overview
Receives automated notifications of specified events
Source Record(s)
This Table relies on/pulls information from the following records (An asterisk [*] indicates a required field on this
Table):
User Codes

How To Use the Enterprise E2 Shop System
R. 1.0 Page 83 of 295
Contact Information (Customers and Vendors)
SQL Statements will pull from records throughout the system
Destination Record(s)
This does not pull to any other area of the software
Once configured, Triggers simply provide alerts to designated Users or Contacts
Key Values/Points of Consideration (An asterisk [*] indicates a Required Field):
General Tab
*Area represents the System Area the Trigger is monitoring
*Trigger Code can be up to 20 alpha-numeric characters
*Trigger Type indicates how the Trigger information will be delivered
Internal Message – Sent to User Code within E2
Email – Sent to designated email address
Option to Use Associated Contact For Recipient Information becomes available when this option selected
Will use the email of the person listed as the designated Contact on the Customer or Vendor record as
appropriate
Fax – Sent via fax if a Fax Server is connected to the PC running the Trigger
Task – Creates Task in Contact Management
Appropriate Tab will display for configuration purposes based on Trigger Type selected
*SQL Statement – The SQL command carried out by the system when the triggered event occurs
Some Triggers may allow for attached Forms
Select from drop-down menus when available as appropriate
Schedule Tab
*Start Date is the date the Trigger will begin monitoring for the triggered event
Defaults to the current day’s date
Can be edited
End Date represents the date the Trigger will stop monitoring the system if it is continuous
Defaults to the current day’s date
Can be edited
*Interval Size is the value that represents how long the Trigger will take between notifications (in terms of Interval
Unit)
The default Size is 10, but it can be edited
*Interval Unit determines how long the Trigger will take between notifications in relation to Interval Size
Options for Interval Unit are
SECOND
MINUTE
HOUR
DAY
WEEK
MONTH
YEAR

How To Use the Enterprise E2 Shop System
R. 1.0 Page 84 of 295
The default Unit is Minutes
Mark the option to Delete Trigger After First Successful Occurrence if the Trigger should only notify of the
designated event one time
Notification Tab
This Tab will change based on the Trigger Type selected
Enter the appropriate notification-related information based on the option selected
Common items to select include
To, CC, and BCC fields (Internal Message and Email)
Subject (Internal Message and Email)
Message/Cover Page Message
Task Type (Tasks)
On Internal Messages, Emails, and Faxes can edit Message field
Edit manually
Use Fields drop-down at bottom of page to select additional values to display in message
Select an existing field value and the appropriate details will populate the Triggered message
Using Triggers
Triggers can be created in multiple ways
Manually create Trigger (New Trigger button)
When Area is selected system automatically populates SQL Statement
Edit SQL Statement manually
Use Trigger Wizard
Use a default Trigger that comes with the System
New Trigger From Template
Select from existing list
Default Triggers need to be edited to specify whether they should be Global or record-specific
Click the Search Icon (Binoculars)
Click YES to include all values (Global Trigger)
Click NO to make Trigger record-specific
Use Search Grid to select record
Edit an existing Trigger
Edit a Template Trigger by modifying SQL Statement
Manually edit
Click HotSpot Wizard icon to use query wizard
Cannot Edit Area
Copy a Trigger in the Table List
Both SQL Statement and Area can be edited
Once configured, no additional action is needed
Triggers will automatically monitor system for Triggered Event and send notification(s) accordingly
E2 Service must be running for Trigger to function
Verify contact information (Email address, Internal Messaging enabled, etc.)

How To Use the Enterprise E2 Shop System
R. 1.0 Page 85 of 295
If multiple Triggers are active at one time, your system - and possibly even your network - could suffer a
reduction in performance depending on hardware capabilities and the number of Triggers enabled.
Vendor Types (Base Table)
Overview
Groups Vendors together by products or services provided
Provides default G/L Account for Purchasing-related records
Source Record(s)
This Table relies on/pulls information from the following records (An asterisk [*] indicates a required field on this
Table):
G/L Accounts
Destination Record(s)
This Table is used on the following records (An asterisk [*] indicates this Table is a required field on the Destination
Record):
Vendors
Key Values/Points of Consideration (An asterisk [*] indicates a Required Field):
General Tab
*Vendor Type can be up to 20 alpha-numeric characters
Expense G/L Account will auto-populate the Expense G/L Account on NEW Vendor records associated with the
Vendor Type
Work Codes (Base Table)
Overview
Groups Customers together based on a common point (industry type, type of work provided, etc.)
One of two options available to drive A/R Billing details
If using QuickBooks Interface, this option cannot be selected to drive A/R Billing
Source Record(s)
This Table relies on/pulls information from the following records (An asterisk [*] indicates a required field on this
Table):
*G/L Account (multiple)
Destination Record(s)
This Table is used on the following records (An asterisk [*] indicates this Table is a required field on the Destination
Record):
*Customers (Required only if selected to drive A/R Billing)
*Quotes (Required only if selected to drive A/R Billing)
*Orders (Required only if selected to drive A/R Billing)

How To Use the Enterprise E2 Shop System
R. 1.0 Page 86 of 295
*A/R Invoices (Required only if selected to drive A/R Billing)
Key Values/Points of Consideration (An asterisk [*] indicates a Required Field):
General Tab
*Work Code be up to 20 alpha-numeric characters
Work Codes provide the following default G/L Accounts on A/R Invoices if selected to drive A/R Billing in Company
Preferences
*A/R Account
*Cash Discount Account
*Sales Account
*Freight (Income) Account)
Of the default G/L Accounts provided, Sales is the one value that would not pull from Fiscal Year defaults if a Work
Code was not present
It is possible that a source record was created without a Work Code if not originally selected to drive A/R Billing,
but was later designated to do so
If selected to drive A/R Billing, Sales information is driven by default based on whom work is performed for (each
line items “inherits” the Work Code associated with the Customer Code assigned to the record)
Work Code cannot be used to drive A/R Billing when using QuickBooks Interface. Select Product Code in this
case.
Work Code becomes a required field on other records when selected to drive A/R Billing in Company
Preferences. Work Codes provide a valuable way of sorting and filtering production reports, even if not
selected to drive A/R Billing.

How To Use the Enterprise E2 Shop System
R. 1.0 Page 87 of 295
Fiscal Years
Location: G/L | Fiscal Years
Overview
Defines Fiscal Year for accounting purposes
Years can be defined differently if needed
Post Periods to print finalized financial reports
Balance Sheet
Income Statement
Trial Balance
General Ledger Summary
Key Values/Points of Consideration (An asterisk [*] indicates a Required Field):
General Tab
*Fiscal Year can be up to 50 alpha-numeric characters
*Fiscal Year Begin Date is when the year being defined will begin for accounting purposes
Can be any month
Must be the first day of the month
*Fiscal Year End Date represents when the fiscal year being defined will end for accounting purposes
Can be any month
Can be any day of the month
Period Creation options
Use 12 Periods (Monthly Periods)
Starts at designated Begin Date and creates 12 monthly Periods
Total Days In Period
Designate how many days each Period should have
System creates as many Periods as necessary between Begin Date and End Date to accommodate the
number of days designated
Last Period may be longer or shorter to hit exact End Date
Click Set Periods to have system create Periods based on selected option
Period Grid contains the list of Periods for the Fiscal Year
Click the Post Icon (Green Arrow) to Post a specific Period
Cannot enter accounting records into a Posted Period (with the exception of a Journal Entry)
Period must be Posted for financial reports listed previously to print accurately
Unpost a Period to enter additional accounting records or edit existing ones
If Period has been Locked (Padlock icon) it cannot be Unposted
Only lock Periods that will not need to be edited as there is no Unlock option in the system
Period Number is assigned by the system
Can be edited
Begin and End Dates of specific Periods can be adjusted
Following Period adjusts automatically to match

How To Use the Enterprise E2 Shop System
R. 1.0 Page 88 of 295
Accounts Tab
Designate the default G/L Accounts the system will use on accounting records if individual records do not have the
necessary values
Each Fiscal Year can have different default values
There is no default Sales Account for A/R Invoices
Product Codes or Work Codes provide that default value
Process Year
Click the Process Year icon to close out the current Fiscal Year
All Periods must be Posted
Current Earnings closed and rolled into Retained Earnings
No accounting records can be entered into a closed Year (includes Journal Entries)
Financial reports can be printed for closed Years

How To Use the Enterprise E2 Shop System
R. 1.0 Page 89 of 295
Company Maintenance
Location: System | Company Maintenance
Overview
Designates default information for your Company
Contact Information
Default Holidays and Company Work Shifts
Key Values/Points of Consideration (An asterisk [*] indicates a Required Field):
General Tab
*Company Code can be up to 20 alpha-numeric characters
*Company Name can be up to 50 alpha-numeric characters
*Fiscal Year Code indicates the current Fiscal Year for accounting purposes
Accounting records cannot be entered for date prior to current Fiscal Year
Enter contact information for your Company
Divisions Grid
Define Divisions for use on Income Statement-related G/L Accounts if needed
Divisions defined here will be available when creating G/L Accounts
Addresses Tab
Create as many Addresses as necessary for Billing, Shipping, and Remittance
If Address is used for multiple purposes select SHARED as Address Type
*Select Default Remittance and Shipping Location Codes (Addresses) at the bottom of the screen
Can be the same Location Code (Address)
Logo Image Tab
Assign the path to the image file the system can use to print Company Logo on specified forms
Designate which forms to print the logo on in Company Preferences (Forms | Print Logo On)
.bmp and .jpg files are supported by the system
Holidays Tab
List the Holidays your shop will observe
Must designate dates manually each year
Shop will be considered Closed on designated dates for Scheduling purposes
Scheduling Tab
Calendar Sub-tab
Use the Days Of The Week Grid to specify the Company’s default availability for scheduling purposes
Will provide default Shift values for Employees, Work Centers, and Schedule Codes
Use the Specific Dates Grid to specify exceptions to the default Days Of The Week settings
Breaks Sub-tab
Designate Company-wide Breaks that should be used as default values for Employees

How To Use the Enterprise E2 Shop System
R. 1.0 Page 90 of 295
Company Preferences
Location: System | Company Preferences
Overview
Determines behavior of many areas of the system
Preferences will do one of the following:
Designate default action to take (Yes/No)
Designate default record to use
Designate default value to use (Non-record input)
Primary Preferences
While all Preference Settings impact the behavior of the system and should be considered accordingly, some
undoubtedly have greater impact than others. Of particular note are the following options due to the impact they can
have on costs and/or the production process:
Accounting
Customer Billing G/L Coding Driven By
Company Burden Rate Code
Company Labor Rate Code
Default Currency Code (If not US Dollar)
Data Collection
Validation Settings (If using Data Collection devices)
Validate Quantity Reported
Validate Quantity Reported On First Step
Validate Routing Step Status Before Starting New Step
Job Requirements Must Be Filled Before Start Job
Inventory
Inventory Allocation Method
Fill Requirements From Bins
Fill Requirements From Stock Jobs
Automatically Perform Inventory Transfer
Order Entry
Default Customer Code For Stock Jobs
Require Ready To Ship Status Prior To Packing List
Require Ready To Transfer Status Prior To Stock Job Transfer
Remove Open Job Requirements When Job Is Closed
While not a Company Preference, it is important to consider whether the option to Track Consumed by
Reported Pieces is enabled at the Part Level as well, especially with regards to Order Entry settings.

How To Use the Enterprise E2 Shop System
R. 1.0 Page 91 of 295
Auto-numbers
Overview
Determines which records the system will automatically assign record numbers for
Source Record(s)
This Preference does not rely on/pull from any other record
Destination Record(s)
This Preference is used on/impacts the function of the following record(s). (An asterisk [*] indicates this Preference
impacts a required field on the Destination Record):
*Attendance Codes
*Break Codes
*Collection Terminals
*Corrective Actions
*Customer Returns
*Customer RFQs
*Documents
*Employees
*Feedbacks
*Internal Rejections
*Invoices (A/R only)
*Inspections
*Journal Entries
*Material Allocations
*Non-Conformances
*Operations
*Orders
*Packing Lists
*POs (Purchase Orders)
*Preventive Actions
*Quotations
*Reason Codes
*Receivers
*Service Codes
*Stock Job Transfers
*Outside Service Packing Lists
*Vendor RFQs
*Vendor Returns
*Work Centers
Related Preferences/Settings
Next Number Maintenance

How To Use the Enterprise E2 Shop System
R. 1.0 Page 92 of 295
Designate the numeric value the system should start with in Next Number Maintenance for each record
enabled
Initial Setting
The default value for this Preference (all options) is initially set to YES
Functional Notes/Points of Consideration
Record Numbers must be unique values
Two records of note are not listed here
Jobs: Job Number Creation Method selected under Order Entry Preferences
Checks: Next Check Number is set in the appropriate Bank Code
Accounting
Match Invoice With Packing List Number
Overview
Automatically forces A/R Invoice Numbers to match the related Packing List Number
Source Record(s)
This Preference does not rely on/pull from any other record
Destination Record(s)
This Preference is used on/impacts the function of the following record(s). (An asterisk [*] indicates this Preference
impacts a required field on the Destination Record):
A/R Invoices
Related Preferences/Settings
Auto-numbers/Next Number Maintenance
If this option is enabled it will override Auto-numbering details even if A/R Invoices are set to YES
Initial Setting
The default value for this Preference is initially set to YES
Functional Notes/Points of Consideration
If an Invoice Number already exists that matches a Packing List Number selected to create an Invoice for, the
system will assign the Packing List Number with a “dash 1” at the end of it as the new Invoice Number
Customer Billing G/L Coding Driven By
Overview
Determines whether system looks to Work Code or Product Code for A/R Invoice details
If using QuickBooks Interface, Product Code must be selected
Source Record(s)
This Preference does not rely on/pull from any other record

How To Use the Enterprise E2 Shop System
R. 1.0 Page 93 of 295
Destination Record(s)
This Preference is used on/impacts the function of the following record(s). (An asterisk [*] indicates this Preference
impacts a required field on the Destination Record):
*A/R Invoices
Related Preferences/Settings
This Preference does not directly rely on or impact any other Preference/Setting
Initial Setting
The default value for this Preference is initially set to W (Work Code)
Functional Notes/Points of Consideration
Jobs can have both Work Code and Product Code present
Not mutually exclusive
Preference merely determines which code A/R Invoice looks to for the following G/L Accounts
A/R
Cash Discount
Sales
Freight (Income)
The option selected here becomes a Required Field on Orders
Interest Earned G/L Account
Overview
Provides default G/L Account used during Bank Reconciliation for Interest Income
Source Record(s)
This Preference relies on/pulls information from the following record(s):
G/L Accounts
Destination Record(s)
This Preference is used on/impacts the function of the following record(s). (An asterisk [*] indicates this Preference
impacts a required field on the Destination Record):
Bank Reconciliation
Related Preferences/Settings
This Preference does not directly rely on or impact any other Preference/Setting
Initial Setting
The default value for this Preference is initially set to BLANK (No Value)
Functional Notes/Points of Consideration
When dollar value entered during Bank Reconciliation for Interest Earned:
System will automatically create a Journal Entry to account for it
If Preference left blank, the system will prompt for a G/L Account when Bank Reconciliation is processed

How To Use the Enterprise E2 Shop System
R. 1.0 Page 94 of 295
Service Charge G/L Account
Overview
Provides default G/L Account used during Bank Reconciliation for Service Charges (expense)
Source Record(s)
This Preference relies on/pulls information from the following record(s):
G/L Accounts
Destination Record(s)
This Preference is used on/impacts the function of the following record(s). (An asterisk [*] indicates this Preference
impacts a required field on the Destination Record):
Bank Reconciliation
Related Preferences/Settings
This Preference does not directly rely on or impact any other Preference/Setting
Initial Setting
The default value for this Preference is initially set to BLANK (No Value)
Functional Notes/Points of Consideration
When dollar value entered during Bank Reconciliation for Service Charge:
System will automatically create a Journal Entry to account for it
If Preference left blank, the system will prompt for a G/L Account when Bank Reconciliation is processed
Bank Code A/R
Overview
Provides default Bank Code to use on Cash Receipts
Source Record(s)
This Preference relies on/pulls information from the following record(s):
Bank Codes
Destination Record(s)
This Preference is used on/impacts the function of the following record(s). (An asterisk [*] indicates this Preference
impacts a required field on the Destination Record):
*Cash Receipts
Related Preferences/Settings
This Preference does not directly rely on or impact any other Preference/Setting
Initial Setting
The default value for this Preference is initially set to BLANK (No Value)
Functional Notes/Points of Consideration
If left blank the User will have to select a Bank Code for each Cash Receipt created

How To Use the Enterprise E2 Shop System
R. 1.0 Page 95 of 295
Bank Code A/P
Overview
Default Bank Code to use on Cash Disbursements (Checks)
Source Record(s)
This Preference relies on/pulls information from the following record(s):
Bank Codes
Destination Record(s)
This Preference is used on/impacts the function of the following record(s). (An asterisk [*] indicates this Preference
impacts a required field on the Destination Record):
*Cash Disbursements
Related Preferences/Settings
This Preference does not directly rely on or impact any other Preference/Setting
Initial Setting
The default value for this Preference is initially set to BLANK (No Value)
Functional Notes/Points of Consideration
If left blank the User will have to select a Bank Code for each Cash Disbursement created
Federal Tax ID Number
Overview
Company Federal Tax ID
Source Record(s)
This Preference does not rely on/pull from any other record
Destination Record(s)
This Preference does not impact any other record
Related Preferences/Settings
This Preference does not directly rely on or impact any other Preference/Setting
Initial Setting
The default value for this Preference is initially set to BLANK (No Value)
Functional Notes/Points of Consideration
This value is for reference purposes
Company Burden Rate Code
Overview
Designates Burden Rate Code for use on Work Centers
Source Record(s)
This Preference relies on/pulls information from the following record(s):

How To Use the Enterprise E2 Shop System
R. 1.0 Page 96 of 295
Rate Codes
Destination Record(s)
This Preference is used on/impacts the function of the following record(s). (An asterisk [*] indicates this Preference
impacts a required field on the Destination Record):
*Work Centers
Related Preferences/Settings
This Preference does not directly rely on or impact any other Preference/Setting
Initial Setting
The default value for this Preference is initially set to BURDEN
Functional Notes/Points of Consideration
BURDEN Rate Code is already present in New Systems
The dollar amount of Burden is designated on each Work Center
Company Labor Rate Code
Overview
Designates Labor Rate Code for use on Work Centers
Source Record(s)
This Preference relies on/pulls information from the following record(s):
Rate Codes
Destination Record(s)
This Preference is used on/impacts the function of the following record(s). (An asterisk [*] indicates this Preference
impacts a required field on the Destination Record):
*Work Centers
Related Preferences/Settings
This Preference does not directly rely on or impact any other Preference/Setting
Initial Setting
The default value for this Preference is initially set to LABOR
Functional Notes/Points of Consideration
LABOR Rate Code is already present in New Systems
The dollar amount of estimated Labor is designated on each Work Center
Default Currency Code
Overview
Provides default Currency Code for use on new records with dollar values
Source Record(s)
This Preference relies on/pulls information from the following record(s):
Currency Codes

How To Use the Enterprise E2 Shop System
R. 1.0 Page 97 of 295
Destination Record(s)
This Preference is used on/impacts the function of the following record(s). (An asterisk [*] indicates this Preference
impacts a required field on the Destination Record):
Any record dealing with dollar values, including, but not necessarily limited to:
*G/L Accounts
*Customers
*Vendors
*Orders
*Purchase Orders
*Vendor Request For Quotation
*Invoices (A/R and A/P)
*Cash Receipts
*Cash Disbursements
Related Preferences/Settings
Allow Multiple Currencies
If Multiple Currencies are not allowed, only the Default Currency Code will be available for use throughout the
software
Initial Setting
The default value for this Preference is initially set to USA
Functional Notes/Points of Consideration
The following Currency Codes are already present in New Systems
USA
CANADA
MEXICO
Allow Multiple Currencies
Overview
Determines ability to complete transactions with foreign currencies
Source Record(s)
This Preference does not rely on/pull from any other record
Destination Record(s)
This Preference is used on/impacts the function of the following record(s). (An asterisk [*] indicates this Preference
impacts a required field on the Destination Record):
Any record dealing with dollar values, including, but not necessarily limited to:
*G/L Accounts
*Customers
*Vendors
*Orders
*Purchase Orders
*Vendor Request For Quotation

How To Use the Enterprise E2 Shop System
R. 1.0 Page 98 of 295
*Invoices (A/R and A/P)
*Cash Receipts
*Cash Disbursements
Related Preferences/Settings
Default Currency Code
If Multiple Currencies are not allowed, only the Default Currency Code will be available for use throughout the
software
Initial Setting
The default value for this Preference is initially set to YES
Functional Notes/Points of Consideration
The following Currency Codes are already present in New Systems
USA
CANADA
MEXICO
Data Collection
Validation Settings: Flag User On Closed Jobs
Overview
Determines whether Real-time Data Collection Users can clock onto Closed Jobs
Source Record(s)
This Preference does not rely on/pull from any other record
Destination Record(s)
This Preference is used on/impacts the function of the following record(s). (An asterisk [*] indicates this Preference
impacts a required field on the Destination Record):
Time And Attendance Tickets
Related Preferences/Settings
This Preference does not directly rely on or impact any other Preference/Setting
Initial Setting
The default value for this Preference is initially set to YES
Functional Notes/Points of Consideration
When enabled (set to Yes), Employees will not be allowed to clock onto Closed Jobs when using Real-time Data
Collection Devices
Time And Attendance records entered “manually” (in Shop Floor Control portion of system) do not produce a
prompt regardless of this Preference setting (time can be entered against Closed Jobs)
Validation Settings: Flag User On Planned Jobs
Overview
Determines whether Real-time Data Collection Users can clock onto Planned Jobs

How To Use the Enterprise E2 Shop System
R. 1.0 Page 99 of 295
Source Record(s)
This Preference does not rely on/pull from any other record
Destination Record(s)
This Preference is used on/impacts the function of the following record(s). (An asterisk [*] indicates this Preference
impacts a required field on the Destination Record):
Time And Attendance Tickets
Related Preferences/Settings
This Preference does not directly rely on or impact any other Preference/Setting
Initial Setting
The default value for this Preference is initially set to YES
Functional Notes/Points of Consideration
When enabled (set to Yes), Employees will not be allowed to clock onto Planned Jobs when using E2 Shop
Application
Time And Attendance records cannot be entered “manually” (in Shop Floor Control portion of system) against
Planned Jobs regardless of this Preference setting
Validation Settings: Validate Quantity Reported
Overview
Controls the quantity entered as “Pieces Good” throughout production
Source Record(s)
This Preference does not rely on/pull from any other record
Destination Record(s)
This Preference is used on/impacts the function of the following record(s). (An asterisk [*] indicates this Preference
impacts a required field on the Destination Record):
Time And Attendance Tickets
Related Preferences/Settings
This Preference does not directly rely on or impact any other Preference/Setting
Initial Setting
The default value for this Preference is initially set to NO
Functional Notes/Points of Consideration
If enabled, Employees can only enter a combined Quantity of Accepted and Suspect that is equal to or less than the
total Quantity of the previous Step
If not enabled, any Quantity can be entered at each Step
Validation Settings: Validate Quantity Reported On First Step
Overview
Controls the quantity entered as “Pieces Good” on initial Step

How To Use the Enterprise E2 Shop System
R. 1.0 Page 100 of 295
Source Record(s)
This Preference does not rely on/pull from any other record
Destination Record(s)
This Preference is used on/impacts the function of the following record(s). (An asterisk [*] indicates this Preference
impacts a required field on the Destination Record):
Time And Attendance Tickets
Related Preferences/Settings
This Preference does not directly rely on or impact any other Preference/Setting
Initial Setting
The default value for this Preference is initially set to YES
Functional Notes/Points of Consideration
If enabled, Employees can enter a combined Quantity of Accepted and Suspect that is greater than the listed
Quantity To Make
It is possible to allow additional pieces to be turned in on the initial Step (this Preference = Enabled) but
prevent future Steps from entering a quantity greater than the initial value provided (Validate Qty. Reported =
Enabled)
If not enabled, Employees can only enter the Quantity To Make or less as the total Quantity for the initial Step
Validation Settings: Validate Routing Step Status Before Starting New Step
Overview
Controls order of production process
Source Record(s)
This Preference does not rely on/pull from any other record
Destination Record(s)
This Preference is used on/impacts the function of the following record(s). (An asterisk [*] indicates this Preference
impacts a required field on the Destination Record):
Time And Attendance Tickets
Related Preferences/Settings
This Preference does not directly rely on or impact any other Preference/Setting
Initial Setting
The default value for this Preference is initially set to NO
Functional Notes/Points of Consideration
If enabled, Employees cannot proceed to next routed Step until current Step has been completed
All Pieces accounted for (Accepted/Suspect)
Step manually Closed
If not enabled, Employees can enter time against any Step, in any order

How To Use the Enterprise E2 Shop System
R. 1.0 Page 101 of 295
Validation Settings: Job Requirements Must Be Filled Before Start Job
Overview
Controls when job can be started
Source Record(s)
This Preference does not rely on/pull from any other record
Destination Record(s)
This Preference is used on/impacts the function of the following record(s). (An asterisk [*] indicates this Preference
impacts a required field on the Destination Record):
Time And Attendance Tickets
Related Preferences/Settings
Automatically Perform Inventory Transfer (Inventory Preference)
Option to Fill Job Requirements Before Start of Job must be enabled if option to Automatically Perform
Inventory Transfer is enabled
Initial Setting
The default value for this Preference is initially set to YES
Functional Notes/Points of Consideration
If enabled, material requirements must be filled before Employees can clock onto Job
Posted from Stock
Purchased to Job
If not enabled, Employees can enter time against the Job regardless of requirement fulfillment status
Miscellaneous Settings: Manual Break Code
Overview
Determines Break Code system will use when Break Button used on Data Collection Device
Source Record(s)
This Preference relies on/pulls information from the following record(s):
Break Codes
Destination Record(s)
This Preference is used on/impacts the function of the following record(s). (An asterisk [*] indicates this Preference
impacts a required field on the Destination Record):
Time And Attendance Tickets
Related Preferences/Settings
This Preference does not directly rely on or impact any other Preference/Setting
Initial Setting
The default value for this Preference is initially set to BREAK
Functional Notes/Points of Consideration
Break Code of BREAK is present in New Systems

How To Use the Enterprise E2 Shop System
R. 1.0 Page 102 of 295
Miscellaneous Settings: Default Display Mode
Overview
Determines what View will display by default when viewing Logins in Shop Application
Source Record(s)
This Preference does not rely on/pull from any other record
Destination Record(s)
This Preference is used on/impacts the function of the following record(s). (An asterisk [*] indicates this Preference
impacts a required field on the Destination Record):
Shop Application
Related Preferences/Settings
This Preference does not directly rely on or impact any other Preference/Setting
Initial Setting
The default value for this Preference is initially set to JOB DETAILS
Functional Notes/Points of Consideration
Options for the default View include
Job Details
Job Summary
Attendance
Transactions
Miscellaneous Settings: Display Refresh Time
Overview
Determines interval between screen refreshes for Shop Application
Source Record(s)
This Preference does not rely on/pull from any other record
Destination Record(s)
This Preference is used on/impacts the function of the following record(s). (An asterisk [*] indicates this Preference
impacts a required field on the Destination Record):
Shop Application
Related Preferences/Settings
This Preference does not directly rely on or impact any other Preference/Setting
Initial Setting
The default value for this Preference is initially set to 15 seconds
Functional Notes/Points of Consideration
Options for the refresh times (in seconds) include:
10
15

How To Use the Enterprise E2 Shop System
R. 1.0 Page 103 of 295
30
45
60
Forms
Letterhead Allowance
Overview
Determines how much space to insert at the top of printed forms
Source Record(s)
This Preference does not rely on/pull from any other record
Destination Record(s)
This Preference is used on/impacts the function of the following record(s). (An asterisk [*] indicates this Preference
impacts a required field on the Destination Record):
Printed Forms
A/R Invoices
Packing Lists
Purchase Orders
Etc.
Related Preferences/Settings
This Preference does not directly rely on or impact any other Preference/Setting
Initial Setting
The default value for this Preference is initially set to 0 lines
Functional Notes/Points of Consideration
The options for the Number Of Lines include:
0 (0.0 inches)
3 (0.5 inches)
6 (1.0 inches)
9 (1.5 inches)
12 (2.0 inches)
15 (2.5 inches)
Print Logo On
Overview
Determines which forms to print Company logo on
Source Record(s)
This Preference does not rely on/pull from any other record

How To Use the Enterprise E2 Shop System
R. 1.0 Page 104 of 295
Destination Record(s)
This Preference is used on/impacts the function of the following record(s). (An asterisk [*] indicates this Preference
impacts a required field on the Destination Record):
Acknowledgements
Certifications
Corrective Actions
Customer Returns
Internal Rejections
Invoices
Non-Conformances
Packing Lists
Purchase Orders
Quotations
Vendor RFQs
Statements (Customer Billing)
Vendor Returns
Work Orders
Preventive Actions
Outside Service Packing Lists
Receivers
Customer RFQs
Inspections
Stock Job Transfers
Stock Job Transfer Certifications
Related Preferences/Settings
Company Maintenance | Logo Image
This is the location of the image file the system will print at the top of selected forms
Initial Setting
The default value for this Preference for each form listed above is initially set to NO
Functional Notes/Points of Consideration
Image files supported by the system include
.bmp
.jpg
Interfaces
Payroll Interface: Payroll Interface Type
Overview
Determines which interface options to make available in system

How To Use the Enterprise E2 Shop System
R. 1.0 Page 105 of 295
Source Record(s)
This Preference does not rely on/pull from any other record
Destination Record(s)
This Preference is used on/impacts the function of the following record(s). (An asterisk [*] indicates this Preference
impacts a required field on the Destination Record):
Payroll Exports/Imports
Related Preferences/Settings
Specific Interface Options (subset of Payroll Interface Preference)
CenterPoint Options
ADP Options
Paychex Options
Initial Setting
The default value for this Preference is initially set to BLANK
Functional Notes/Points of Consideration
The options for the Payroll Interface Type include:
ADP
Easy Pay
PayChex
Peachtree
QuickBooks
RedWing (CenterPoint)
Simply Accounting
Payroll Interface: Payroll Export File
Overview
Sets location of export file for Payroll Interface
Source Record(s)
This Preference does not rely on/pull from any other record
Destination Record(s)
This Preference is used on/impacts the function of the following record(s). (An asterisk [*] indicates this Preference
impacts a required field on the Destination Record):
Payroll Exports
Related Preferences/Settings
This Preference does not directly rely on or impact any other Preference/Setting
Initial Setting
The default value for this Preference is initially set to BLANK
Functional Notes/Points of Consideration
The location designated needs to be accessible by all Users that will be creating Payroll export files

How To Use the Enterprise E2 Shop System
R. 1.0 Page 106 of 295
Some Interfaces may require specific location paths, so review associated help documentation accordingly
Payroll Interface: Payroll Export Source
Overview
Sets whether Payroll export details pull from Attendance or Time Ticket
Source Record(s)
This Preference does not rely on/pull from any other record
Destination Record(s)
This Preference is used on/impacts the function of the following record(s). (An asterisk [*] indicates this Preference
impacts a required field on the Destination Record):
Payroll Exports
Related Preferences/Settings
This Preference does not directly rely on or impact any other Preference/Setting
Initial Setting
The default value for this Preference is initially set to ATTENDANCE
Functional Notes/Points of Consideration
It is possible for Time Ticket Details to not include as many hours as Attendance Details if Employees are not
clocked onto Jobs the entire day
Payroll Interface: Payroll Import File
Overview
Sets location of import file for Payroll Interface
Source Record(s)
This Preference does not rely on/pull from any other record
Destination Record(s)
This Preference is used on/impacts the function of the following record(s). (An asterisk [*] indicates this Preference
impacts a required field on the Destination Record):
Payroll Imports
Related Preferences/Settings
This Preference does not directly rely on or impact any other Preference/Setting
Initial Setting
The default value for this Preference is initially set to BLANK
Functional Notes/Points of Consideration
The location designated needs to be accessible by all Users that will be creating Payroll export files
Some Interfaces may require specific location paths, so review associated help documentation accordingly

How To Use the Enterprise E2 Shop System
R. 1.0 Page 107 of 295
Payroll Interface: Payroll Interface Bank Code
Overview
Determines which Bank Code Payroll import files will use
Source Record(s)
This Preference relies on/pulls information from the following record(s):
Bank Codes
Destination Record(s)
This Preference is used on/impacts the function of the following record(s). (An asterisk [*] indicates this Preference
impacts a required field on the Destination Record):
Journal Entries
Cash Disbursements
Related Preferences/Settings
This Preference does not directly rely on or impact any other Preference/Setting
Initial Setting
The default value for this Preference is initially set to BLANK
Functional Notes/Points of Consideration
Payroll transactions could be entered as Journal Entries or Manual Checks depending on the Interface and the
settings used
Payroll Interface: CenterPoint Options – Payroll Interface Vendor Type
Overview
Determines Vendor Type used by CenterPoint payroll import files
Source Record(s)
This Preference relies on/pulls information from the following record(s):
Vendor Types
Destination Record(s)
This Preference is used on/impacts the function of the following record(s). (An asterisk [*] indicates this Preference
impacts a required field on the Destination Record):
Cash Disbursements
Related Preferences/Settings
Payroll Interface Type
This Preference will only come into play if RedWing has been selected as the Payroll Interface Type
Initial Setting
The default value for this Preference is initially set to BLANK
Functional Notes/Points of Consideration
This Vendor Type will be assigned by default to Cash Disbursements created by the CenterPoint import file

How To Use the Enterprise E2 Shop System
R. 1.0 Page 108 of 295
Payroll Interface: CenterPoint Options – Regular Earnings Code
Overview
Determines Earnings Code passed on to CenterPoint for regular hours worked
Source Record(s)
This Preference does not rely on/pull from any other record
Destination Record(s)
This Preference is used on/impacts the function of the following record(s). (An asterisk [*] indicates this Preference
impacts a required field on the Destination Record):
CenterPoint export file
Related Preferences/Settings
Payroll Interface Type
This Preference will only come into play if RedWing has been selected as the Payroll Interface Type
Force All Regular Hours To Regular Earnings Code
If the option to Force Regular Hours To (this) Earnings Code is set to NO, the export file will pass along the
associated Payroll Rate Code to the export file
If that is the case, CenterPoint must be set up to match the Payroll Rate
Initial Setting
The default value for this Preference is initially set to RegHrs
Functional Notes/Points of Consideration
This value can be overwritten
If changed, verify new value can be used by CenterPoint
Payroll Interface: CenterPoint Options – Overtime Earnings Code
Overview
Determines Earnings Code passed on to CenterPoint for Overtime hours worked
Source Record(s)
This Preference does not rely on/pull from any other record
Destination Record(s)
This Preference is used on/impacts the function of the following record(s). (An asterisk [*] indicates this Preference
impacts a required field on the Destination Record):
CenterPoint export file
Related Preferences/Settings
Payroll Interface Type
This Preference will only come into play if RedWing has been selected as the Payroll Interface Type
Initial Setting
The default value for this Preference is initially set to Overtime

How To Use the Enterprise E2 Shop System
R. 1.0 Page 109 of 295
Functional Notes/Points of Consideration
This value can be overwritten
If changed, verify new value can be used by CenterPoint
Payroll Interface: CenterPoint Options – Limit Employee Number Field To 3 Digits
In Length
Overview
Limits Employee Number passed on to CenterPoint/RedWing to 3 characters or allow larger (undefined) value
Source Record(s)
This Preference does not rely on/pull from any other record
Destination Record(s)
This Preference is used on/impacts the function of the following record(s). (An asterisk [*] indicates this Preference
impacts a required field on the Destination Record):
CenterPoint export file
Related Preferences/Settings
Payroll Interface Type
This Preference will only come into play if RedWing has been selected as the Payroll Interface Type
Initial Setting
The default value for this Preference is initially set to YES
Functional Notes/Points of Consideration
Does not prevent Employee Number from being longer than three digits in E2 (Employee record)
If Employee Number in E2 is longer than three digits it will be truncated in export file
If leading zero is present it is dropped
Otherwise first three digits used
Works in conjunction with CenterPoint setting
Payroll Interface: CenterPoint Options – Force All Regular Hours To Regular
Earnings Code
Overview
Allows for Payroll Rate to be named differently than CenterPoint Earning Code
Source Record(s)
This Preference does not rely on/pull from any other record
Destination Record(s)
This Preference is used on/impacts the function of the following record(s). (An asterisk [*] indicates this Preference
impacts a required field on the Destination Record):
CenterPoint export file
Related Preferences/Settings
Payroll Interface Type

How To Use the Enterprise E2 Shop System
R. 1.0 Page 110 of 295
This Preference will only come into play if RedWing has been selected as the Payroll Interface Type
Regular Earnings Code
If the option to Force Regular Hours To (designated) Regular Earnings Code is set to YES, it does not matter
what the Payroll Rate Code is named on Time and Attendance Tickets
If set to NO, the system will pass along the Payroll Rate Code as the Earnings Code
Initial Setting
The default value for this Preference is initially set to YES
Functional Notes/Points of Consideration
See notes above regarding Related Preferences
Payroll Interface: ADP Options – ADP Payroll Import File Type
Overview
Designates whether payroll pulls from ADP bank account or your Company’s bank account
Source Record(s)
This Preference does not rely on/pull from any other record
Destination Record(s)
This Preference is used on/impacts the function of the following record(s). (An asterisk [*] indicates this Preference
impacts a required field on the Destination Record):
ADP import file
Journal Entries
Cash Disbursements
Related Preferences/Settings
Payroll Interface Type
This Preference will only come into play if ADP has been selected as the Payroll Interface Type
Initial Setting
The default value for this Preference is initially set to BLANK
Functional Notes/Points of Consideration
If ADP Account used, a single transfer of funds to ADP covers payroll
If Company Account used, multiple transactions/checks must be created to cover payroll
Payroll Interface: ADP Options – ADP Company Code
Overview
Sets Company Code used in export file
Source Record(s)
This Preference does not rely on/pull from any other record
Destination Record(s)
This Preference is used on/impacts the function of the following record(s). (An asterisk [*] indicates this Preference
impacts a required field on the Destination Record):

How To Use the Enterprise E2 Shop System
R. 1.0 Page 111 of 295
ADP export file
Related Preferences/Settings
Payroll Interface Type
This Preference will only come into play if ADP has been selected as the Payroll Interface Type
Initial Setting
The default value for this Preference is initially set to BLANK
Functional Notes/Points of Consideration
This value is assigned by ADP
Used to identify transactions sent to ADP
Payroll Interface: Paychex Options – Paychex Payroll Import File Type
Overview
Designates whether payroll pulls from Paychex bank account or Company’s bank account
Source Record(s)
This Preference does not rely on/pull from any other record
Destination Record(s)
This Preference is used on/impacts the function of the following record(s). (An asterisk [*] indicates this Preference
impacts a required field on the Destination Record):
Paychex import file
Journal Entries
Cash Disbursements
Related Preferences/Settings
Payroll Interface Type
This Preference will only come into play if Paychex has been selected as the Payroll Interface Type
Initial Setting
The default value for this Preference is initially set to BLANK
Functional Notes/Points of Consideration
If Paychex Account used, a single transfer of funds to Paychex covers payroll
If Company Account used, multiple transactions/checks must be created to cover payroll
Accounting Interface: Accounting Interface Type
Overview
Determines which interface options to make available in system
Source Record(s)
This Preference does not rely on/pull from any other record
Destination Record(s)
This Preference is used on/impacts the function of the following record(s). (An asterisk [*] indicates this Preference
impacts a required field on the Destination Record):

How To Use the Enterprise E2 Shop System
R. 1.0 Page 112 of 295
Accounting Record Exports:
A/R & A/P Invoices
Packing Lists & Receivers
Related Preferences/Settings
Specific Interface Options (subset of Accounting Interface Preference)
QuickBooks Options
Simply Accounting Options
Initial Setting
The default value for this Preference is initially set to BLANK
Functional Notes/Points of Consideration
The options for the Payroll Interface Type include:
QuickBooks
Simply Accounting
Accounting Interface: Accounting Export File
Overview
Sets location of export file for Accounting Interface (if needed)
Not necessary if using Auto Sync option with QuickBooks
Source Record(s)
This Preference does not rely on/pull from any other record
Destination Record(s)
This Preference is used on/impacts the function of the following record(s). (An asterisk [*] indicates this Preference
impacts a required field on the Destination Record):
Accounting Record Exports
Related Preferences/Settings
This Preference does not directly rely on or impact any other Preference/Setting
Initial Setting
The default value for this Preference is initially set to BLANK
Functional Notes/Points of Consideration
The location designated needs to be accessible by all Users who will be creating Payroll export files
Some Interfaces may require specific location paths, so review their associated help documentation carefully
Accounting Interface: QuickBooks Options – Create Billing From
Overview
Determines whether export information for A/R Invoices in QuickBooks pulls from Packing List details or A/R Invoice
details
Source Record(s)
This Preference does not rely on/pull from any other record

How To Use the Enterprise E2 Shop System
R. 1.0 Page 113 of 295
Destination Record(s)
This Preference is used on/impacts the function of the following record(s). (An asterisk [*] indicates this Preference
impacts a required field on the Destination Record):
Accounting Record Exports
Related Preferences/Settings
Accounting Interface Type
This Preference will only come into play if QuickBooks has been selected as the Accounting Interface Type
Initial Setting
The default value for this Preference is initially set to BILLING
Functional Notes/Points of Consideration
If set to Billing, the export sync uses details from A/R Invoices created in E2
Would recommend also using E2 A/P Invoices as the source of QB A/P Invoices for consistency
If set to Packing List, the export sync uses details from Packing Lists created in E2
No need to create A/R Invoices in E2
Would recommend also using E2 Receivers as source of QB A/P Invoices for consistency
Accounting Interface: QuickBooks Options – Create Invoices From
Overview
Determines whether export information for A/P Invoices in QuickBooks pulls from Receiver details or A/P Invoice
details
Source Record(s)
This Preference does not rely on/pull from any other record
Destination Record(s)
This Preference is used on/impacts the function of the following record(s). (An asterisk [*] indicates this Preference
impacts a required field on the Destination Record):
Accounting Record Exports
Related Preferences/Settings
Accounting Interface Type
This Preference will only come into play if QuickBooks has been selected as the Accounting Interface Type
Initial Setting
The default value for this Preference is initially set to INVOICE
Functional Notes/Points of Consideration
If set to Invoice, the export sync uses details from A/P Invoices created in E2
Would recommend also using E2 A/R Invoices as source of QB A/R Invoices for consistency
If set to Receiver, the export sync uses details from Receivers created in E2
No need to create A/P Invoices in E2
Would recommend also using E2 Packing Lists as source of QB A/R Invoices for consistency

How To Use the Enterprise E2 Shop System
R. 1.0 Page 114 of 295
Accounting Interface: QuickBooks Options – Sync Selected Areas Automatically
Overview
Determines whether Accounting Export for QuickBooks will occur automatically or be run at a time of your choosing
Source Record(s)
This Preference does not rely on/pull from any other record
Destination Record(s)
This Preference is used on/impacts the function of the following record(s). (An asterisk [*] indicates this Preference
impacts a required field on the Destination Record):
Accounting Record Exports:
Billing (A/R Invoices)
Invoices (A/P Invoices)
Related Preferences/Settings
Accounting Interface Type
This Preference will only come into play if QuickBooks has been selected as the Accounting Interface Type
Initial Setting
The default value for this Preference is initially set to NO (in both areas)
Functional Notes/Points of Consideration
If set to NO, the export sync must be launched “manually” by using the export Utility provided in the system
Available in both A/R and A/P Invoice Navigators
If set to YES, the export sync occurs automatically based on the settings provided to QuickBooks Company
No need to use sync Utility
Must provide connection information to designated QuickBooks Company
It is possible to have A/R Invoices automatically sync but require a “manual” sync for A/P Invoices or vice versa
Reference documentation on QuickBooks Interface for details regarding the configuration of the QuickBooks
Company and the auto sync options
Accounting Interface: Simply Accounting Options – Username For Accounting
Interface
Overview
Provides Username for accessing Simply Accounting program during export
Source Record(s)
This Preference does not rely on/pull from any other record
Destination Record(s)
This Preference is used on/impacts the function of the following record(s). (An asterisk [*] indicates this Preference
impacts a required field on the Destination Record):
Accounting Record Exports
Billing (A/R Invoices)
Invoices (A/P Invoices)

How To Use the Enterprise E2 Shop System
R. 1.0 Page 115 of 295
Related Preferences/Settings
Accounting Interface Type
This Preference will only come into play if Simply Accounting has been selected as the Accounting Interface
Type
Initial Setting
The default value for this Preference is initially set to BLANK
Functional Notes/Points of Consideration
This value is entered manually
Accounting Interface: Simply Accounting Options – Password For Accounting
Interface
Overview
Provides Password for accessing Simply Accounting program during export
Source Record(s)
This Preference does not rely on/pull from any other record
Destination Record(s)
This Preference is used on/impacts the function of the following record(s). (An asterisk [*] indicates this Preference
impacts a required field on the Destination Record):
Accounting Record Exports:
Billing (A/R Invoices)
Invoices (A/P Invoices)
Related Preferences/Settings
Accounting Interface Type
This Preference will only come into play if Simply Accounting has been selected as the Accounting Interface
Type
Initial Setting
The default value for this Preference is initially set to BLANK
Functional Notes/Points of Consideration
This value is entered manually
Accounting Interface: Simply Accounting Options – G/L Asset Account For Parts
Overview
Sets Asset Account to associate with Parts created in Simply Accounting as a result of the export
Source Record(s)
This Preference relies on/pulls information from the following record(s):
G/L Accounts

How To Use the Enterprise E2 Shop System
R. 1.0 Page 116 of 295
Destination Record(s)
This Preference is used on/impacts the function of the following record(s). (An asterisk [*] indicates this Preference
impacts a required field on the Destination Record):
Accounting Record Exports:
Billing (A/R Invoices)
Invoices (A/P Invoices)
Related Preferences/Settings
Accounting Interface Type
This Preference will only come into play if Simply Accounting has been selected as the Accounting Interface
Type
Initial Setting
The default value for this Preference is initially set to BLANK
Functional Notes/Points of Consideration
This value is used by Simply Accounting when creating a new Part
Occurs if a Part Number referenced in the export was not already present in Simply Accounting
If no value is provided, the record will not successfully export
Accounting Interface: Simply Accounting Options – G/L Expense Account For Parts
Overview
Sets Expense Account to associate with Parts created in Simply Accounting as a result of the export
Source Record(s)
This Preference relies on/pulls information from the following record(s):
G/L Accounts
Destination Record(s)
This Preference is used on/impacts the function of the following record(s). (An asterisk [*] indicates this Preference
impacts a required field on the Destination Record):
Accounting Record Exports:
Billing (A/R Invoices)
Invoices (A/P Invoices)
Related Preferences/Settings
Accounting Interface Type
This Preference will only come into play if Simply Accounting has been selected as the Accounting Interface
Type
Initial Setting
The default value for this Preference is initially set to BLANK
Functional Notes/Points of Consideration
This value is used by Simply Accounting when creating a new Part
Occurs if a Part Number referenced in the export was not already present in Simply Accounting

How To Use the Enterprise E2 Shop System
R. 1.0 Page 117 of 295
If no value is provided, the record will not successfully export
Accounting Interface: Simply Accounting Options – G/L Revenue Account For Parts
Overview
Sets Revenue (Income) Account to associate with Parts created in Simply Accounting as a result of the export
Source Record(s)
This Preference relies on/pulls information from the following record(s):
G/L Accounts
Destination Record(s)
This Preference is used on/impacts the function of the following record(s). (An asterisk [*] indicates this Preference
impacts a required field on the Destination Record):
Accounting Record Exports:
Billing (A/R Invoices)
Invoices (A/P Invoices)
Related Preferences/Settings
Accounting Interface Type
This Preference will only come into play if Simply Accounting has been selected as the Accounting Interface
Type
Initial Setting
The default value for this Preference is initially set to BLANK
Functional Notes/Points of Consideration
This value is used by Simply Accounting when creating a new Part
Occurs if a Part Number referenced in the export was not already present in Simply Accounting
If no value is provided, the record will not successfully export
Accounting Interface: Export Options – Mark Bill As Paid After Export
Overview
Determines whether exported A/R Invoices (if created) are marked as Paid in E2
Source Record(s)
This Preference does not rely on/pull from any other record
Destination Record(s)
This Preference is used on/impacts the function of the following record(s). (An asterisk [*] indicates this Preference
impacts a required field on the Destination Record):
A/R Invoices
Related Preferences/Settings
Accounting Interface Type
This Preference will only come into play if A/R Invoices are exported to a listed program

How To Use the Enterprise E2 Shop System
R. 1.0 Page 118 of 295
Initial Setting
The default value for this Preference is initially set to NO
Functional Notes/Points of Consideration
If set to NO, A/R Invoices will remain marked as Unpaid within E2 after the export completes
Such Invoices will not show as Paid in the future since payment will be handled external to E2
If set to YES, A/R Invoices will be marked as Paid upon completion of the export
Such Invoices will be seen as Paid in E2 even if payment has not actually been received yet since it is handled
external to the system
In either case, A/R Aging will not be accurate in E2
Accounting Interface: Export Options – Mark Invoice As Paid After Export
Overview
Determines whether exported A/P Invoices (if created) are marked as Paid in E2
Source Record(s)
This Preference does not rely on/pull from any other record
Destination Record(s)
This Preference is used on/impacts the function of the following record(s). (An asterisk [*] indicates this Preference
impacts a required field on the Destination Record):
A/P Invoices
Related Preferences/Settings
Accounting Interface Type
This Preference will only come into play if A/P Invoices are exported to an external accounting program
Initial Setting
The default value for this Preference is initially set to NO
Functional Notes/Points of Consideration
If set to NO, A/P Invoices will remain marked as Unpaid within E2 after the export completes
Such Invoices will not show as Paid in the future since payment will be handled outside of E2
If set to YES, A/P Invoices will be marked as Paid upon completion of the export
Such Invoices will be seen as Paid in E2 even if payment has not actually been sent yet since it is handled
external to the system
In either case A/P Aging will not be accurate in E2
Accounting Interface: Export Options – Create New Part As
Overview
Determines how Parts are created in QuickBooks as a result of how the export will be set up
Source Record(s)
This Preference does not rely on/pull from any other record

How To Use the Enterprise E2 Shop System
R. 1.0 Page 119 of 295
Destination Record(s)
This Preference is used on/impacts the function of the following record(s). (An asterisk [*] indicates this Preference
impacts a required field on the Destination Record):
Accounting Export Records
Related Preferences/Settings
Accounting Interface Type
This Preference will only come into play if A/P Invoices are exported to an external accounting program
Initial Setting
The default value for this Preference is initially set to SERVICE ITEM
Functional Notes/Points of Consideration
This setting is used when the export creates a new Part in the selected Accounting Interface
Occurs if a Part Number referenced in the export was not already present in the selected Accounting Interface
Company
The options include:
Service Item
Inventory Item
Non-Inventory Item (QuickBooks ONLY)
Note: QuickBooks allows a limited number of Inventory Items
Estimation Interface: Estimation Interface Type
Overview
Determines what file format/interface options imported Bill Of Material information will use
Source Record(s)
This Preference does not rely on/pull from any other record
Destination Record(s)
This Preference is used on/impacts the function of the following record(s). (An asterisk [*] indicates this Preference
impacts a required field on the Destination Record):
Estimation Imports (Bill of Material records)
Related Preferences/Settings
This Preference does not directly rely on or impact any other Preference/Setting
Initial Setting
The default value for this Preference is initially set to BLANK
Functional Notes/Points of Consideration
File format/import options include:
CSV
Micro (Micro Estimating)
Costimator
Utility present on Manufactured Parts to import records to create Bill of Material

How To Use the Enterprise E2 Shop System
R. 1.0 Page 120 of 295
Estimation Interface: Estimation Interface Path
Overview
Sets location of import file for Estimation Interface
Source Record(s)
This Preference does not rely on/pull from any other record
Destination Record(s)
This Preference is used on/impacts the function of the following record(s). (An asterisk [*] indicates this Preference
impacts a required field on the Destination Record):
Estimation Imports (Bill of Material records)
Related Preferences/Settings
This Preference does not directly rely on or impact any other Preference/Setting
Initial Setting
The default value for this Preference is initially set to BLANK
Functional Notes/Points of Consideration
The location designated needs to be accessible by all Users that will be creating Bills Of Material from import files.
Some Interfaces may require specific location paths, so review associated help documentation accordingly.
Inventory
Inventory Allocation Method
Overview
Sets timing/costing method for relieving material from Inventory
Source Record(s)
This Preference does not rely on/pull from any other record
Destination Record(s)
This Preference is used on/impacts the function of the following record(s). (An asterisk [*] indicates this Preference
impacts a required field on the Destination Record):
Job Costs
Parts (Available Quantities in each Location Code)
Related Preferences/Settings
This Preference does not directly rely on or impact any other Preference/Setting
Initial Setting
The default value for this Preference is initially set to STANDARD
Functional Notes/Points of Consideration
Options for Allocating/Posting material to Jobs include the following:
Average: Weighted average cost of material; Relieved using LIFO timing
Standard: Stocking Cost (Part Record | Inventory Tab | General Sub-tab); Relieved using LIFO timing

How To Use the Enterprise E2 Shop System
R. 1.0 Page 121 of 295
FIFO (First In, First Out): Actual cost of material; Oldest material relieved first
LIFO (Last In, First Out): Actual cost of material; Newest material relieved first
Inventory Decimal Places Quantities
Overview
Sets number of decimal places allowed for tracking of quantities throughout the system
Source Record(s)
This Preference does not rely on/pull from any other record
Destination Record(s)
This Preference is used on/impacts the function of the following record(s). (An asterisk [*] indicates this Preference
impacts a required field on the Destination Record):
Purchase Orders (Purchasing Unit and Stocking Unit)
Bills Of Material (Stocking Unit – use of material for Estimating purposes)
Inventory Adjustments (Stocking Unit)
Related Preferences/Settings
This Preference does not directly rely on or impact any other Preference/Setting
Initial Setting
The default value for this Preference is initially set to 4
Functional Notes/Points of Consideration
This value can be set for any whole value from 0 to 8
For items that DO NOT Allow Decimal Values:
Inventory Adjustments and Purchase Orders (Stocking Unit value) must be made in whole numbers
Quantity on Bill Of Material could be entered in decimal value up to limit allowed here
If entered as decimal, be aware whole units will pull from Inventory or be ordered, as appropriate
Fill Requirements From Bins
Overview
Allows system to automatically Post Available (On Hand) material to Jobs in order to fill requirements (Needed
Records)
Source Record(s)
This Preference does not rely on/pull from any other record
Destination Record(s)
This Preference is used on/impacts the function of the following record(s). (An asterisk [*] indicates this Preference
impacts a required field on the Destination Record):
Job Material Processing
Fill Job Requirements
Jobs (Order Material Tab – Material Status)
Related Preferences/Settings

How To Use the Enterprise E2 Shop System
R. 1.0 Page 122 of 295
Automatically Fill Requirements (Part Level Setting)
If (Company Preference) Fill Requirements From Bins is not enabled, the system would not automatically Post
material to Jobs even if (Part Level Setting) Automatically Fill Requirements was enabled
Manufactured Parts could still fill requirements from Stock Jobs, if appropriate Preference allowed
Initial Setting
The default value for this Preference is initially set to YES
Functional Notes/Points of Consideration
As noted above this Preference works in conjunction with the Part Level Setting to Automatically Fill Requirements
for greater control over material usage
Fill Requirements From Stock Jobs
Overview
Allows system to automatically redirect (rob) Manufactured Parts being made on dedicated Stock Jobs to Customer
Jobs to fill requirements (Needed Records)
Source Record(s)
This Preference does not rely on/pull from any other record
Destination Record(s)
This Preference is used on/impacts the function of the following record(s). (An asterisk [*] indicates this Preference
impacts a required field on the Destination Record):
Job Material Processing
Jobs (Order Material Tab – Material Status)
Related Preferences/Settings
Automatically Fill Requirements (Part Level Setting)
If (Company Preference) Fill Requirements From Stock Jobs is not enabled, the system would not automatically
redirect Manufactured Parts to Customer Jobs even if (Part Level Setting) Automatically Fill Requirements was
enabled
Manufactured Parts could still fill requirements from Available Inventory quantities, if appropriate
Preference allowed
Default Customer Code For Stock Jobs (Order Entry Preference)
The system will only rob from Jobs on Orders using this Customer Code
Initial Setting
The default value for this Preference is initially set to YES
Functional Notes/Points of Consideration
To successfully “Rob From A Stock Job,” the following conditions must be true:
Part Level Setting to Automatically Fill Requirements must be enabled
Company Preference to Fill Requirements From Stock Jobs must be enabled
Part being robbed must be on an Order using the Default Customer Code For Stock Jobs
Due Date of Customer Job must be equal to or later than Due Date of the Stock Job being robbed

How To Use the Enterprise E2 Shop System
R. 1.0 Page 123 of 295
Fill Requirements From Stock POs
Overview
This setting is not currently in effect
Default Location Code
Overview
Sets Location Code used when placing material into Inventory if Part record does not have one specified
Source Record(s)
This Preference relies on/pulls information from the following record(s):
Location Codes
Destination Record(s)
This Preference is used on/impacts the function of the following record(s). (An asterisk [*] indicates this Preference
impacts a required field on the Destination Record):
*Inventory Adjustments
*Purchase Orders (for Stock transactions)
*Receivers (for Stock transactions)
Related Preferences/Settings
This Preference does not directly rely on or impact any other Preference/Setting
Initial Setting
The default value for this Preference is initially set to DEFAULT
Functional Notes/Points of Consideration
The system will look first to the Part record for a Location Code
Automatically Perform Inventory Transfer
Overview
Determines initial Status (Order Material Tab) of material pulled from Inventory or Purchased directly to a Job
Source Record(s)
This Preference does not rely on/pull from any other record
Destination Record(s)
This Preference is used on/impacts the function of the following record(s). (An asterisk [*] indicates this Preference
impacts a required field on the Destination Record):
Inventory Transfers
Time and Attendance Ticket (via Data Collection Device)
Related Preferences/Settings
Job Requirements Must Be Filled Before Start Job
Job Requirement Preference must be enabled before system will enforce need for Inventory Transfer record

How To Use the Enterprise E2 Shop System
R. 1.0 Page 124 of 295
Initial Setting
The default value for this Preference is initially set to YES
Functional Notes/Points of Consideration
If this Preference is set to Yes:
Order Material Status is set to Posted
Indicates material has been reserved for specific Job AND has been physically moved to Shop Floor for
production purposes
Inventory Transfer record is not required
Does not actually create Inventory Transfer record – one is simply not needed
Time can be entered against Job/production can commence
If this Preference is set to No:
Order Material Status is set to Allocated
Indicates material has been reserved for specific Job BUT is still in its most recent Location – has not been
physically moved to Shop Floor
Inventory Transfer record is required
Creation of Inventory Transfer sets Status to Posted
Time cannot be entered against Job (via Data Collection Devices) until Status is Posted
Only true with regards Data Collection Devices
Time can be entered against Job “manually” (via Shop Floor Control area of system)
As noted above, Transfer record is only required if Validation Preference regarding the need for Job
Requirements to be Filled prior to Start of Job is also enabled
Inventory Transfer record is only required prior to first Time Ticket entry
Once material is Posted, additional Transfer records not required
Can be entered “voluntarily” to track movement between Steps
Inventory Transfers relate only to the physical movement of material; they do not (directly) impact Job
Costs. Material costs are incurred as material is consumed, not merely moved.
Default Container Code
Overview
Sets Container Code to be used by system if:
Container is not designated on Part record
Fill Containers Utility not used when creating Packing List
Source Record(s)
This Preference relies on/pulls information from the following record(s):
Container Codes
Destination Record(s)
This Preference is used on/impacts the function of the following record(s). (An asterisk [*] indicates this Preference
impacts a required field on the Destination Record):
Customer Packing Lists
Outside Service Packing Lists

How To Use the Enterprise E2 Shop System
R. 1.0 Page 125 of 295
Vendor Returns
Related Preferences/Settings
This Preference does not directly rely on or impact any other Preference/Setting
Initial Setting
The default value for this Preference is initially set to BLANK
Functional Notes/Points of Consideration
Default Container Code replaced with Container Code associated with Part when option to Pack Items
Separately/Fill Containers Utility launched on Container Tab of noted records
Miscellaneous
Require That Attached Documents Be Defined In Document Control
Overview
Determines what documents can be selected as attachments
Source Record(s)
This Preference does not rely on/pull from any other record
Destination Record(s)
This Preference is used on/impacts the function of the following record(s). (An asterisk [*] indicates this Preference
impacts a required field on the Destination Record):
Any record with a Documents Tab:
Quotations
Orders
Parts
Invoices
Etc.
Related Preferences/Settings
This Preference does not directly rely on or impact any other Preference/Setting
Initial Setting
The default value for this Preference is initially set to NO
Functional Notes/Points of Consideration
Use of this Preference does require access to the Quality Module
If this Preference is enabled, Users will be limited to only those Documents created/approved in Document
Control portion of Quality Module
If this Preference is not enabled, Users will be able to attach any file they can access on the local network
The ability to attach Documents is also impacted by the Document Permissions granted to the User Group
Treat User-Defined Fields As One
Overview
Determines whether User-Defined values “flow” through system with originating record

How To Use the Enterprise E2 Shop System
R. 1.0 Page 126 of 295
Source Record(s)
This Preference does not rely on/pull from any other record
Destination Record(s)
This Preference is used on/impacts the function of the following record(s). (An asterisk [*] indicates this Preference
impacts a required field on the Destination Record):
Over 30 Source Records (point of origin for User-Defined Values)
See list in System | User-Defined Maintenance
Any subsequent record with a User-Defined Tab:
Orders
Purchase Orders
Invoices
Etc.
Related Preferences/Settings
This Preference does not directly rely on or impact any other Preference/Setting
Initial Setting
The default value for this Preference is initially set to YES
Functional Notes/Points of Consideration
If this Preference is enabled, User-Defined values entered on a Source Record will display on subsequent records
that pull information from the Source Record
Common Examples include:
Customer USER-DEFINED Values flowing to Quotations/Orders
Vendor USER-DEFINED values flowing to Purchase Orders
Part USER-DEFINED values flowing to Jobs
If this Preference is not enabled, the User-Defined values remain on the Source Record only
The ability to use User-Defined values is also impacted by the Document Permissions granted to the User Group
Use ShipRush Integration In Shipments
Overview
Determines ability to utilize third party application (ShipRush) to perform End Of Day transactions
Source Record(s)
This Preference does not rely on/pull from any other record
Destination Record(s)
This Preference is used on/impacts the function of the following record(s). (An asterisk [*] indicates this Preference
impacts a required field on the Destination Record):
Packing Lists
Related Preferences/Settings
This Preference does not directly rely on or impact any other Preference/Setting
Initial Setting
The default value for this Preference is initially set to YES

How To Use the Enterprise E2 Shop System
R. 1.0 Page 127 of 295
Functional Notes/Points of Consideration
This functionality provided by third party application
Requires license from application provider
Configuration and support of application is handled by application provider
Use of ShipRush integration not required even if Preference is enabled
Default Unit Of Measure For Weight
Overview
Determines Weight Unit provided by system on new records
Source Record(s)
This Preference does not rely on/pull from any other record
Destination Record(s)
This Preference is used on/impacts the function of the following record(s). (An asterisk [*] indicates this Preference
impacts a required field on the Destination Record):
Any record where Weight is tracked, such as:
Parts (Manufactured and Purchased)
Packing Lists
Quotations
Related Preferences/Settings
This Preference does not directly rely on or impact any other Preference/Setting
Initial Setting
The default value for this Preference is initially set to LB
Functional Notes/Points of Consideration
This value can be changed on individual records
Options for this Preference (and throughout the system) include:
OZ (Ounce)
OZT (Troy Ounce)
LB (Pound)
CWT (Hundredweight)
TON (Ton)
MG (Milligram)
G (Gram)
KG (Kilogram)
These options are hard-coded and cannot be edited

How To Use the Enterprise E2 Shop System
R. 1.0 Page 128 of 295
Order Entry
Default Customer Code For Stock Jobs
Overview
Identifies dedicated Stock Orders
Source Record(s)
This Preference relies on/pulls information from the following record(s):
Customer Codes
Destination Record(s)
This Preference is used on/impacts the function of the following record(s). (An asterisk [*] indicates this Preference
impacts a required field on the Destination Record):
Orders
Related Preferences/Settings
This Preference does not directly rely on or impact any other Preference/Setting
Initial Setting
The default value for this Preference is initially set to BLANK
Functional Notes/Points of Consideration
This Preference works in conjunction with the Inventory Preference to Fill Requirements From Stock Jobs
The system will only fill requirements “rob” from Jobs on Orders that use the Customer Code designated on this
Preference
If an Order for any other Customer Code has a Stock Release present, those items will simply go to Inventory
when completed
If items on an Order using the Default Stock Customer Code are not needed to fill requirements, the completed
units will be placed into Inventory
Automatically Perform Job Material Processing Following Order Entry
Overview
Determines when Job Material Processing occurs
Source Record(s)
This Preference does not rely on/pull from any other record
Destination Record(s)
This Preference is used on/impacts the function of the following record(s). (An asterisk [*] indicates this Preference
impacts a required field on the Destination Record):
Orders
Related Preferences/Settings
This Preference does not directly rely on or impact any other Preference/Setting

How To Use the Enterprise E2 Shop System
R. 1.0 Page 129 of 295
Initial Setting
The default value for this Preference is initially set to YES
Functional Notes/Points of Consideration
If this Preference is enabled, the Job Material Processing Utility automatically launches upon Saving and Closing an
Order
The Utility opens with all unprocessed Jobs present on the Order
The Utility does not have to be run at this time
Can simply close without clicking Process
If run, the results do not have to be saved
Can close processed record without saving (remains unprocessed)
If this Preference is not enabled, the Job Material Processing Utility will not launch upon Saving and Closing
Customer Orders
User can launch Utility at time of their choosing
Utility will automatically launch when saving and closing Orders that use the Default Stock Customer Code
System assumes such jobs should be processed immediately
Can close Utility without running, if desired
Require Ready To Ship Status Prior To Packing List
Overview
Determines when Packing Lists can be created
Source Record(s)
This Preference does not rely on/pull from any other record
Destination Record(s)
This Preference is used on/impacts the function of the following record(s). (An asterisk [*] indicates this Preference
impacts a required field on the Destination Record):
Packing Lists
Related Preferences/Settings
This Preference does not directly rely on or impact any other Preference/Setting
Initial Setting
The default value for this Preference is initially set to NO
Functional Notes/Points of Consideration
This Preference provides the default setting for Jobs that have the option to Use Time Tickets enabled.
Jobs that have this setting enabled cannot have a Packing List created for them until its Order Material Status is
Ready To Ship
Jobs that have this setting disabled can have a Packing List created for them at any point, regardless of what its
Order Material Status is
This setting can be overwritten at the Job level

How To Use the Enterprise E2 Shop System
R. 1.0 Page 130 of 295
Having the option to Inspect Outgoing Orders/Stock Job Transfers enabled will restrict the creation of
Packing Lists regardless of a Job’s Order Material Status and the setting regarding the requirement of a Ready
To Ship Status.
Require Ready To Transfer Status Prior To Stock Job Transfer
Overview
Determines when Stock Job Transfers can be created
Source Record(s)
This Preference does not rely on/pull from any other record
Destination Record(s)
This Preference is used on/impacts the function of the following record(s). (An asterisk [*] indicates this Preference
impacts a required field on the Destination Record):
Stock Job Transfers
Related Preferences/Settings
This Preference does not directly rely on or impact any other Preference/Setting
Initial Setting
The default value for this Preference is initially set to NO
Functional Notes/Points of Consideration
This Preference provides the default setting for Jobs that have the option to Use Time Tickets enabled.
Jobs that have this setting enabled cannot have a Stock Job Transfer created for them until its Order Material
Status is Ready To Transfer
Jobs that have this setting disabled can have a Stock Job Transfer created for them at any point, regardless of
what its Order Material Status is
This setting can be overwritten at the Job level
Having the option to Inspect Outgoing Orders/Stock Job Transfers enabled will restrict the creation of Stock
Job Transfers regardless of a Job’s Order Material Status and the setting regarding the requirement of a Ready
To Transfer Status.

How To Use the Enterprise E2 Shop System
R. 1.0 Page 131 of 295
Minimum Order Amount
Overview
Sets Minimum Order Amount used on Customer records
Source Record(s)
This Preference does not rely on/pull from any other record
Destination Record(s)
This Preference is used on/impacts the function of the following record(s). (An asterisk [*] indicates this Preference
impacts a required field on the Destination Record):
Customer Records
Related Preferences/Settings
This Preference does not directly rely on or impact any other Preference/Setting
Initial Setting
The default value for this Preference is initially set to $0.00
Functional Notes/Points of Consideration
System looks to Minimum Order Amount of Customer Code present on an Order to determine whether the Order
meets the required value threshold
Job Number Creation Method
Overview
Determines how Job Numbers are assigned
Source Record(s)
This Preference does not rely on/pull from any other record
Destination Record(s)
This Preference is used on/impacts the function of the following record(s). (An asterisk [*] indicates this Preference
impacts a required field on the Destination Record):
Orders
Related Preferences/Settings
This Preference does not directly rely on or impact any other Preference/Setting
Initial Setting
The default value for this Preference is initially set to ORDER + ITEM NUMBER
Functional Notes/Points of Consideration
Options for this Preference include:
Order + Item Number
Job Number is dependent on Order Number
If Order Number is 1000, Jobs would be numbered 1000-01, 1000-02, etc.
Direct numeric connection to Order, easily identified
Sequential

How To Use the Enterprise E2 Shop System
R. 1.0 Page 132 of 295
Job number is independent of Order Number
System simply increments Jobs forward as they are created
No immediately obvious connection to Order
It is strongly encouraged to use Order + Item Number as the Job Number Creation Method unless there is a
strong overriding reason not to.
Allow Planned Status For Production Jobs
Overview
Determines whether Orders can have Planned Jobs present
Source Record(s)
This Preference does not rely on/pull from any other record
Destination Record(s)
This Preference is used on/impacts the function of the following record(s). (An asterisk [*] indicates this Preference
impacts a required field on the Destination Record):
Orders
Related Preferences/Settings
Default Job Status For Production Orders
If Planned Jobs not allowed, cannot set Default Status to Planned
Initial Setting
The default value for this Preference is initially set to YES
Functional Notes/Points of Consideration
Planned Jobs provide the ability to see what anticipated demand will be without creating actual requirements
Can launch Job Material Processing Utility to see what it would take by way of material, but system will not use
results when creating Purchase Orders for required material or services
Cannot Post material to Planned Jobs
Could create Schedule Code to account for Planned Jobs without including them in Default Production Schedule
Time Tickets cannot be entered against a Planned Job
Planned Jobs can be switched to Firm Jobs for Production Purposes
Manually change the Job Status from Planned to Firm and then Process
Default Job Status For Production Orders
Overview
Sets initial Job Status for new Jobs
Source Record(s)
This Preference does not rely on/pull from any other record
Destination Record(s)
This Preference is used on/impacts the function of the following record(s). (An asterisk [*] indicates this Preference
impacts a required field on the Destination Record):

How To Use the Enterprise E2 Shop System
R. 1.0 Page 133 of 295
Orders
Related Preferences/Settings
Allow Planned Status For Production Orders
If Planned Jobs not allowed, cannot set Default Status to Planned
Initial Setting
The default value for this Preference is initially set to FIRM
Functional Notes/Points of Consideration
Firm Jobs are ready for production
Once Job Material Processing is complete:
Material can be Posted/Purchased to Job (if not done during processing)
Time Tickets can be entered
Time can be entered against unprocessed Jobs so long as the Work Center on the Step does not Consume
material
Planned Jobs can be switched to Firm Jobs
Manually change Job Status once Job is determined to be Firm
Default Job Status For Sales Orders
Overview
This setting is not currently in effect
Allow Purchased Parts At Order Entry
Overview
Determines what Parts are available to select during Order Entry
Source Record(s)
This Preference does not rely on/pull from any other record
Destination Record(s)
This Preference is used on/impacts the function of the following record(s). (An asterisk [*] indicates this Preference
impacts a required field on the Destination Record):
Orders
Related Preferences/Settings
This Preference does not directly rely on or impact any other Preference/Setting
Initial Setting
The default value for this Preference is initially set to NO
Functional Notes/Points of Consideration
When this Preference is enabled, Purchased Parts display in the Part Number drop-down during Order Entry
When this Preference is not enabled, the drop-down list for Part Numbers in Order Entry will only display
Manufactured Parts
Purchased Parts can be manually entered by typing in the value

How To Use the Enterprise E2 Shop System
R. 1.0 Page 134 of 295
Remove Open Job Requirements When Job Is Closed
Overview
Determines what happens with unfilled requirements when Job is Closed
Source Record(s)
This Preference does not rely on/pull from any other record
Destination Record(s)
This Preference is used on/impacts the function of the following record(s). (An asterisk [*] indicates this Preference
impacts a required field on the Destination Record):
Orders
Purchase Orders
Related Preferences/Settings
This Preference does not directly rely on or impact any other Preference/Setting
Initial Setting
The default value for this Preference is initially set to NO
Functional Notes/Points of Consideration
When this Preference is enabled, any unfilled material or service requirements will be removed from the system
automatically when a Job is Closed
Job can be closed by:
Entering all pieces against all Steps
Creating Packing List even if all Steps not completed
Manually Cancelling all Open Releases
When this Preference is not enabled, any unfilled requirements will remain in the system
Creates Purchase Orders from requirements and costs are applied to Closed Job when received
Time and Attendance
Auto Rounding: Apply Auto Rounding (Occurs Prior To Schedule Rounding)
Overview
Determines whether system applies rounding rules to Attendance portion of Time Records entered at Data
Collection Devices
Source Record(s)
This Preference does not rely on/pull from any other record
Destination Record(s)
This Preference is used on/impacts the function of the following record(s). (An asterisk [*] indicates this Preference
impacts a required field on the Destination Record):
Time and Attendance Tickets
Related Preferences/Settings
This Preference impacts the sub-settings regarding rounding rules

How To Use the Enterprise E2 Shop System
R. 1.0 Page 135 of 295
If this Preference is not enabled, none of the rounding rules will apply
Initial Setting
The default value for this Preference is initially set to NO
Functional Notes/Points of Consideration
When this Preference is enabled, the system will automatically round Attendance Time based on the rounding rules
entered (sub-preference settings)
As stated in Preference Name cited in the heading above, these rounding rules would take place BEFORE
Schedule Rounding rules
When this Preference is not enabled, Attendance Time is taken directly as entered at Data Collection Device
Auto Rounding: Apply Auto Rounding – Clock In Nearest
Overview
Set the minute increment time will be rounded to when clocking in (Attendance)
Source Record(s)
This Preference does not rely on/pull from any other record
Destination Record(s)
This Preference is used on/impacts the function of the following record(s). (An asterisk [*] indicates this Preference
impacts a required field on the Destination Record):
Time and Attendance Tickets
Related Preferences/Settings
Apply Auto Rounding
This Preference will only be applicable if Auto Rounding is enabled
Clock In Round Up At
Determines when time will be rounded up to designated increment (this Preference)
Initial Setting
The default value for this Preference is initially set to 0
Functional Notes/Points of Consideration
This value represents the minute increment time will be rounded to
Example: If set to 10, time will be rounded to the nearest 10 minute increment based on the rounding rule
entered in the Clock In Round Up At Preference (immediately follows this Preference)
Auto Rounding: Apply Auto Rounding – Clock In Round Up At
Overview
Sets the rounding rule for when time will round up to the designated increment upon clock in
Source Record(s)
This Preference does not rely on/pull from any other record

How To Use the Enterprise E2 Shop System
R. 1.0 Page 136 of 295
Destination Record(s)
This Preference is used on/impacts the function of the following record(s). (An asterisk [*] indicates this Preference
impacts a required field on the Destination Record):
Time and Attendance Tickets
Related Preferences/Settings
Apply Auto Rounding
This Preference will only be applicable if Auto Rounding is enabled
Clock In Nearest
The increment time is rounded to
Initial Setting
The default value for this Preference is initially set to 0
Functional Notes/Points of Consideration
This value represents the number of minutes past the previous rounding increment at which time will round up to
the next rounding increment designated in the Clock In Nearest Preference
Example: Assume rounding increment (Clock In Nearest) set to 10, and Round Up rule (this Preference) is set to
5
If Employees clock in between 1 and 4 minutes past the hour
Attendance record rounded back to top of hour
If Employees clock in between 5 and 9 minutes past the hour
Attendance record rounded forward to 10 minutes past the hour
This pattern would be repeated for each 10 minute increment
Auto Rounding: Apply Auto Rounding – Clock Out Nearest
Overview
Sets the minute increment time will be rounded to when clocking out (Attendance)
Source Record(s)
This Preference does not rely on/pull from any other record
Destination Record(s)
This Preference is used on/impacts the function of the following record(s). (An asterisk [*] indicates this Preference
impacts a required field on the Destination Record):
Time and Attendance Tickets
Related Preferences/Settings
Apply Auto Rounding
This Preference will only be applicable if Auto Rounding is enabled
Clock Out Round Up At
Determines when time will be rounded up to designated increment (this Preference)
Initial Setting
The default value for this Preference is initially set to 0

How To Use the Enterprise E2 Shop System
R. 1.0 Page 137 of 295
Functional Notes/Points of Consideration
This value represents the minute increment time will be rounded to
Example: If set to 10, time will be rounded to the nearest 10-minute increment, based on the rounding rule
entered in the Clock Out Round Up At Preference (see next Auto Rounding Preference)
Auto Rounding: Apply Auto Rounding – Clock Out Round Up
Overview
Sets the rounding rule when time will round up to designated increment upon clock out.
Source Record(s)
This Preference does not rely on/pull from any other record
Destination Record(s)
This Preference is used on/impacts the function of the following record(s). (An asterisk [*] indicates this Preference
impacts a required field on the Destination Record):
Time and Attendance Tickets
Related Preferences/Settings
Apply Auto Rounding
This Preference will only be applicable if Auto Rounding is enabled
Clock Out Nearest
The increment time will round to
Initial Setting
The default value for this Preference is initially set to 0
Functional Notes/Points of Consideration
This value represents the number of minutes past the previous rounding increment at which time will round up to
the next rounding increment designated in the Clock Out Nearest Preference
Example: Assume rounding increment (Clock Out Nearest) is set to 10, and Round Up rule (this Preference) is
set to 5
If Employees clock out between 1 and 4 minutes past the hour
Attendance record rounded back to top of hour
If Employees clock out between 5 and 9 minutes past the hour
Attendance record rounded forward to 10 minutes past the hour
This pattern would be repeated for each 10-minute increment
Schedule Rounding: Apply Schedule Rounding
Overview
Determines whether system rounds Attendance portion of Time Records entered at Data Collection Devices to
Employee’s designated Shift Begin/End
Source Record(s)
This Preference does not rely on/pull from any other record

How To Use the Enterprise E2 Shop System
R. 1.0 Page 138 of 295
Destination Record(s)
This Preference is used on/impacts the function of the following record(s). (An asterisk [*] indicates this Preference
impacts a required field on the Destination Record):
Time and Attendance Tickets
Related Preferences/Settings
This Preference impacts the sub-settings regarding rounding rules
If this Preference is not enabled, none of the rounding rules will apply
Initial Setting
The default value for this Preference is initially set to NO
Functional Notes/Points of Consideration
When this Preference is enabled, the system will automatically round Attendance-related time to the Employee’s
defined Shift Begin or Shift End if they clock in or out within the designated Grace Periods (established in
subsequent rounding rules/Preferences)
If Auto Rounding is also enabled, those rounding rules are applied FIRST and the result of those calculations is used
for Schedule Rounding
Example: Auto Rounding set to round to nearest 10-minute increment, Round Up at 5 minutes
Employee clocks in at 5:46 AM
System rounds to 5:50 AM
System then uses 5:50 AM as the basis for any Schedule Rounding considerations
Schedule Rounding: Apply Schedule Rounding – Clock In Early Grace Time
Overview
Sets time frame (in minutes) used by system to determine whether early clock-ins will be rounded to Shift Start
Source Record(s)
This Preference does not rely on/pull from any other record
Destination Record(s)
This Preference is used on/impacts the function of the following record(s). (An asterisk [*] indicates this Preference
impacts a required field on the Destination Record):
Time and Attendance Tickets
Related Preferences/Settings
Apply Schedule Rounding
This Preference will only be applicable if Schedule Rounding is enabled
Initial Setting
The default value for this Preference is initially set to 0
Functional Notes/Points of Consideration
If clock in falls outside of the designated Grace Time, no rounding occurs
Example: Employee’s Shift Begins at 6:00 AM
Clock In Early Grace Time = 5 (minutes)

How To Use the Enterprise E2 Shop System
R. 1.0 Page 139 of 295
Employee clocks in at 5:54 AM
No rounding occurs – Attendance Ticket shows 5:54 AM Clock In
Employee clocks in at 5:55 AM
System rounds clock in to 6:00 AM
Schedule Rounding occurs after Auto Rounding (if enabled)
Schedule Rounding: Apply Schedule Rounding – Clock In Late Grace Time
Overview
Sets time frame (in minutes) used by system to determine whether late clock ins will be rounded to Shift Start
Source Record(s)
This Preference does not rely on/pull from any other record
Destination Record(s)
This Preference is used on/impacts the function of the following record(s). (An asterisk [*] indicates this Preference
impacts a required field on the Destination Record):
Time and Attendance Tickets
Related Preferences/Settings
Apply Schedule Rounding
This Preference will only be applicable if Schedule Rounding is enabled
Initial Setting
The default value for this Preference is initially set to 0
Functional Notes/Points of Consideration
If clock in falls outside of the designated Grace Time, no rounding occurs
Example: Employee’s Shift Begins at 6:00 AM
Clock In Late Grace Time = 5 (minutes)
Employee clocks in at 6:06 AM
No rounding occurs – Attendance Ticket shows 6:06 AM Clock In
Employee clocks in at 6:05 AM
System rounds clock in to 6:00 AM
Schedule Rounding occurs after Auto Rounding. if enabled
Schedule Rounding: Apply Schedule Rounding – Clock Out Early Grace Time
Overview
Sets time frame (in minutes) used by system to determine whether early clock outs will be rounded to Shift End
Source Record(s)
This Preference does not rely on/pull from any other record
Destination Record(s)
This Preference is used on/impacts the function of the following record(s). (An asterisk [*] indicates this Preference
impacts a required field on the Destination Record):
Time and Attendance Tickets

How To Use the Enterprise E2 Shop System
R. 1.0 Page 140 of 295
Related Preferences/Settings
Apply Schedule Rounding
This Preference will only be applicable if Schedule Rounding is enabled
Initial Setting
The default value for this Preference is initially set to 0
Functional Notes/Points of Consideration
If clock out falls outside of the designated Grace Time, no rounding occurs
Example: Employee’s Shift Ends at 2:00 PM
Clock Out Early Grace Time = 5 minutes
Employee clocks out at 1:54 PM
No rounding occurs – Attendance Ticket shows 1:54 PM Clock Out
Employee clocks out at 1:55 PM
System rounds clock out to 2:00 PM
Schedule Rounding occurs after Auto Rounding, if enabled
Schedule Rounding: Apply Schedule Rounding – Clock Out Late Grace Time
Overview
Sets time frame (in minutes) used by system to determine whether late clock outs will be rounded to Shift End
Source Record(s)
This Preference does not rely on/pull from any other record
Destination Record(s)
This Preference is used on/impacts the function of the following record(s). (An asterisk [*] indicates this Preference
impacts a required field on the Destination Record):
Time and Attendance Tickets
Related Preferences/Settings
Apply Schedule Rounding
This Preference will only be applicable if Schedule Rounding is enabled
Initial Setting
The default value for this Preference is initially set to 0
Functional Notes/Points of Consideration
If clock out falls outside of the designated Grace Time, no rounding occurs
Example: Employee’s Shift Ends at 2:00 PM
Clock Out Late Grace Time = 5 minutes
Employee clocks out at 2:04 PM
No rounding occurs – Attendance Ticket shows 2:04 PM Clock Out
Employee clocks out at 2:05 PM
System rounds clock out to 2:00 PM
Schedule Rounding occurs after Auto Rounding, if enabled

How To Use the Enterprise E2 Shop System
R. 1.0 Page 141 of 295
Shift Rounding: Round to Shift Start
Overview
Determines whether system rounds Time Ticket portion of Time Records entered at Data Collection Devices to
Employee’s designated Shift Begin
Source Record(s)
This Preference does not rely on/pull from any other record
Destination Record(s)
This Preference is used on/impacts the function of the following record(s). (An asterisk [*] indicates this Preference
impacts a required field on the Destination Record):
Time and Attendance Tickets
Related Preferences/Settings
This Preference impacts the sub-setting regarding Time Window To Round
If this Preference is not enabled, the rounding rule will not apply
Initial Setting
The default value for this Preference is initially set to NO
Functional Notes/Points of Consideration
When this Preference is enabled, the system will automatically round Time Ticket-related (Job) time to the
Employee’s defined Shift Begin, if the Job is started within the designated Time Window To Round
Shift Rounding: Round to Shift Start – Time Window to Round
Overview
Sets time frame (in minutes) used by system to determine whether Time Ticket Start Job will be rounded to Shift
Start
Source Record(s)
This Preference does not rely on/pull from any other record
Destination Record(s)
This Preference is used on/impacts the function of the following record(s). (An asterisk [*] indicates this Preference
impacts a required field on the Destination Record):
Time and Attendance Tickets
Related Preferences/Settings
Round To Shift Start
This Preference will only be applicable if Shift Rounding is enabled
Initial Setting
The default value for this Preference is initially set to 0
Functional Notes/Points of Consideration
If Start Job falls within Time Window, the system will round it to match the Employee’s Shift Start time

How To Use the Enterprise E2 Shop System
R. 1.0 Page 142 of 295
Overtime Calculation: Calculate Overtime
Overview
Determines whether the system will automatically calculate Overtime on Time and Attendance records entered at
Data Collection Devices
Source Record(s)
This Preference does not rely on/pull from any other record
Destination Record(s)
This Preference is used on/impacts the function of the following record(s). (An asterisk [*] indicates this Preference
impacts a required field on the Destination Record):
Time and Attendance Tickets
Related Preferences/Settings
This Preference impacts the sub-settings regarding Overtime
If this Preference is not enabled, the remaining Overtime Settings will not apply
Initial Setting
The default value for this Preference is initially set to NO
Functional Notes/Points of Consideration
When this Preference is enabled, the system will automatically calculate Overtime for both Attendance and Job
Costing purposes using the Overtime factors designated in the subsequent settings
Only Time and Attendance Tickets entered via Data Collection Devices will have Overtime automatically calculated
Overtime Calculation: Calculate Overtime – Overtime Method
Overview
Determines time frame in which Overtime is calculated
Source Record(s)
This Preference does not rely on/pull from any other record
Destination Record(s)
This Preference is used on/impacts the function of the following record(s). (An asterisk [*] indicates this Preference
impacts a required field on the Destination Record):
Time and Attendance Tickets
Related Preferences/Settings
Calculate Overtime
This Preference will only be applicable if Calculate Overtime is enabled
Initial Setting
The default value for this Preference is initially set to W
Functional Notes/Points of Consideration
Options for this setting include:

How To Use the Enterprise E2 Shop System
R. 1.0 Page 143 of 295
W (Weekly): Overtime is calculated once the designated Overtime threshold Hours have been reached in a
given week (as defined in Time and Attendance | Miscellaneous Settings Preferences)
D (Daily): Overtime is calculated once the designated Overtime threshold Hours have been reached in a given
day (as defined in Time and Attendance | Miscellaneous Settings Preferences)
Overtime Calculation: Calculate Overtime – Overtime Threshold Hours
Overview
Defines the number of hours that need to pass in designated time frame (as set in Overtime Method) before system
will calculate Overtime
Source Record(s)
This Preference does not rely on/pull from any other record
Destination Record(s)
This Preference is used on/impacts the function of the following record(s). (An asterisk [*] indicates this Preference
impacts a required field on the Destination Record):
Time and Attendance Tickets
Related Preferences/Settings
Calculate Overtime
This Preference will only be applicable if Calculate Overtime is enabled
Initial Setting
The default value for this Preference is initially set to 40.00 hours
Functional Notes/Points of Consideration
Designate hours appropriate to Overtime Method
If Method = W, typical setting is 40.00 hours
If Method = D, typical setting is 8.00 hours
Overtime Calculation: Calculate Overtime – Overtime Factor
Overview
Defines value applied to Labor Cost when Time and Attendance records are marked as Overtime
Source Record(s)
This Preference does not rely on/pull from any other record
Destination Record(s)
This Preference is used on/impacts the function of the following record(s). (An asterisk [*] indicates this Preference
impacts a required field on the Destination Record):
Time and Attendance Tickets
Related Preferences/Settings
Calculate Overtime
This Preference will only be applicable if Calculate Overtime is enabled

How To Use the Enterprise E2 Shop System
R. 1.0 Page 144 of 295
Initial Setting
The default value for this Preference is initially set to 1.5000
Functional Notes/Points of Consideration
If system is set to calculate Overtime, it is NOT recommended to create a “manual” Overtime Labor Rate Code for
Employees
Miscellaneous Settings: Payroll Period Begin Day
Overview
Designates day of week Payroll Periods begin
Source Record(s)
This Preference does not rely on/pull from any other record
Destination Record(s)
This Preference is used on/impacts the function of the following record(s). (An asterisk [*] indicates this Preference
impacts a required field on the Destination Record):
Time and Attendance Tickets
Related Preferences/Settings
Overtime Method
System begins tracking time on Day listed as Payroll Period Begin Day for Overtime calculation when Overtime
Method is W (Weekly)
Initial Setting
The default value for this Preference is initially set to MONDAY
Functional Notes/Points of Consideration
In addition to Overtime calculations, the system uses this information to define when the Work Week begins for
general payroll purposes
Impacts Payroll Interface records
Miscellaneous Settings: Start Of Day
Overview
Designates time workday begins
Source Record(s)
This Preference does not rely on/pull from any other record
Destination Record(s)
This Preference is used on/impacts the function of the following record(s). (An asterisk [*] indicates this Preference
impacts a required field on the Destination Record):
Time and Attendance Tickets
Schedule Codes
Related Preferences/Settings
Overtime Method

How To Use the Enterprise E2 Shop System
R. 1.0 Page 145 of 295
System begins tracking time from the Start Of Day for Overtime calculation when Overtime Method is D (Daily)
Initial Setting
The default value for this Preference is initially set to 8:00 AM
Functional Notes/Points of Consideration
In addition to Overtime calculations, the system uses this information for Scheduling purposes
The first shift of the day (as defined by Shift Codes) must begin at the same time entered as Start Of Day if using
Scheduling
Miscellaneous Settings: Default Hours Entered To
Overview
Designates how initial (calculated) time is handled when entering manual Time and Attendance records
Source Record(s)
This Preference does not rely on/pull from any other record
Destination Record(s)
This Preference is used on/impacts the function of the following record(s). (An asterisk [*] indicates this Preference
impacts a required field on the Destination Record):
Time and Attendance Tickets
Related Preferences/Settings
This Preference does not directly rely on or impact any other Preference/Setting
Initial Setting
The default value for this Preference is initially set to SETUP
Functional Notes/Points of Consideration
The options for this Preference include:
Setup (Time)
Cycle (Time)
When entering Time Ticket Details manually, the system auto-populates either Setup or Cycle Time (based on the
option selected here) with the anticipated amount of time worked, based on the Employee’s defined Shift
As more time is entered, the remaining time is auto-populated for each subsequent line until the end of the
Shift has been reached
Default time can be (and often is) overwritten
Miscellaneous Settings: Create Internal Rejections For Rejected Parts
Overview
Determines whether Suspect Parts can be reviewed or should be considered Scrapped immediately
Source Record(s)
This Preference does not rely on/pull from any other record
Destination Record(s)
This Preference is used on/impacts the function of the following record(s). (An asterisk [*] indicates this Preference
impacts a required field on the Destination Record):

How To Use the Enterprise E2 Shop System
R. 1.0 Page 146 of 295
Time and Attendance Tickets
Internal Rejections
Related Preferences/Settings
This Preference does not directly rely on or impact any other Preference/Setting
Initial Setting
The default value for this Preference is initially set to YES
Functional Notes/Points of Consideration
If this Preference is enabled, the system allows for the creation of an Internal Rejection when Parts are marked as
Suspect on Time Ticket details
System does not automatically create the Internal Rejection record
User creates the record from Time and Attendance Tickets that have Suspect Parts present
Ability to determine whether Parts can continue on with Production (Accepted) or not (Rejected)
If this Preference is not enabled, Parts marked as Suspect are assumed to be Scrapped immediately
There is no ability to create Internal Rejections
Miscellaneous Settings: Holiday Attendance Code
Overview
Sets default Attendance Code to use on Attendance Records created for Holidays
Source Record(s)
This Preference relies on/pulls information from the following record(s):
Attendance Codes
Destination Record(s)
This Preference is used on/impacts the function of the following record(s). (An asterisk [*] indicates this Preference
impacts a required field on the Destination Record):
Time and Attendance Tickets
Related Preferences/Settings
This Preference does not directly rely on or impact any other Preference/Setting
Initial Setting
The default value for this Preference is initially set to HOLIDAY
Functional Notes/Points of Consideration
Company Holidays can be copied to Employees
The system will create Time and Attendance records for Employees based on their Holidays
Miscellaneous Settings: Holiday Payroll Code
Overview
Sets default Payroll (Rate) Code to use on Attendance Records created for Holidays
Source Record(s)
This Preference relies on/pulls information from the following record(s):

How To Use the Enterprise E2 Shop System
R. 1.0 Page 147 of 295
Rate Codes
Destination Record(s)
This Preference is used on/impacts the function of the following record(s). (An asterisk [*] indicates this Preference
impacts a required field on the Destination Record):
Time and Attendance Tickets
Employee Records
Related Preferences/Settings
This Preference does not directly rely on or impact any other Preference/Setting
Initial Setting
The default value for this Preference is initially set to HOLIDAY
Functional Notes/Points of Consideration
Company Holidays can be copied to Employees
The system will create Time and Attendance records for Employees based on their Holidays
The dollar amount to pay each Employee will pull from the Employee record
Human Resources Tab | Payroll Sub-tab
Miscellaneous Settings: Vacation Attendance Code
Overview
Sets default Attendance Code to use on Attendance Records created for Vacations
Source Record(s)
This Preference relies on/pulls information from the following record(s):
Attendance Codes
Destination Record(s)
This Preference is used on/impacts the function of the following record(s). (An asterisk [*] indicates this Preference
impacts a required field on the Destination Record):
Time and Attendance Tickets
Related Preferences/Settings
This Preference does not directly rely on or impact any other Preference/Setting
Initial Setting
The default value for this Preference is initially set to VACATION
Functional Notes/Points of Consideration
Vacations are entered directly on Employee records (Holidays Sub-tab)
The system will create Time and Attendance records for Employees based on their Holidays
Records entered on the Holidays Sub-tab that do not match a Company Holiday are considered to be Vacation
Miscellaneous Settings: Vacation Payroll Code
Overview
Sets default Payroll (Rate) Code to use on Attendance Records created for Vacations

How To Use the Enterprise E2 Shop System
R. 1.0 Page 148 of 295
Source Record(s)
This Preference relies on/pulls information from the following record(s):
Rate Codes
Destination Record(s)
This Preference is used on/impacts the function of the following record(s). (An asterisk [*] indicates this Preference
impacts a required field on the Destination Record):
Time and Attendance Tickets
Employee Records
Related Preferences/Settings
This Preference does not directly rely on or impact any other Preference/Setting
Initial Setting
The default value for this Preference is initially set to VACATION
Functional Notes/Points of Consideration
Vacations are entered directly on Employee records (Holidays Sub-tab)
The system will create Time and Attendance records for Employees based on their Holidays
Records entered on the Holidays Sub-tab that do not match a Company Holiday are considered to be Vacation
The dollar amount to pay each Employee will pull from the Employee record
Human Resources Tab | Payroll Sub-tab
Estimating
Default Estimate Code
Overview
Auto-populates Estimate Code field on new records that have Manufacturing Details
Source Record(s)
This Preference relies on/pulls information from the following record(s):
Estimate Codes
Destination Record(s)
This Preference is used on/impacts the function of the following record(s). (An asterisk [*] indicates this Preference
impacts a required field on the Destination Record):
Records that have Manufacturing Details:
*Manufactured Parts (Table Record)
*Quotations
*Jobs
Related Preferences/Settings
This Preference does not directly rely on or impact any other Preference/Setting
Initial Setting
The default value for this Preference is initially set to DEFAULT

How To Use the Enterprise E2 Shop System
R. 1.0 Page 149 of 295
Functional Notes/Points of Consideration
Estimate Codes can be used to create multiple production processes on the same record based on volume
Default Billing Rate
Overview
Auto-populates Billing Rate field on new records that have Manufacturing Details
Source Record(s)
This Preference relies on/pulls information from the following record(s):
Rate Codes (Billing)
Destination Record(s)
This Preference is used on/impacts the function of the following record(s). (An asterisk [*] indicates this Preference
impacts a required field on the Destination Record):
Records that have Manufacturing Details:
*Manufactured Parts (Table Record)
*Quotations
*Jobs
Related Preferences/Settings
This Preference does not directly rely on or impact any other Preference/Setting
Initial Setting
The default value for this Preference is initially set to 1
Functional Notes/Points of Consideration
Billing Rates are used to determine a suggested Sales price for Manufactured Items
Sales value of Work Center time
It is a required field located on the Engineering Tab of Manufacturing Details
Returns
Work Code Rework
Overview
Defines Work Code used on Stock Jobs created for rework (Repair/Remake) as a result of Returns or Rejections
Source Record(s)
This Preference relies on/pulls information from the following record(s):
Work Codes
Destination Record(s)
This Preference is used on/impacts the function of the following record(s). (An asterisk [*] indicates this Preference
impacts a required field on the Destination Record):
*Jobs

How To Use the Enterprise E2 Shop System
R. 1.0 Page 150 of 295
Related Preferences/Settings
This Preference does not directly rely on or impact any other Preference/Setting
Initial Setting
The default value for this Preference is initially set to BLANK
Functional Notes/Points of Consideration
System will use this value in lieu of one associated with the designated Stock Customer Code
Rework Jobs look to Work Code even if Product Code is selected to drive A/R Billing
Can be selected manually on Job, if needed
Restocking Percent
Overview
Defines Restocking Percentage charge to be used on Customer Records, if applicable
Source Record(s)
This Preference does not rely on/pull from any other record
Destination Record(s)
This Preference is used on/impacts the function of the following record(s). (An asterisk [*] indicates this Preference
impacts a required field on the Destination Record):
Customer Records
Related Preferences/Settings
This Preference does not directly rely on or impact any other Preference/Setting
Initial Setting
The default value for this Preference is initially set to 0.0000
Functional Notes/Points of Consideration
Restocking charges are applied against Customer Returns deemed to be acceptable and placed back into Inventory
The percentage charged is Customer specific and can be edited
Quotations
Followup Days
Overview
Defines number of days to wait to follow up on Quotations
Source Record(s)
This Preference does not rely on/pull from any other record
Destination Record(s)
This Preference is used on/impacts the function of the following record(s). (An asterisk [*] indicates this Preference
impacts a required field on the Destination Record):
Quotations

How To Use the Enterprise E2 Shop System
R. 1.0 Page 151 of 295
Related Preferences/Settings
This Preference does not directly rely on or impact any other Preference/Setting
Initial Setting
The default value for this Preference is initially set to 7
Functional Notes/Points of Consideration
The system uses this value to calculate the default Followup Date of any new Quote
Date can be edited as desired
Expiration Days
Overview
Defines number of days until Quotations expire
Source Record(s)
This Preference does not rely on/pull from any other record
Destination Record(s)
This Preference is used on/impacts the function of the following record(s). (An asterisk [*] indicates this Preference
impacts a required field on the Destination Record):
Quotations
Related Preferences/Settings
This Preference does not directly rely on or impact any other Preference/Setting
Initial Setting
The default value for this Preference is initially set to 30
Functional Notes/Points of Consideration
The system uses this value to calculate the default Expiration Date of any new Quote
Date can be edited as desired
Customer Request For Quotation
Followup Days
Overview
Defines number of days to wait to follow up on Customer Request For Quotation records
Source Record(s)
This Preference does not rely on/pull from any other record
Destination Record(s)
This Preference is used on/impacts the function of the following record(s). (An asterisk [*] indicates this Preference
impacts a required field on the Destination Record):
Customer Request For Quotation records
Related Preferences/Settings
This Preference does not directly rely on or impact any other Preference/Setting

How To Use the Enterprise E2 Shop System
R. 1.0 Page 152 of 295
Initial Setting
The default value for this Preference is initially set to 7
Functional Notes/Points of Consideration
The system uses this value to calculate the default Followup Date of any new Customer Request For Quotation
Date can be edited as desired
Expiration Days
Overview
Defines number of days until Customer Requests For Quotation expire
Source Record(s)
This Preference does not rely on/pull from any other record
Destination Record(s)
This Preference is used on/impacts the function of the following record(s). (An asterisk [*] indicates this Preference
impacts a required field on the Destination Record):
Customer Request For Quotation records
Related Preferences/Settings
This Preference does not directly rely on or impact any other Preference/Setting
Initial Setting
The default value for this Preference is initially set to 30
Functional Notes/Points of Consideration
The system uses this value to calculate the default Expiration Date of any new Customer Request For Quotation
Date can be edited as desired
Vendor Request For Quotation
Date Required
Overview
Defines date Vendor Request For Quotation is required
Source Record(s)
This Preference does not rely on/pull from any other record
Destination Record(s)
This Preference is used on/impacts the function of the following record(s). (An asterisk [*] indicates this Preference
impacts a required field on the Destination Record):
Vendor Request For Quotation records
Related Preferences/Settings
This Preference does not directly rely on or impact any other Preference/Setting
Initial Setting
The default value for this Preference is initially set to 7

How To Use the Enterprise E2 Shop System
R. 1.0 Page 153 of 295
Functional Notes/Points of Consideration
The system uses this value to calculate the default Date Required of any new Vendor Request For Quotation
Date can be edited as desired
Expiration Days
Overview
Defines number of days until Vendor Requests For Quotation expire
Source Record(s)
This Preference does not rely on/pull from any other record
Destination Record(s)
This Preference is used on/impacts the function of the following record(s). (An asterisk [*] indicates this Preference
impacts a required field on the Destination Record):
Vendor Request For Quotation records
Related Preferences/Settings
This Preference does not directly rely on or impact any other Preference/Setting
Initial Setting
The default value for this Preference is initially set to 30
Functional Notes/Points of Consideration
The system uses this value to calculate the default Expiration Date of any new Vendor Request For Quotation
Date can be edited as desired

How To Use the Enterprise E2 Shop System
R. 1.0 Page 154 of 295
Report Customization
Location
System | Report Customization Maintenance
Overview
Allows User to add/manage Document Numbers on existing reports
Key Values/Points of Consideration (An asterisk [*] indicates a Required Field):
General Tab
*Report Name is system-generated and cannot be edited
Document Number represents the Footer value that will print on the lower left corner of the report
Can be alpha-numeric characters
Entering a Document Number creates a Custom Report used by the system
Not the same as Custom EXE Filename (below)
Revision Date represents the date of the most recent change to the report
Auto-populates with current day’s date
Can be edited
Additional Report Text
Allows for default text on Forms/Reports that have additional text option already present
Examples: Work Order
Quotation
Etc.
Custom EXE Filename represents the path to a customized version of the report
If present, system will look to the Custom file for generation as opposed to the “standard” report
Used for changes made to Crystal Report format beyond those available by simply adding a Document Number
(above)
General Notes
If a User clicks the Delete Button while in a Report Customization form, the report is not actually deleted from the
system
The standard report can still be printed
The report is no longer available to edit by way of default text or Document Numbering
As opposed to “Deleting,” simply re-edit the existing report to reflect the desired output

How To Use the Enterprise E2 Shop System
R. 1.0 Page 155 of 295
Scheduled Report Maintenance
Location
System | Scheduled Report Maintenance
Overview
Schedules (or Queues) reports to generate at designated times
Key Values/Points of Consideration (An asterisk [*] indicates a Required Field):
General Tab
*Scheduled Report Code can be up to 20 alpha-numeric characters
*Report Name is a list of available reports that can be scheduled to generate
List includes Reports and Summaries
Does not include Forms and Labels
*Filter Set represents the filters used when the report is generated
Default Filter Set assumes the report is run “wide open” using the default values present when the report is
“manually” generated
Default Filter Set is the only option available unless custom filters are added
Example: May create Custom Filter Set on Inventory Summary for specific Product Code only
*User Code defaults to the User setting up the Scheduled Report
Can be changed
*Deliver Report Via determines how the report will be delivered when generated
Delivery options include:
Printer (Default)
Email
Fax
Internal Message
An Additional Tab becomes available for configuration purposes for the following options:
Email
Fax
Internal Message
Print Report To is used when the report is delivered via Printer
Printers must be added with the User ID associated with the Server Name referenced on the screen
Description provides a means of detailing what the report represents
Note special filters, etc.
Schedule Tab
*Start Date represents the date from which the system will begin monitoring for scheduling purposes
Defaults to current date
*Start Time represents the time on the designated start date from which the system will begin monitoring for
scheduling purposes
Defaults to current time
End Date represents the date on which the system should stop generating the report
Defaults to 12/31/2049 (i.e. the “indefinite future”)

How To Use the Enterprise E2 Shop System
R. 1.0 Page 156 of 295
End Time represents the time on the designated end date at which the system should stop generating the report
Defaults to 11:59 PM
*Interval Size represents the frequency (in terms of Interval Units) which the report should be generated
Defaults to 1.0000
*Interval Unit represents the time frame in which the report should be generated (in relation to Interval Size)
Interval Units include
Second
Minute
Hour
Day (Default)
Week
Month
Year
Delete Scheduled Report After First Successful Occurrence
If marked, the system will stop generating the report after the first occurrence
If left blank, the system will continue generating the report at the defined Interval (Size/Unit) until the End Date
and Time is reached
General Notes
Scheduled Reports and Triggers utilize the Windows Service for generation
If the Service stops running, these records will not generate
Be mindful of the number of Scheduled Reports and Triggers created, as they will take up network resources

How To Use the Enterprise E2 Shop System
R. 1.0 Page 157 of 295
Using The System
Record Management
This section of the User Guide will focus on how existing information can be found and reviewed within the system.
Considerations include:
Record searches
Running reports
Record Searches
Provide the ability to locate existing records for Editing and/or Viewing purposes
Two areas of consideration
Navigator Searches
Grid Searches
Navigator Search Options
Navigator Searches determine which records display in the Record Search Grid of the selected area
Search By Options
Standard Options available for each Data Entry area of the system
Provides Primary Search/Filter criteria
Options will vary depending on the Data Entry Area, but each one will provide at least the following:
ALL: Wide open Search – returns all records of the selected area that meet the Additional Filter criteria
selected (if any; see below)
Key Index Value of selected record type; Examples include:
Order Navigator – Order Number
Quotation Navigator – Quotation Number
Customer Navigator – Customer Code
Etc.
Other common options found on many Searches include
Part Number
Part Description
Customer/Vendor Code
Notes
User-Defined Fields appear as an option when they are made available in User-Defined Maintenance
Additional Filter Criteria
Applied against Primary Search By Option
Will vary throughout system based on Data Entry Area, but typical options include
Status Filter
Open/Closed
Active/Inactive
Etc.

How To Use the Enterprise E2 Shop System
R. 1.0 Page 158 of 295
Date Filter
As applicable to record type
Are optional
Additional Filters can be applied (checked) or dis-regarded (not checked) when records are searched
Stack with one another
If multiple Additional Filters are applied, they are treated as “AND” qualifiers
The Default Search Option is to display ALL Open/Active records when the Area Navigator is selected.
Recently Used
“Shortcut” option that returns the last ten records opened (Viewed or Edited)
Does not matter how long ago records were accessed
Additional Filter Criteria will impact results if applied
User-Defined Searches
Create customized searches if desired filters are not present
In Navigator View
Right click in Navigator Search Pane
Select “Add a new User-Defined search to this list”
New Search Wizard launches
Enter a Query Code (used to identify the Search)
Select a Field to Search By (Field Name drop-down)
Lists available Fields associated with Data Entry Area
Select a Criteria
Equal To
Not Equal To
Less Than
Etc.
Determine whether the Filter will Prompt for input or be a fixed value
Prompt = False: System will return results based on fixed value(s) provided in Query
Values available in drop-down box if present
Search automatically returns records that match specified value(s) only
Prompt = True: User will see dialog box and have the ability to select Value(s)
Would not enter default Value in Wizard
Allow User to select desired Value(s) from drop-down box
Make sure the Criteria is Applied
Custom Searches can have multiple Criteria applied
Select Operator if multiple Criteria used
And: Both/all Criteria must be met to return results
Or: Either/any Criteria can be met to return results
In Contextual Ribbon View
Click Search Maintenance
Click New Search
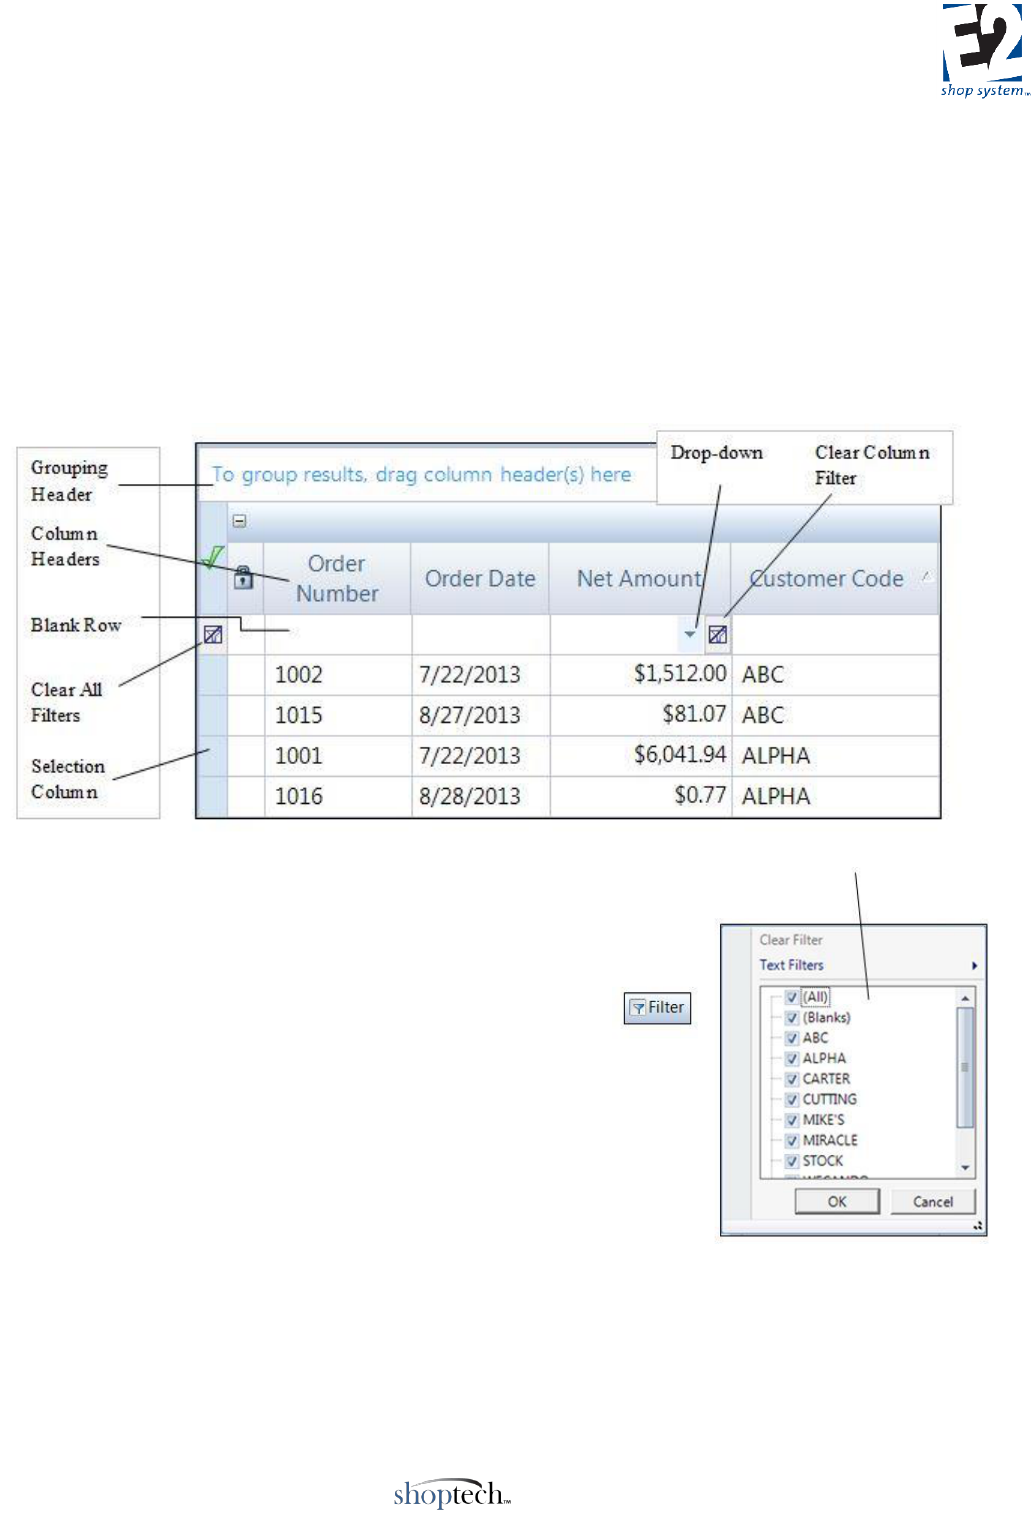
How To Use the Enterprise E2 Shop System
R. 1.0 Page 159 of 295
New Search Wizard launches
Follow steps outlined above for remainder
Once created User-Defined Searches can be
Edited
Copied
Deleted
To remove all User-Defined Searches from Data Entry Area at one time use Delete All Searches option
Customized Searches are User specific
Grid Search Options
Once the Record Search Grid has been populated, Grid Search Tools can narrow the list further
Filter Tool
Applied to Grid Columns
Enable/Disable by clicking Filter Button
When enabled, Blank Row provided at top of Grid
Click in Blank field at top of desired Column to access options
Drop-down: Value List
Displays record values listed in Column
Each value listed one time
o Example: In Customer Code Column,
Customer Code of ABC listed only once even if
multiple records present
Selected (checked) records displayed in Column
All values returned by Navigator Search
selected/displayed by Default
Clearing the check from a record value removes it from the list
Click again to re-select
Grid reflects change once User clicks OK in Filter Dialog Box
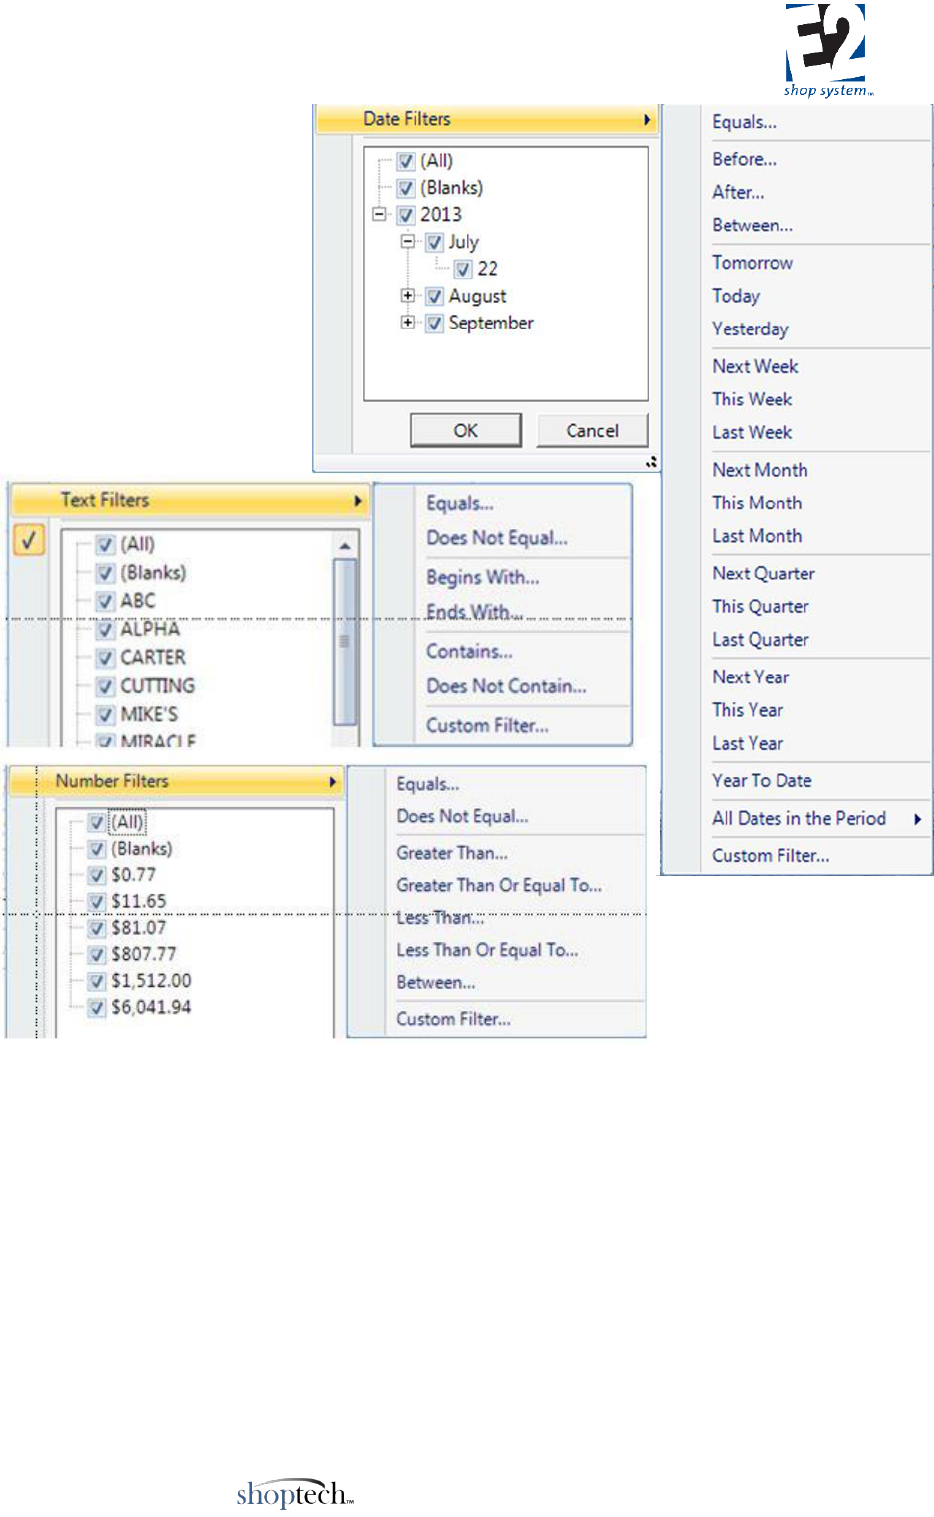
How To Use the Enterprise E2 Shop System
R. 1.0 Page 160 of 295
Drop-down: Data Type Filters
Additional Filters available in each
Column depending on the record data
type
Located above Value List
Options include
Date
Text
Number
Each Data Type includes a Custom Filter
option
Auto Type Filter
Begin typing in blank field
Value List reduces based on “Begins With” Filter assumption
Multiple Column Filters can be applied at the same time
Grid Filters are not removed by the Restore feature
Remain in effect until cleared
To clear Filters
Click Clear Column Filter button to remove Filter in specific Column
Other Filters remain in effect
Click Clear All Filters button (far left of Grid) to remove all Filters at once
Column Sort Options
Grid can be sorted based on selected Column contents
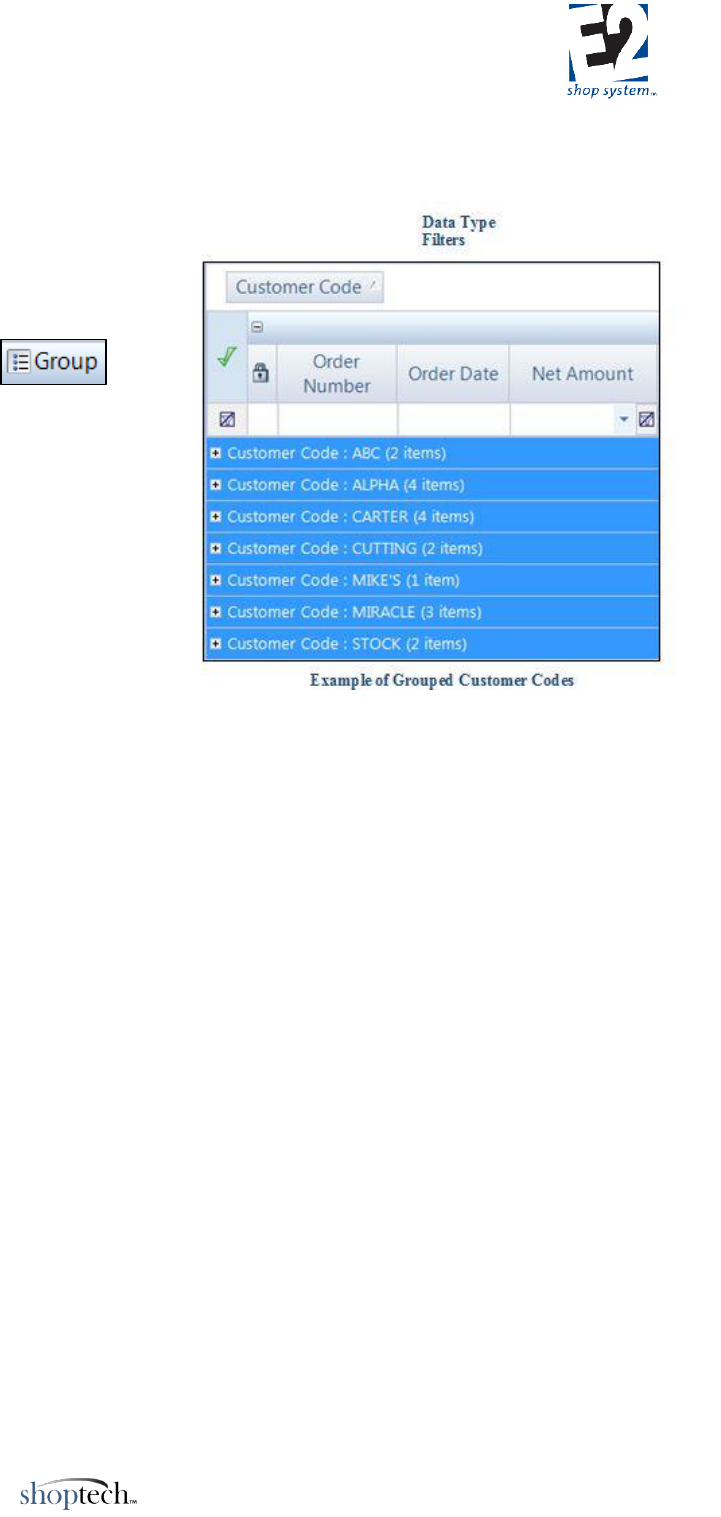
How To Use the Enterprise E2 Shop System
R. 1.0 Page 161 of 295
Right click in desired Column Header
Hover over Sort column to access sort options
Select desired sort order
Sort ascending
Sort descending
Entire Grid sorted based on Column Sort
Sorting another Column replaces existing Sort order
Group Tool
Enable/disable by clicking Group
Button
Creates expandable tree view in Grid
Top of tree view determined by selected Column
Left click desired Column and drag to Grouping Header
Records in Grid display in tree view based on Column
selected
Click to expand details under each Group
Can Group multiple Columns
Creates Sub-Group
Groupings are not removed by the Restore feature
To undo Grouping drag the Column(s) back to the Grid
Selecting Records
Once filtered and sorted, select one or more records to Edit or View
Select Single Record
Click anywhere on record row
Use Action buttons available in Navigator Pane or Contextual Ribbon
Right clicking on selected record provides Line Item Grid Options
Double clicking record (using left mouse button) opens it for Editing
Select Multiple Records
To select specific records that are not next to each other
Select first record as normal
Hold the CTRL (Control) Key
Left click in the Selection Column next to each desired record
The selected rows will display in a different color to indicate their inclusion
Complete the desired action by clicking the appropriate Action Button
To select multiple records that are next to each other
Select first record as normal
Hold the Shift Key
Left click in the Selection Column beside the last record desired
All the rows “between the clicks” will display as selected
Complete the desired action by clicking the appropriate Action Button
How To Use the Enterprise E2 Shop System
R. 1.0 Page 162 of 295
To select ALL the records in the Grid
Click the “Select All” Button (green checkmark icon)
Located at the top of the Selection Column
Can de-select specific records following steps noted above
To select multiple records, the User MUST click in the colored Selection Column next to the desired records.
Simply clicking in the record row will not be sufficient and will de-select previously selected records.
Working with Multiple Records
Once selected, the User can work with multiple records in one session
Open the records using the desired Action Button
View
Edit
Use the “VCR Buttons” located at the top of the record Form to
navigate between the selected records
Must Save the current record if changes are made before moving to a different one to keep the new
information
Grid Search Options are available within specific record Grids as well, not just Record Search Grids. The
functionality detailed here will work at whatever level the Grid appears.

How To Use the Enterprise E2 Shop System
R. 1.0 Page 163 of 295
Running Summary Reports
Ability to look at consolidated information for multiple records at one time as opposed to having to view individual
records
Available throughout entire System, but some of the more common Summary Reports include:
Job Schedule
Margin Summary
Work In Process Summary
Job Cost Summary
Inventory Summary
A/R / A/P Aging Summary
Navigator Panes
Located under Summary Reports Tab
Contextual Ribbon
Located under Summary Reports drop-down
Available Filters
Filter options will vary, but the functionality is the same throughout the System
Standard Filter Set provided for each report
Listed in Filter Grid
To activate a Filter for the report it must be marked to Apply
Filter is Applied by either of the following means:
Select/Enter information in the Value 1 Field
Automatically marks the Filter as Applied
Manually mark the Filter as Applied
Would then select/enter Value information
Designate the desired Filter Criteria
Equal To
Not Equal To
Less Than
Greater Than
Less Than or Equal To
Greater Than or Equal To
Starts With
Ends With
Contains
Between
Does Not Start With
Does Not End With
Does Not Contain
Not Between
If the Criterion selected is Between or Not Between, both Value Fields will be available for use
Multiple Filters can be applied to the Report

How To Use the Enterprise E2 Shop System
R. 1.0 Page 164 of 295
Designate the appropriate Operator for additional Filters
And = Both Criteria must be met to be included in the results
Or = Either/Any of the criteria can be met to be included in the results
Existing Filters can be Copied
Click Copy Button next to the Filter to duplicate
Allows Application of same Filter
Apply Operators to Copied Filters as appropriate
User-Defined Fields associated with the Data Entry area will be automatically available as a Standard Filter
Filter settings will remain in effect until reset by the User
Report Options
As with Filters, Report Options will vary throughout the System
Basic Options
Destination: Included on each Report
Determines output option of Report
Email: Report will be emailed to designated recipient(s)
o Email settings must be configured in User Maintenance
Fax: Report will be faxed to designated number
o Fax Server must be accessible and configured
File: Report will be saved to designated file format
o Specified program/format must be available on PC
Printer: Report will be sent to designated printer
o Printers must be available to PC via Windows configuration or connected locally
May also have option for Number of Copies (Applicable only when Printer is Destination)
Screen: Report will be displayed on screen as a Crystal Report
Show In Native Currency: Included on Reports that display dollar values
Useful when multiple Currencies are used
Detail Summary
Show Detail: Included on each Report
Disabling option reduces the amount of information displayed on Report
Other options may be available based on the Report
Breakdown Reports
Present on many Summary Reports throughout System
Based on same information, but they provide additional views based on significant Field Values
Examples:
G/L Account Breakdown
Salesperson breakdown
Part number Breakdown
Work Code Breakdown
Product Code Breakdown
Options will vary throughout the System
Output as PDFs (Destination = File or Email)

How To Use the Enterprise E2 Shop System
R. 1.0 Page 165 of 295
Display as multiple tabs across the top of the Report Form (Destination = Screen)
Can Print single Report or Print All Reports from Screen
Can Close single Report or Close All Reports from Screen
Filter Sets
Filter Sets represent the Primary Reports available to generate in the selected Data Entry Area
Each Area has a default Summary Report Filter Set
Provides list of default Available Filters
Customized Filter Sets can be created if desired Filters are not present
In Navigator View
Right click in Filter Sets window
Select “Create a new User-Defined filter set”
Could choose to Copy existing Filter Set, including the default
New Report Filter Wizard launches
Enter a Query Code (used to identify the Report)
Select a Field to Filter By (Field Name drop-down)
Lists available Fields associated with Data Entry Area
If Copying existing Filter Set, Fields will already be populated
o Edit values accordingly
Select a Criteria
Equal To
Not Equal To
Less Than
Etc.
Custom Filter Sets can have multiple Criteria applied
Select Operator if multiple Criteria used
o And: Both/All Criteria must be met to return results
o Or: Either/Any Criteria can be met to return results
In Contextual Ribbon View
Click Summary Reports to open desired Report
Makes Contextual Ribbon for selected Report available
Click New Filter Set
New Report Filter Wizard launches
Follow steps outlined above for remainder
New Filter Sets will display along with default Summary Report Filter Set
When selected, customized Filter Sets will display specified Filters in the Available Filters Grid
Functions same as standard Report from this point
User-Defined Filter Sets utilize the same format and additional options as the default Filter Set when Generated
Once created User-Defined Filter Sets can be
Edited
Copied
Deleted

How To Use the Enterprise E2 Shop System
R. 1.0 Page 166 of 295
To remove all User-Defined Searches from Data Entry Area at one time, use Clear All Filter Sets option
Customized Filter Sets are User-specific
Schedule Report
Reports can be scheduled to generate at specific times
Click the Schedule Report Button
Add New Scheduled Report form opens
Scheduled Reports utilize the same functionality as Triggers (See Tables Section of this Manual)
General Tab (An asterisk [*] indicates a Required Field)
*Scheduled Report Code can be up to 20 alpha-numeric characters
Identifies the nature of the Report Trigger
*Report Name represents the base report the Trigger is being scheduled for
The Summary Report of the Area currently opened displays by default
Can be changed
*Filter Set represents the Filter Set to use when generating the Report
Must select Default Filter Set even if no additional Sets have been created
If additional Sets have been created, select the appropriate one for the Scheduled Report to use
*User Code provides the security access for the Report
*Deliver Report Via determines the output type/Destination of the Scheduled Report
Email
Email information must be configured in User Maintenance
Additional Email Tab becomes available when this Delivery Method selected
Fax
Fax server must be connected to PC scheduling the report
Additional Fax Tab becomes available when this Delivery Method selected
Internal Message
Additional Internal Message Tab becomes available when this Delivery Method selected
Printer
Must have at least one printer associated with the PC scheduling the report
Print Report To represents the printer the report will be printed on when the Delivery Method is set to Printer
Schedule Tab (An asterisk [*] indicates a Required Field)
*Start Date: Starting point (day) the Report Trigger will use to determine the first occurrence of generating the
Report
Defaults to the current day’s date
Can be edited
*Start Time: Starting point (time of day) the Report Trigger will use to determine the first occurrence of generating
the Report
End Date: Date the Trigger will stop generating the Report, if it is continuous
Defaults to a date in the future
Can be edited
End Time represents the time of day the Trigger will stop generating the Report, if it is continuous
Defaults to 11:59 PM

How To Use the Enterprise E2 Shop System
R. 1.0 Page 167 of 295
Can be edited
*Interval Size: Value that represents how long the Trigger will take between generating the Report (in terms of
Interval Unit)
The default Size is 1.0000 but can be edited
*Interval Unit determines how long the Trigger will take between generating the Report in relation to Interval Size
Options for Interval Unit are
SECOND
MINUTE
HOUR
DAY
WEEK
MONTH
YEAR
The default Unit is DAY but can be changed
Mark the option to Delete Scheduled Report After First Successful Occurrence if the Report should only be
generated one time
Only Reports that are run without date Filters should be continuously generated
If date filters are applied, they do not roll forward
Report would continue generating information based on same date range each time
Documents Tab
Additional documents can be attached to generate along with report at scheduled time, if desired
Forms and Labels
Specifically formatted reports associated with the selected Data Entry Area
Forms And Labels will vary throughout the System
Common Examples include:
Job Traveler (Order Entry)
Job Label (Order Entry)
Purchase Order (Purchase Orders)
Packing List (Shipments)
Customer Invoice (Customer Billing)
Checks (Cash Disbursements)
Not every Area will have Forms And Labels
No Available Filters/Filter Sets
Forms And Labels are printed for selected Data Records
Available records display in Print Spool for selected Form/Label
Report Options
Basic Options
Number of Copies: Used when Destination is Printer
Destination: Output option for Form/Label
Email
Fax

How To Use the Enterprise E2 Shop System
R. 1.0 Page 168 of 295
File
Printer
Screen
Breakdown Reports
Some Forms/Labels will have additional Breakdown Formats available

How To Use the Enterprise E2 Shop System
R. 1.0 Page 169 of 295
Creating New Records – Overview
The rest of this manual deals with creating records and using them in conjunction with each other to track information
significant to your business.
There are two primary ways records can be created/placed into the System:
Conversion
Many Table Records are entered into E2 during data conversion from a Legacy System
Common examples of converted records include:
Parts
Customers
Vendors
Employees
Transactional records such as Orders, Purchase Orders, Invoices, etc. are not converted
Table items that convert will vary, based on the originating system
This process is reviewed and dealt with during the initial implementation of the E2 Shop System
Create as New Record in E2
Majority of records created directly in the System
Will be focus of this section
Record Creation Options
New Records can be created in one of the following ways, depending on the area of the software:
From a Template
Available in most areas of the System
Contain pre-populated values as a means of speeding Record Creation up and reducing potential errors
Additional information is provided manually or through the selection of a Source Record
Source Records are often used as a means of passing information through the System as work is performed.
Classic examples of this record relationship are included in the following scenarios:
Customer Quote Order Packing List A/R Invoice
Vendor Vendor RFQ Purchase Order Receiver A/P Invoice
Option to Create Record Form Template will be available only if one or more Templates have been configured
for the Record Type
Templates are covered in the Implementation Guide
From an Existing Record
Most records in E2 can be created from an existing record of the same type
Typically listed as a Source Record option in the Record Creation Wizard
Creates a duplicate of the other record that can be edited and given a new identifying Record Number
Journal Entries are an exception to this practice
System allows for Line Item(s) to be copied from another Journal Entry
From an Automatic Creation Utility

How To Use the Enterprise E2 Shop System
R. 1.0 Page 170 of 295
The following areas of the System provide utilities that allow for the creation of multiple records at one time,
using criterion designated in the utility:
A/R Invoices (Customer Billing)
A/P Check Writing (Cash Disbursements)
From Scratch
Key information is provided on the Record manually or through the selection of a Source Record
Given the reliance on Source Records to provide details to subsequent records, it is extremely important to
set Table Items up as completely and accurately as possible.
Once created, most Records can be accessed in two ways (depending on Security Settings):
Edit
Information on the Record can be changed (if Edit is allowed)
Specific Fields may be restricted
The Record is Locked while open for Editing
Other Users cannot access the Record for Editing while Locked
Can impact ability to Edit associated Records as well
Record can be Viewed by other Users while being Edited
View
Information is Read Only
Ability to see specific Fields can be restricted
The Record is not Locked when being Viewed
No restriction on the number of Users that can View a record at the same time
Note Regarding the Order of Records Covered
The remainder of this section details how specific records can be created or used within E2. We will begin with a review
of Global Features found throughout the software. Next, we will cover each Data Entry Area in the order in which they
are encountered within the Ribbon Menu.
Global Features (Common functionality found on Records throughout the System)
Quoting
Orders
Purchasing
Inventory
Shop Floor Control
A/R
A/P
G/L
Contact Management
Due to the nature of the transactions and the fact it is offered as a separate Module, Quality will be covered in its own
documentation.
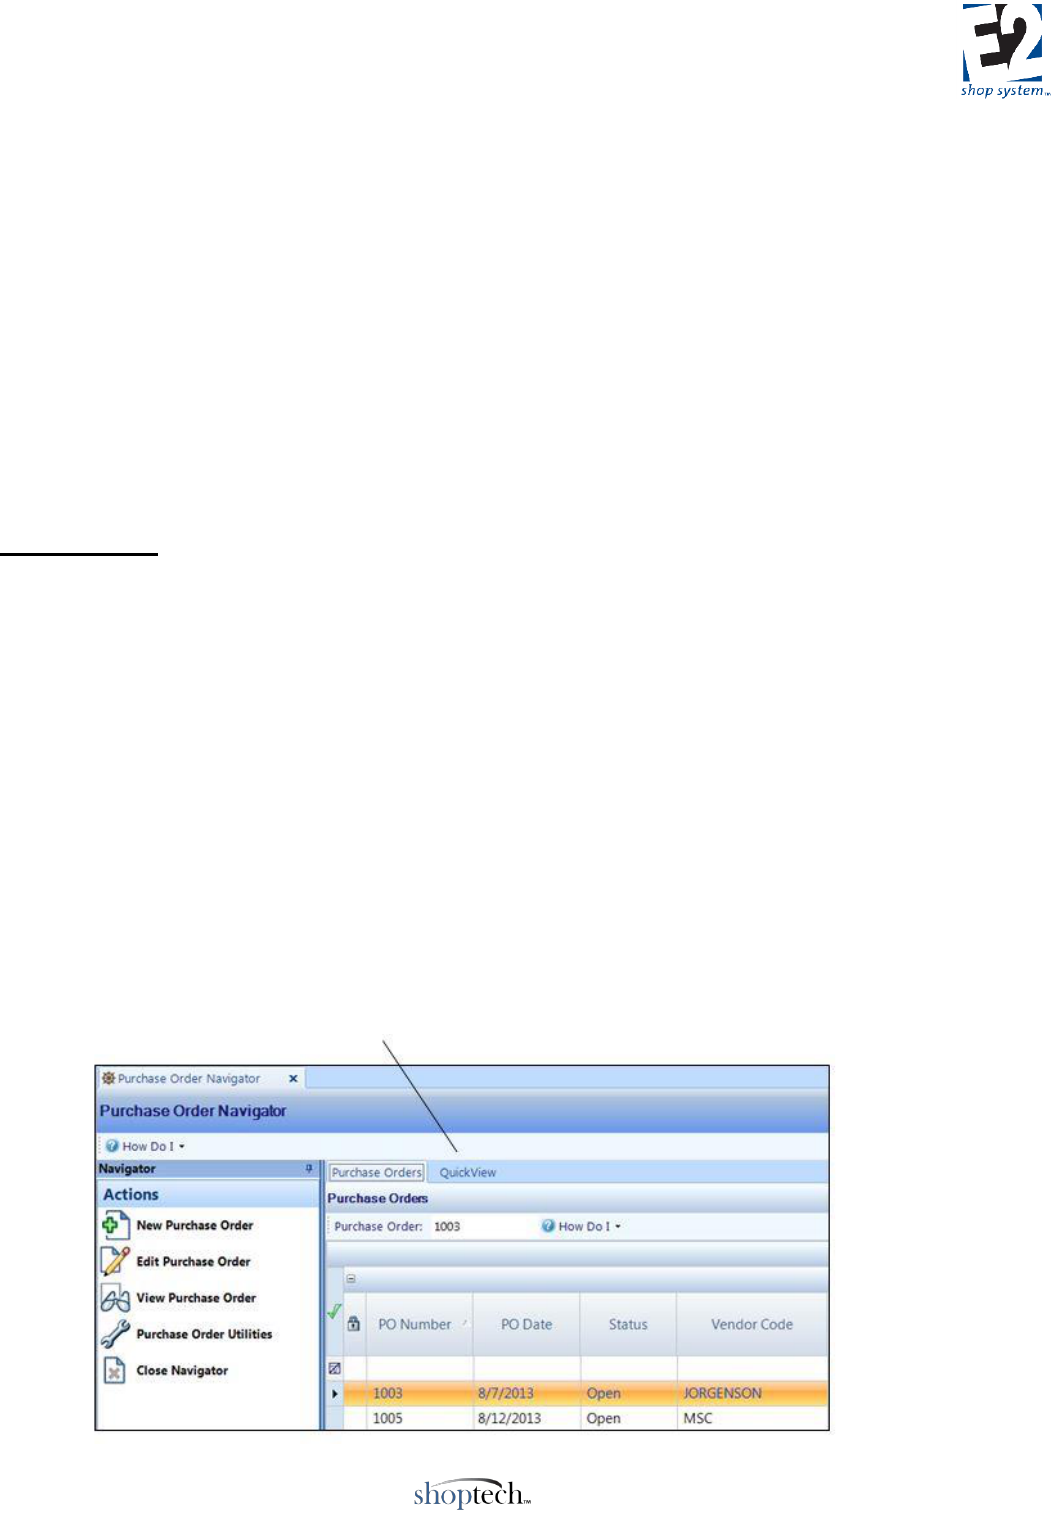
How To Use the Enterprise E2 Shop System
R. 1.0 Page 171 of 295
Global Features
Before reviewing specific records, this section covers features found throughout much of the software that serve the
same general purpose/function regardless where they are located. (The details they deal with will vary, but the
functionality found in each item behaves in the same manner.)
The topics that fall under the Global Features list include:
QuickView
Common Header/Line Item Objects
Tasks
Documents
User-Defined
Audit Trail
QuickView
Of all the Global Features, QuickView is the one that will have the most variation, but its overall function remains
consistent wherever it is found: to provide Read Only access to pre-defined key values.
Overview
Available at different levels within a specific Data Entry Area
Navigator Level
Record (Form Level)
In addition, there are two independent applications that can provide similar functionality:
E2SS View Application
E2SS Executive Overview
Navigator Level
Displays information-related to selected records
Select desired records in same fashion as you would prior to Editing or Viewing
Information displays in QuickView Tab
Located next to Record Search Grid Tab

How To Use the Enterprise E2 Shop System
R. 1.0 Page 172 of 295
Click QuickView Tab (after selecting Records)
Overview Sub-tab displays by default
Provides summarized information pertinent to Data Entry Area for selected record(s)
If multiple records selected, some information may be left blank
Some values not applicable for multiple records
Overview information is available in all Data Entry Areas where QuickView is present
Summarized data will vary depending on Area
Additional information, related to selected records, available for review as well
Accessing additional information depends on Ribbon Access Method
Navigator Panes
Click the QuickView Tab in the Navigator Pane for the Data Entry Area
All options associated with the Area are displayed
The example to the right shows the Purchase Order QuickView
options
Beyond Overview, additional options will vary throughout the software
Click the desired option in the QuickView Pane to see results
Related information displayed in a new Tab alongside the Overview Tab
Example below shows PO/Receivers Sub-tab:
A new Tab will be added for each option selected
Show All - loads all available options at one time
May take a while to load information, depending on the number of
options and the amount of records selected
Hide All - removes any additional Tabs present
Overview Tab remains visible
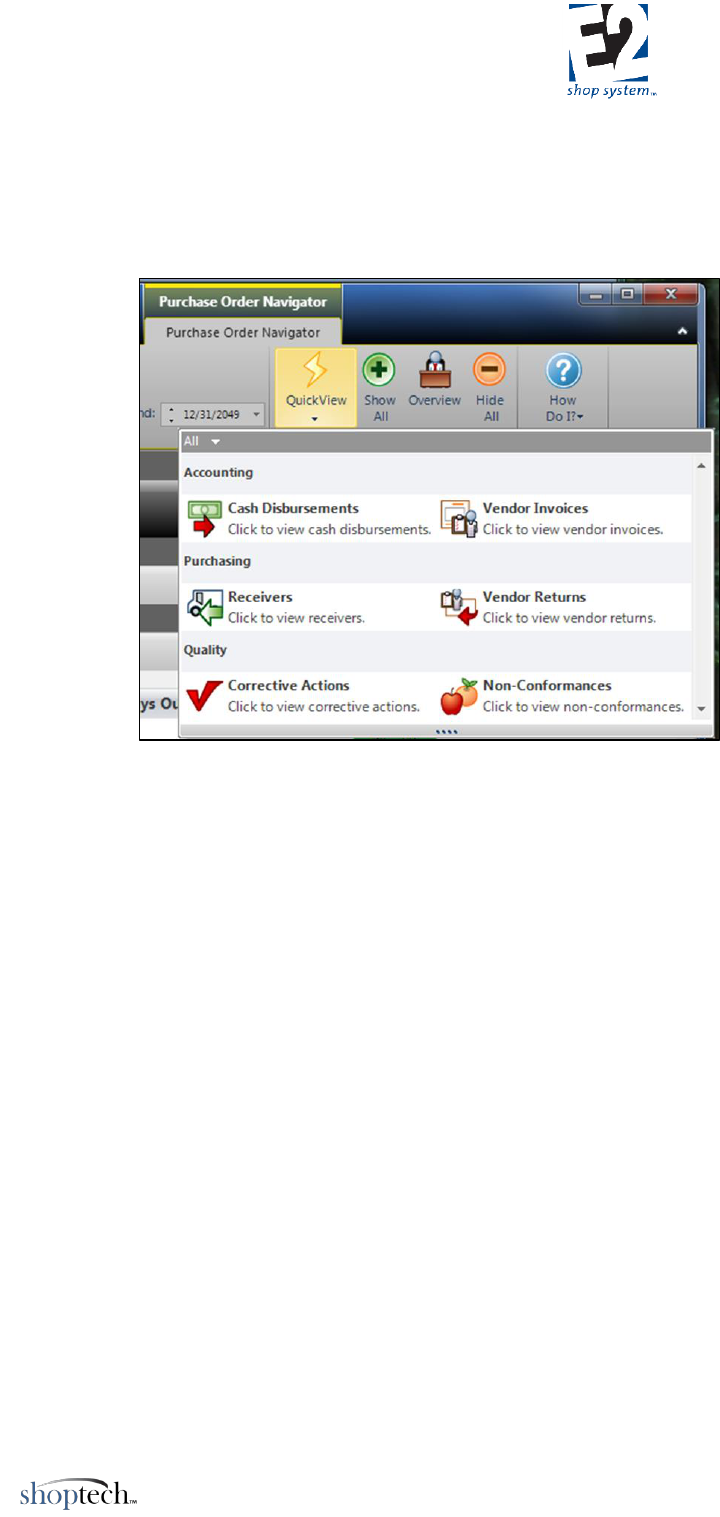
How To Use the Enterprise E2 Shop System
R. 1.0 Page 173 of 295
The Lightning Bolt icons provide a “Quick Jump” to the selected record. Access is Read Only. This feature is
found throughout the System, not just in QuickView. Same functionality provided by Hyperlinks found in
Overview Tabs.
Contextual Ribbons
The Contextual Ribbon displays a QuickView section
Options present include:
Overview
Clicking will open QuickView Tab with
Overview option
Show All
Opens QuickView Tab and loads all available
options
Hide All
Removes from view with other Tabs present.
QuickView remains visible
QuickView Drop-down
Displays additional options for selected Area
Click the desired option in the QuickView
Drop-down list to see results
Related information displayed in a new Tab alongside the Overview Tab
A new Tab will be added for each option selected
Where Used
As indicated, the options available in the Navigators throughout the System will vary depending on where you are
looking, but the Where Used feature is worth particular notice.
Located in Parts Navigator QuickView Tab
Provides a list of all Records where the Part is present on a Bill Of Material
Can be a Purchased Part or Manufactured Part/Sub-assembly
Record Types that could be displayed includes:
Manufactured Part
Job
Quote
Customer Request For Quote
Very useful for determining what Records may need to be edited when Parts are updated
Record (Form) Level
Displays Overview Information for selected Record(s) when Edited or Viewed
Displayed one record at a time, using VCR Buttons if multiple Records selected
Associated records not displayed at Record Level
E2SS View Application
Log in same way as Office Application
How To Use the Enterprise E2 Shop System
R. 1.0 Page 174 of 295
Opens software in View Only mode
System will look the same as in the Office Application, but records cannot be edited
Ability to see records depends on User’s Security Settings
E2SS Executive Overview
Log in same way as Office Application
Provides preset, View Only, “truncated” view of System
Management Dashboard - Overview: Key management values summarized
Accounts Receivable
Accounts Payable
Bank Codes (Cash balances)
Management Dashboard – Data Collection: Time and Attendance-related information
Job Details (Jobs currently logged into)
Job Summary (Jobs currently logged into)
Attendance Details (Employees currently logged in)
Transactions (Current Day)
By Employee
Time Ticket Details
Attendance Details
In addition to the Dashboard options, the following records can also be Viewed:
Bank Codes
Customers
Vendors
Parts
Scheduling
Audit Trail Summary
In all options listed, a User cannot View any record they would not normally have Security Access to see in
the Office Application.
Common Header / Line Item Objects
Overview
Located as a Sub-tab under the Header Tab of many records
Allows Record Details of multiple Line Items to be updated at one time
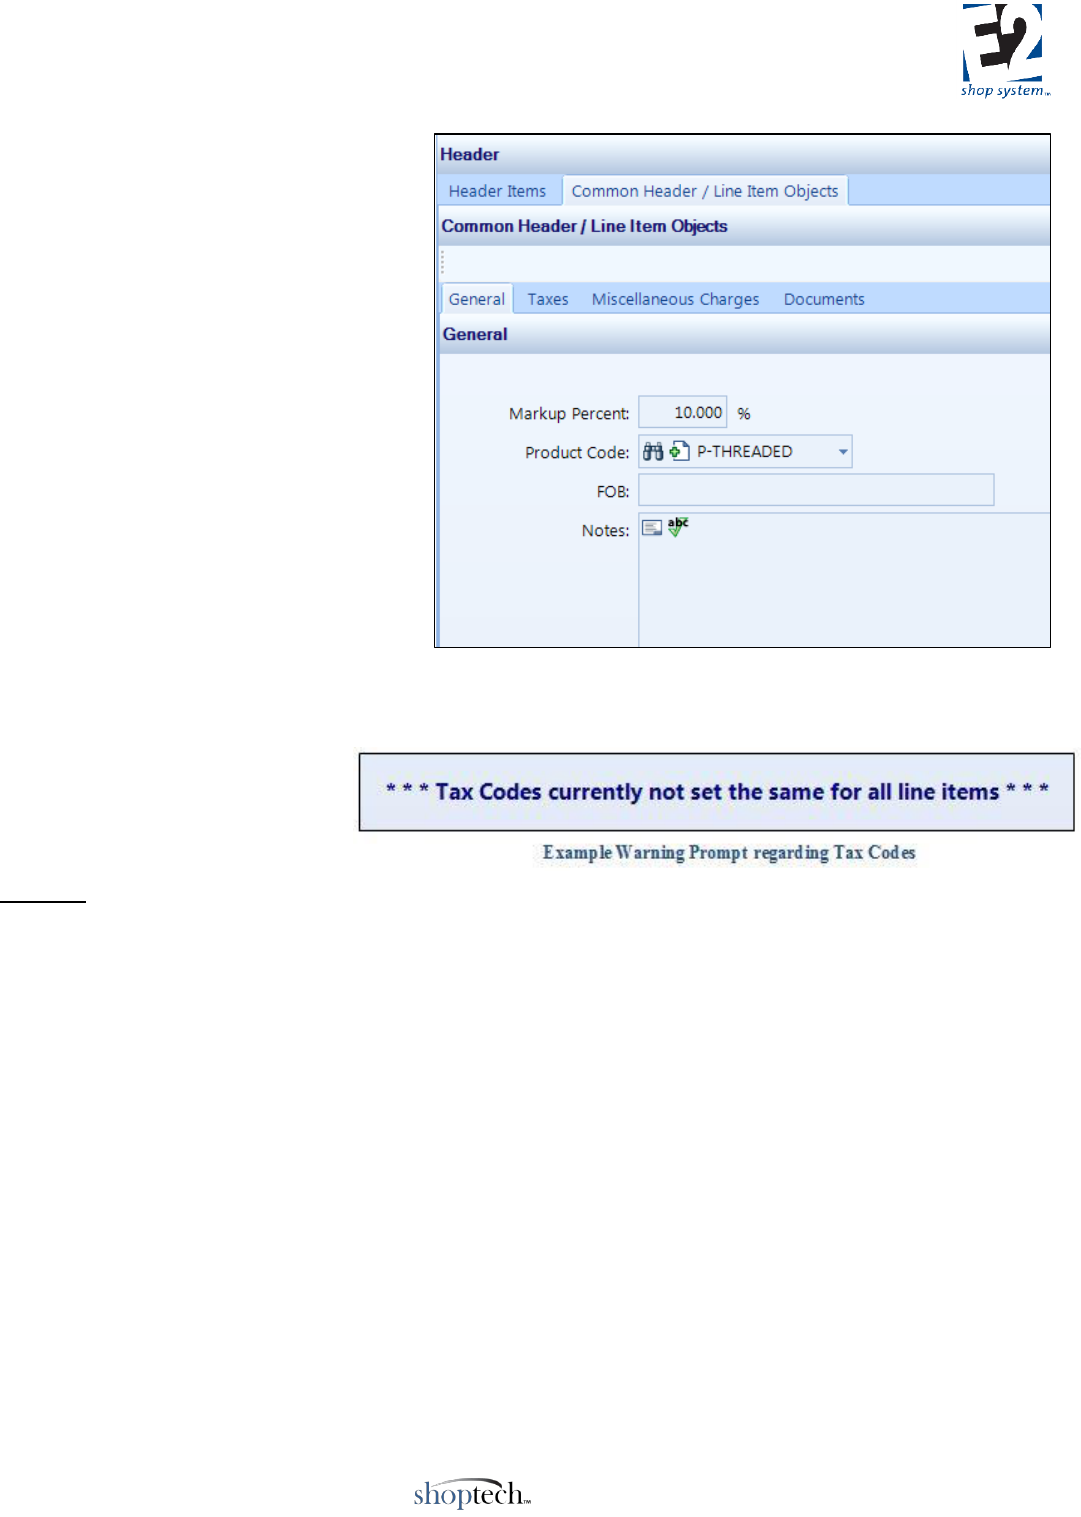
How To Use the Enterprise E2 Shop System
R. 1.0 Page 175 of 295
Key Values/Points of Consideration (An asterisk [*] indicates a Required Field)
Detail level Sub-tabs are listed based on
the Data Entry Area being Edited
The example to the right displays the
options available on a Purchase Order
Any Field listed for the selected Detail Tab
can be edited and the change “pushed” to
all Line Items present on the Record
Edit the desired Field(s)
Click the Update Button
System provides verification prompt
If confirmed, existing values will be
overwritten and replaced with new
ones
Revision takes place on ALL Grid
Records present at the time the utility
is used
Only the Detail Tab currently opened will
be updated
If multiple Detail Tabs need updating, each one must be edited and Updated individually
If different values present on a
Detail Tab are detected, the
System provides a warning
prompt
Tasks
Overview
Located as a Primary Tab on many records
Track Contact Management Tasks associated with the Record
Provides direct access to Contact Management
Key Values/Points of Consideration (An asterisk [*] indicates a Required Field)
*Task Type: Indicates the nature of the Task to associate with the Record
Will default to different values depending on the Record Area
Regardless the Area or the default value, Task Type can be changed to any of the following:
Appointment
Call
Email
Event
Note
Maintenance (Work Center/Tooling)
Training (Employee Training)
Review (Document Review)

How To Use the Enterprise E2 Shop System
R. 1.0 Page 176 of 295
Task Type impacts the Details provided in Contact Management
Can be changed in Contact Management as appropriate
*Contact Name: Contact associated with the Task
When dealing with Customer or Vendor-related records, a drop-down will be available
When dealing with Work Center and Employee-related records, the information must be entered manually
Contact Name must be populated in order to create a Task
Date: Displays the Date the Task was created
User Code: Indicates which User created the Task
Description: Provides details about the Task
Information entered in Contact Management details
Pulls from Notes Tab of Contact Management Task
To provide details for the Task, click the Create Task Icon located immediately to the left of Contact Name
Opens Contact Management
Task actually created in Contact Management
Task entry on record acts as “doorway” and provides Record Detail information for Task
Can also open Contact Management and create Task from there
Task can be edited from Record or Contact Management
Record Task Grid will reflect changes in Description
Documents
Overview
Located as both a Primary Tab and Sub-tab on many records
Associates external files with Record
Can be viewed or printed with Record
Requires use of AutoVue
Key Values/Points of Consideration (An asterisk [*] indicates a Required Field)
Associating a Document with a Record can be accomplished in one of two ways.
Assign Document Number (Document Control)
Document Number: Represents Document defined in Quality | Document Control portion of the System
Select pre-defined Document from drop-down list
*Attachment Filename: Path to the associated file (including the file name itself)
Auto-populates, based on assigned Document
File should be stored in central location that can be accessed by all Users that will need to View or Print the
attachment
Description: Description of attached file
Auto-populates from the Document Number selected
Can be edited
Document Type: Indicates the nature/purpose of the attachment
Auto-populates from the Document Number selected
Can be edited
Document Type is a Base Table record
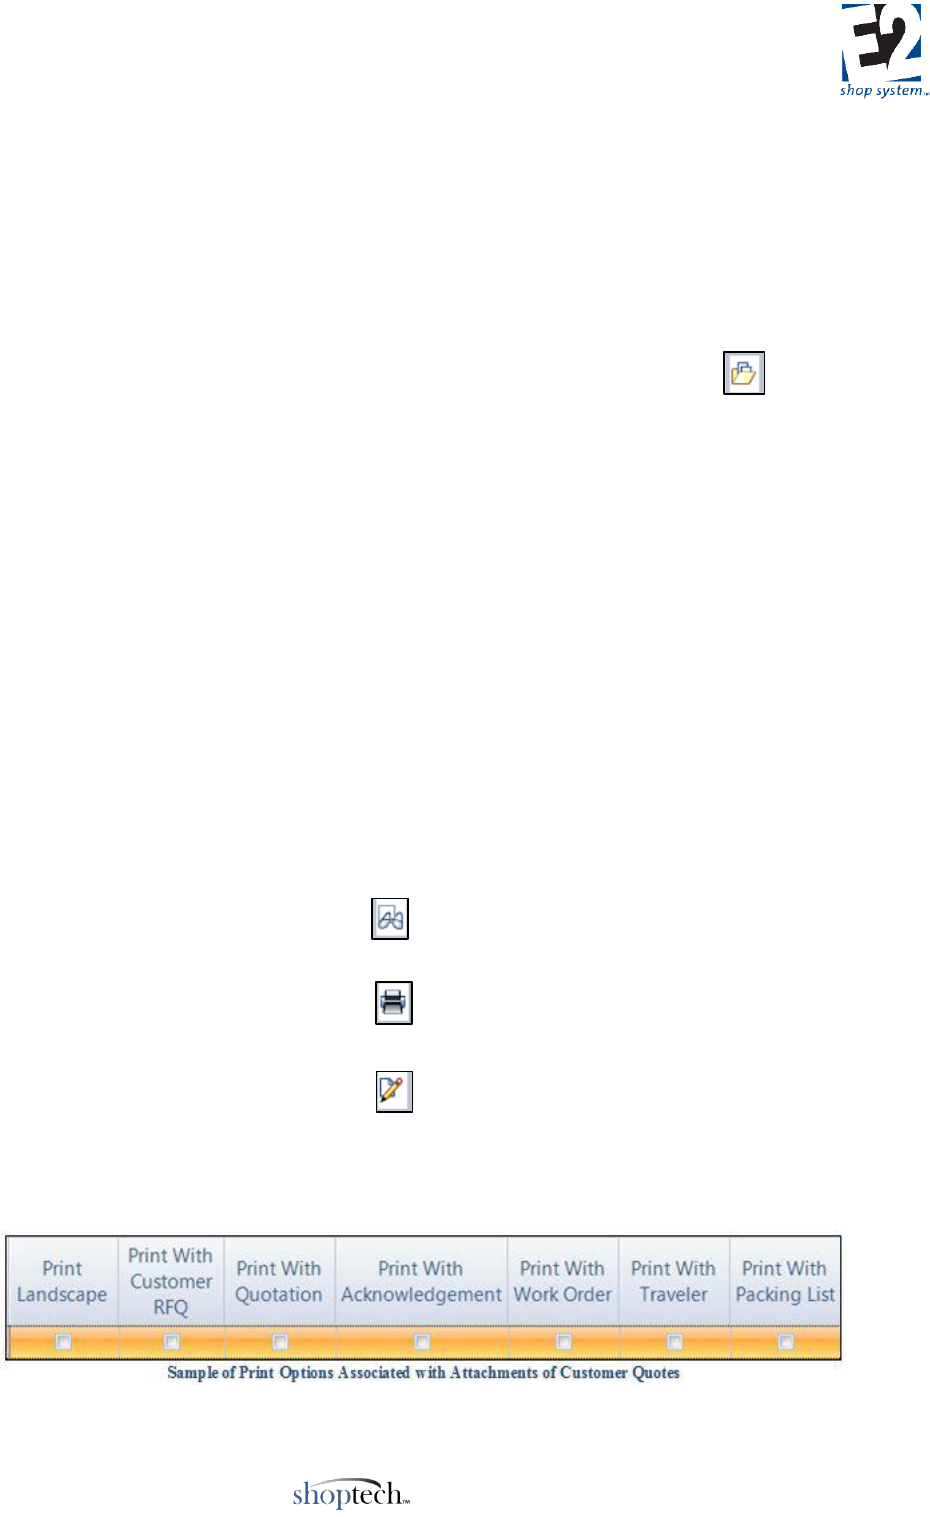
How To Use the Enterprise E2 Shop System
R. 1.0 Page 177 of 295
Customized list created by User
Attachment Revision Level: Revision Level of attached Document
Auto-populates from Document Number selected
Cannot be edited at this level
Attachment Revision Date: Date attached Document was revised
Auto-populates from Document Number selected
Cannot be edited at this level
Manually Select File
Click Browse Folder icon for the next available blank row in the Documents Grid
Select the appropriate file
Any file the User can access via network security can be associated with the Record
*Attachment Filename: Path to the associated file (including the file name itself)
Auto-populates, based on file selected
Could manually enter path, but not recommended
Description: Auto-populates with file type information (i.e., PDF, Word, etc.)
Can be edited manually
Document Type: Indicates the nature/purpose of the attachment
Blank by default
Can be selected manually
Document Number, Attachment Revision Level, and Attachment Revision Date will be blank
If Document Control is being enforced within Company Preferences, Users will be required to select a
defined Document Number; they will not have the ability to manually select undefined/unauthorized files.
Once a file is attached (regardless the method) the User has the following options:
View Attachment
Displays attached file using AutoVue
Requires access to AutoVue seat license
Print Attachment
Prints attached file using AutoVue
Requires access to AutoVue seat license
Edit Attachment
Opens attached file in its native program for editing
Requires access to program that can open file type of attachment
In certain areas of the software, the User will also have the option to designate whether the Attachment should
print with other related Records

How To Use the Enterprise E2 Shop System
R. 1.0 Page 178 of 295
When enabled, the System will automatically include the Attachment to print with the selected Record
Useful for having attached drawing files print with Job Travelers
Requires access to AutoVue seat license on system that generates the selected Record
User Defined Fields
Overview
Located as both a Primary Tab and Sub-tab on many records
Must be activated in User-Defined Maintenance
Provide ability to track customized information throughout System
Key Values/Points of Consideration (An asterisk [*] indicates a Required Field)
User-Defined Tabs will only be visible on Records that have at least one User-Defined Field enabled/marked visible
in User-Defined Maintenance (See Implementation Guide for additional information)
User-Defined Fields can be marked as Required Fields when configured
Would require a value to be entered before record could be saved, if marked as such
User-Defined values will “flow” through the System if marked to do so in Company Preferences
If Miscellaneous option to Treat User-Defined Fields As One is enabled, information will flow from one Record
to the next
Examples: From Vendor to Purchase Order; From Customer to Quote to Order; etc.
When enabled, this provides the ability to have User-Defined Tabs available at multiple levels in the same
Record
Example: On an Order
User-Defined Tab as a Primary Tab – Displays information about Customer
User-Defined Tab as a Detail Sub-tab – Displays information about Parts
o Would be available at each Line Item
Ability to see/edit User-Defined values on a Record can also be impacted by User Group Security Settings
Audit Trail
Overview
Located as a Primary Tab throughout the System
Provides details regarding actions taken on the selected Record
Key Values/Points of Consideration (An asterisk [*] indicates a Required Field)
Start Date: Date and Time the Action began
When the Record was accessed
End Date: Date and Time the Action was completed
When the Record was closed
Duration (seconds): System calculates how long the record was open, based on the previous values
User Code: Who performed the Action
User Action: What type of Action was taken
System-maintained list
When the User Action = EDIT, the Action Line Item can be expanded to display the following details:

How To Use the Enterprise E2 Shop System
R. 1.0 Page 179 of 295
Affected Record Details
Table Name: Indicates which Table was impacted by the Edit
May help identify Tab the Edit occurred on
Example: Order_Material (In Job Details of Order)
Identifying Field Name: Key Index Field of Record/Line Item
Example: Part_Number (Adding/Deleting/Modifying info on Order Material Tab)
Identifying Field Value: Value entered/present in Key Index Field of Record/Line Item
Example: 1018-2.75-B12 (Specific Part Number being Added/Deleted/Modified)
Field Name: Indicates associated Fields impacted by Edit
Blank, if Record is being Added or Deleted
Line Item created for each Field impacted by a Modification
Example: Edit Quantity Needed on Order Material record
o Other Fields listed:
Stocking Quantity
Purchasing Quantity
Line Total Purchasing Cost
Etc.
In many instances, Fields listed are result of System Calculations that result from User Edit
Changes Details
Old Value: Value that was present prior to the Edit
Blank, if Record was Added or Deleted
New Value: Value that was entered
Blank, if Record was Added or Deleted
Added (checkbox): Indicates the Edit was the result of the Record/Field being added
Deleted (checkbox): Indicates the Edit was the result of the Field being deleted
Modified (checkbox): Indicates the Edit was the result of changing an existing value
Audit Trail Details cannot be directly deleted by Users
If Record is deleted, the Audit Trail Summary will still provide information regarding the Record and all related
transactions
Audit Trail Summary located in System Tab of Ribbon Menu

How To Use the Enterprise E2 Shop System
R. 1.0 Page 180 of 295
Quoting
Overview
The Quoting Menu provides access to pre-sales-oriented records that can be used for full-blown estimating to nothing
more than a sales price based on your needs.
Records/Functionality
Quotations
Customer Request For Quotation
Reports
Quotation Summary
Customer RFQ Summary
Quotation Cross Reference
Quotations
Overview
Customer-specific Sales Quote
Can be used for Estimating purposes
Contains Manufacturing Details
Bill Of Materials
Routing
Outside Services
Miscellaneous Charges
Source Record(s)
This Record can use the following Sources to provide information during its creation:
Part Number (Table Item)
Customer RFQ
Quotation (Copy)
Destination Record(s)
This Record can be used as a Source to provide information on the following Records:
Customer Order
Quotation
Key Values/Points of Consideration (An asterisk [*] indicates a Required Field)
General Tab
*Quote Number: Up to 50 alpha-numeric characters
*Customer Code: Who the Quote is for
Customer Name auto-populates, based on the Customer Code selected
Customer Type auto-populates, based on the Customer Code selected
Terms Code: Terms offered to the Customer for the listed Item(s)

How To Use the Enterprise E2 Shop System
R. 1.0 Page 181 of 295
Auto-populates, based on information associated with Customer
Can be edited
*Quote Date: Date the Quote is valid from
Used to calculate Followup Date and Expires On date
Followup Date: Date the Customer should be contacted regarding the Quote
Can be used to create an entry in Contact Management if Create Followup checkbox is enabled
System-calculated/-populated, based on information provided in Company Preferences
Can be edited
Expires On: Date on which the Quote will no longer be valid
System-calculated/-populated, based on information provided in Company Preferences
Can be edited
Create Followup (checkbox): Creates an entry in Contact Management when enabled
Entry created for the User designated in Quoted By field
Quoted By is required if this option is enabled
Entry created first time Quote is Saved after the option is enabled
Quoted By: User ID of the Salesperson associated with the Quote
Blank by default
May not be the User that entered the Quote into the System
Becomes required if option to Create Followup is enabled
Inquiry Number: Up to 50 alpha-numeric characters
Provides ability to track Customer Inquiries
Followup Created (checkbox): Indicates if a Followup entry has been created in Contact Management regarding the
Quote
System maintained field
Quotation Line Item Grid
Status: Pending by default
Additional options include:
Won: System changes Status to Won when the Line Item is used to populate an Order
Pending: Default Status on all New Quotes
Lost: User manually changes Line Item to Lost if the Customer declines the Quote
Expired: System changes Status to Expired if no action has been taken by the Expires On date
No Quote: User manually changes Status to No Quote if you decide not to send the Quote
Delivery Notes: Special instructions to include for delivery purposes
Print in Header of Quote
Part Number: Can be selected from defined Table Items, or can be entered “on the fly,” for Estimating purposes
If the Part is a Table Item, all associated information automatically populates the Line Item Grid (including
Details)
Can be edited as needed
If the Part is Estimated directly on the Quote, Part-related information must be entered manually
In the Line Item Grid, additional key values to consider include:
Revision Level
Part Description

How To Use the Enterprise E2 Shop System
R. 1.0 Page 182 of 295
Product Code (Required Field if Customer Billing driven by Product Code)
o Work Code auto-populates when Customer Code selected
Inspection Settings, Use Time Tickets, and Incremental Job Costing options
o If Part is not defined, these must be designated on the Quote or subsequent Order
Line Item Details must also be entered, including:
Sales Information - Possible to enter Sales values without providing Costs
Manufacturing Information
Undefined Parts entered on Quotes will not be available in the Parts Table, meaning Available Quantities
and Dollar Valuations will not be present.
Quotation Line Item Details
Much of the information in the Quote Details mirrors the functionality available on defined Manufactured Parts (See
Tables – Manufactured Parts)
Click the Magnifying Glass Icon to access the Detail Information for a specific Line Item
Can use VCR Buttons to navigate between record details if more than one Line Item is present
Details - General Tab
Notes: Auto-populates from Part Notes
Will carry forward to Order as Job Notes
Salesmen: Can designate one or more Salesmen for sales tracking and commission calculation
Taxes: Can designate one or more Tax Codes, as appropriate
While not required at this point, it is recommended to associate an Exempt Tax Code if no Tax is required
Tax Code becomes required further along in the System
Details - Sales Tab
Calculation Method determines how E2 will calculate the suggested sales price (Unit Price) of the Part
1 = Billing Rate Method: System looks at each component of the Part (Routing, Outside Services, Material, and
Miscellaneous Charges) and adds together the marked up value of each one
2 = Cost Plus Markup Method: System takes calculated cost of making the Part and applies the User-provided
Markup Percent for each Quantity Break
3 = Profit Margin Method: System takes calculated cost of making the Part and applies the User-provided
Profit Percent for each Quantity Break
Unit Price can be manually entered but requires User to enable the option to Prevent Automatic Calculation Of
Unit Price to maintain them
Prevent Automatic Calculation Of Unit Price – Prevents Unit Price from recalculating even if costs change
This option is enabled by default on a Quote, but Unit Price can still be edited
Commission Percent is used for Estimating purposes only
Anticipated cost of Sales Commission is added back to Part as a cost and the Sales Price adjusts accordingly
Actual Commission earned/paid is determined by Commission of Salesman Code(s) present on Jobs
Selling Price Breaks Grid
System calculates Unit Cost and Unit Price for each Price Break entered in the Quantity (Quote) column

How To Use the Enterprise E2 Shop System
R. 1.0 Page 183 of 295
Assign Estimate Codes to Price Breaks to determine what production-related costs and prices the system looks at to
determine overall Unit Cost and Unit Price for each quantity
Allows for specific costing and pricing of multiple production run scenarios, based on quantities
Example: Assume Price Breaks of 100, 500, and 1,000
Estimate Codes = LOW (Volume) and HIGH (Volume) in addition to DEFAULT
Example: Could assign LOW to quantities of 100 and 500 and HIGH to quantity of 1,000 and above
o For each Estimate Code referenced on the Sales Tab, a complete set of production details needs to
be entered
Markup Percent is applied to overall calculated Unit Cost at each Price Break if Calculation Method 2 selected
Profit Percent calculated accordingly
Markup can be different for each Price Break
Unit Price is calculated by system, based on Calculation Method selected - Can be manually entered/adjusted
Pricing Unit determines how unit Price is applied to Quotes and Jobs
EA: Unit Price applied to each unit
LOT: Unit Price applied as flat value for any quantity up to Price Break provided
C: Divides Total Sales amount on Quote or Order by 100
M: Divides Total Sales Amount on Quote or Order by 1,000
If first Price Break is greater than 1, the Unit Cost associated with the first Price Break will be applied to all
quantities between 1 and the second Price Break. Make sure to click the Calculate Button when making
changes to any component of a Quote to ensure the most accurate and up to date Price has been applied
(assuming they are not Locked).
Details - Manufacturing Tab
Manufacturing Tab (and associated Sub-tab) features and functionality are found on multiple records
Manufactured Part (Part Table)
Quote – Line Item Details
Order – Job Details
If defined as a Part Table record, Manufacturing Details auto-populate Quotes and/or Orders when selected
Can be edited on specific Quotes and/or Orders
Change would be unique to that record and would remain as permanent record unless deleted/purged
Complete Manufacturing details can be entered directly on Quotes or Orders
Permanent unless the record is deleted/purged
Cannot track Available quantity or inventory value if not entered in Part Table
Manufacturing details can be copied to Part Table record
Details – Manufacturing Tab - Engineering Sub-tab
Customer Part Number provides an additional way to identify the Part if the Customer has a different name for it
Assumes Part made for specific Customer
Assign a Customer Code if the Part should be identified with a specific Customer
Assigning one would not prevent making/selling the Part to other Customers
*Billing Rate represents the Billing Rate Code used by the system to pull Billing Rate dollar amounts from Work
Centers when Calculation method 1 is selected on the Sales Tab
Minimum Run Quantity represents the lowest quantity a Job would be created for when making the Part

How To Use the Enterprise E2 Shop System
R. 1.0 Page 184 of 295
Used as the default Quantity Ordered on Orders created using the Default Stock Customer Code designated in
Company Preferences
Orders for any other Customer Code look to Quotes or first Quantity Break of Part
Used for Estimating purposes to keep anticipated costs for Sub-assemblies consistent on Estimates and Quotes
for Top Level Parts for smaller quantities
Example: Minimum Run for SUB1 is 200
Quote created for Top Level Part that uses SUB1 for quantity of 100
System uses cost to make 200 units of SUB1 for estimating cost of Top Level Part
Assumes SUB1 will be made in advance or on separate Stock Run to accommodate Minimum Run as
opposed to simply making 100 units
Part Weight and Weight Unit Of Measure are dynamically linked to values on Inventory Tab
Details – Manufacturing Tab - Bill Of Material Sub-tab
Enter Part Numbers for material or other Manufactured items used in the production of the Manufactured Part
being defined
Records can be one of two types:
Purchased material (Part Type = P)
Can be defined in Part Table or added “free form”
Manufactured items (Part Type = M)
Must be defined in Part Table
If using records defined in Part Table, select them using drop-down menu
If adding records on the fly, manually enter Part Number and related details
Limited information can be provided
Only Purchased Parts can be added in this manner
Associate the appropriate Estimate Code for each item if creating multiple production scenarios
Parts must be listed multiple times if it is common to more than one Estimate Code process
DEFAULT Estimate Code assigned automatically by system
Assigning a Step Number to a material indicates it is not needed until that point of the production process
If Part is not Posted during Job Material Processing:
Order By Date set based on anticipated Start Date/Time of designated Step (Purchased Part)
Due Date of Sub-Job based on anticipated Start Date/Time of designated Step (Manufactured Part)
Defaults to Step 0
Assumes Part is required at beginning of production
Quantity (Stocking) represents how much material is anticipated to be needed to make the Part
Value entered depends on Unit Of Measure (Stocking) selected
If Unit Of Measure (Stocking) is set to the required item’s Stocking Unit (BAR, EA, etc.):
Quantity (Stocking) represents how much material it will take to make One Unit (BARS per Part)
Quantity can be decimal value when dealing with Purchased Parts
Be aware of material configuration regarding use of decimals, as this an Estimate of what it will take to
make ONE UNIT
Actual amount required will depend on Quantity To Make the Manufactured Item
Quantity must be whole value when dealing with another Manufactured Part (Sub-assembly)
If Unit Of Measure (Stocking) is set to P:

How To Use the Enterprise E2 Shop System
R. 1.0 Page 185 of 295
Quantity (Stocking) represents how many Parts can be made out of One Stocking Unit’s worth of material
(Pieces or Parts per BAR)
System assumes at least one entire Stocking Unit (BAR, SHEET, etc.) will be Consumed and expensed to Jobs
for the Part
Cost of one Stocking Unit spread proportionately across Price Breaks up to amount in Quantity (Stocking)
field
Cost of another Stocking Unit is added each time Quantity threshold is reached
Example: Assume 10 Parts (Quantity) can be made from 1 BAR (Unit Of Measure = P)
o Price Breaks = 1, 5, 10, and 15 (Sales Tab)
o Entire cost of BAR placed in Unit Cost of Price Break = 1
o 20% of cost of BAR placed in Unit Cost of Price Break = 5
o 10% of cost of BAR placed in Unit Cost of Price Break = 10 (Optimal use of BAR)
o Unit Cost of 15 will increase as another BAR is expensed but not as high as Price Break = 1
The larger the Price Break, the less impact each additional BAR has
Calculator Utility will be available for use if Calculator Code was associated with required material
Can be used to determine either Parts per Stocking Unit (Parts per BAR,SHEET, etc.) or Stocking Units per
Part (BARS per Part, SHEETS per Part, etc.)
Formula pulls from Calculator Code assigned to material
Unit Of Measure (Stocking) determines how material cost is distributed
See details of Quantity (Stocking) field immediately above for additional information
Vendor Code represents who the material is expected to be purchased from (Part Type = P)
Can select different Vendor, if more than one associated with Part
Entire Vendor List will be available if adding “free form” material
There will be no Vendor Code associated with Sub-assembly items (Part Type = M)
Additional fields are available for reference in the Grid
Details – Manufacturing Tab - Routing Sub-tab
Step Number represents the order in which work will progress
Defaults to increments of 10
Can edit Step Numbers
Can insert new Steps by entering information on first blank row of Grid and changing Step Number to fit
between existing ones
System will re-sort in correct sequence when record Saved
Can reset in increments of 10 by using the Renumber feature
Step Numbers “shared” by Routing Tab and Outside Services Tab
If a Step Number appears to be skipped, it is likely used on the Outside Services Tab (or vice versa)
Associate the appropriate Estimate Code for each Step if creating multiple production scenarios
Steps must be listed multiple times if they are common to more than one Estimate Code process
DEFAULT Estimate Code assigned automatically by system
Work Center represents where work is being performed (internally)
Cost and Billing Rate values auto-populate from Work Center selected
Operation Code can be used to specify what is being done at the Work Center
Auto-populates from Work Center if a Default Operation Code was designated

How To Use the Enterprise E2 Shop System
R. 1.0 Page 186 of 295
Can be selected or edited manually
Production-related details pull from Operation Code if selected
Operation Code is optional value
Description provides written details regarding the work to be performed
Prints on Job Traveler
Auto-populates from Operation Code selected
Can be manually entered or edited, as needed
Setup Time: The estimated amount of time (in terms of the selected Unit) it will take to prepare the Work Center
Setup Unit: Works in conjunction with Setup Time to define how long it is estimated to take to prepare the Work
Center
Options include:
Hours
Minutes
Seconds
Setup Time is a fixed value, regardless the quantity estimated/worked on
Cycle Time: The estimated amount of time (in terms of the selected Unit) it will take to perform the work detailed
in the Description
Cycle Unit: Works in conjunction with Cycle Time to define how long it is estimated to take to perform the work
detailed in the Description
Options include:
Hours
Minutes
Seconds
Pieces Per Hour (System uses value to calculate it will take to make one unit in terms of an hour)
Cycle Time will vary depending on the quantity estimated/worked on
Regardless the Unit Selected for estimating purposes the system will convert all values into terms of hours
for calculation and report purposes.
Machines Run (By Operator): The number of machines the Employee performing the work is capable of running at
one time
If greater than 1, estimated Labor Costs (Cycle Time only) will be reduced accordingly
Machines Job Run On: The number of machines the scheduled Job is able to be worked on at the same time (for a
given Step)
If greater than 1:
Estimated Cycle Time is decreased (same number of Machine Hours spread across multiple machines)
Estimated Setup Time is increased (multiple machines must be prepared)
The Capacity Factor of Work Centers need to match this value in order for scheduling assumptions to be
accurate
Team Size: The number of Employees it is estimated to take to perform the work detailed in the Description
If greater than 1, estimated Labor Costs (Cycle Time only) will be increased accordingly
Scheduled Cycle Time will not be impacted
Scrap Percent: The amount of expected scrap or wasted material that will occur during the Step

How To Use the Enterprise E2 Shop System
R. 1.0 Page 187 of 295
If greater than 0, the system will calculate(during Job Material Processing) how many additional units need to
be made to compensate for the anticipated scrapped pieces
At a minimum, you will be required to make one additional unit
Scrap is cumulative meaning a 1% Scrap Percent on each of 5 Steps will result in a minimum of 5 additional
units being made
Costs and estimated times are impacted by what Step Scrap is associated with
If Scrap is on the first Step, the system assumes additional work is not required beyond that point for
anticipated “extra” scrap units
If Scrap is on final Step, the system assumes extra work is required throughout the entire production
process and the “extra” units will be dealt with at the end
If Scrap is located “somewhere in between,” additional work is scaled accordingly
Since Scrap Percentages are cumulative, consider placing a single Scrap Percent for the entire Routing on a
designated Step, but realize scheduled time and associated costs are impacted by the Step selected.
Percent Efficient: How efficiently the work detailed in the Description can be performed
If less than 100%, Cycle Times (at the Job Level) will be scheduled to take longer to complete than the amount
of time listed here
Example: If Efficiency is 80%, Cycle Time will be increased by 20% FOR SCHEDULING PURPOSES
Estimated Cycle Time itself is not changed, just the amount of time it is expected to take on this particular
Work Center/Step.
G/L Account (Labor): Expense account actual labor costs will be accumulated against as Time Tickets are turned in
against the Step
Mark a Step as Unattended (checkbox) if the Employee is able to prepare the Work Center and then leave it once
the work process has begun
Unattended Steps will estimate/capture Burden Costs for Cycle Time, but NOT Labor Costs
Unattended Steps will estimate/capture BOTH Burden and Labor Costs for Setup Time
If material is physically altered during the Step, mark the option Consumes Raw Material on the appropriate Work
Center
If Labor G/L Account is left blank at the Job Level, costing reports (Job Cost Summary, WIP Summary,
Margin Summary, etc.) will display dollar amounts with no description or a reference of UNKNOWN.
If Jobs are configured to perform Incremental Job Costing, material is not Consumed until pieces are completed
against the first step configured to do so
Once Consumed in this scenario:
Material Cost captured
Material will not be automatically placed back into Inventory if the Job is subsequently Cancelled
Steps using Work Centers such as Engineering, Inspection, and Shipping would typically not Consume Material
Location Code: The physical location of Work Center
Helps track movement of Material/Jobs
Used if you are requiring the creation of Inventory Transfer records before production can begin

How To Use the Enterprise E2 Shop System
R. 1.0 Page 188 of 295
Mark the option (checkbox) Overlap Steps if work can begin on subsequent Steps before all the pieces have been
completed on the current Step
If enabled, the system will schedule work to begin on the next Step once a pre-determined number of pieces
have been completed on the current Step based on the Overlap Method
Overlap Method: Determines how many pieces must be completed on the current Step before work will be
scheduled to begin on the next Step
Automatic: The system will schedule the next Step to complete its Setup process as soon as the first piece is
completed on the current Step
If the Cycle Time on the next Step is FASTER than the Cycle Time of the current Step, it will build in a “head
start” amount to ensure the next Step does not run out of parts
There is no additional input required for this option
Hours: The system will wait a specified length of time before scheduling the next Step
If selected, you must also designate the number of hours to wait in the Overlap Quantity field
Percent: The system will wait until a specified percentage of pieces have been completed before scheduling
the next Step
If selected, you must also designate the percent that needs to be completed in the Overlap Quantity field
Pieces: The system will wait until a specified number of pieces have been completed before scheduling the
next Step
If selected, you must also designate the number of pieces that need to be completed in the Overlap
Quantity field
None: Overlapping is disabled and the system will schedule the next Step to begin after all the pieces have
been completed on the current Step
Each Step can have a different option with regards to Overlapping.
Additional fields are available for reference in the Grid
Details – Manufacturing Tab - Outside Services Sub-tab
Step Number represents the order in which work will progress
Defaults to increments of 10
Can edit Step Numbers
Can insert new Steps by entering information on first blank row of Grid and changing Step Number to fit
between existing ones
System will re-sort in correct sequence when record Saved
Can reset in increments of 10 by using the Renumber feature
Step Numbers “shared” by Routing Tab and Outside Services Tab
If a Step Number appears to be skipped, it is likely used on the Outside Services Tab (or vice versa)
Associate the appropriate Estimate Code for each Step if creating multiple production scenarios
Steps must be listed multiple times if it is common to more than one Estimate Code process
DEFAULT Estimate Code assigned automatically by system
Service Code represents the type of work being provided by the Vendor
Auto-populates Vendor (with Default Vendor) and Vendor-related details (Step Details) when selected
In Outside Services Step Details

How To Use the Enterprise E2 Shop System
R. 1.0 Page 189 of 295
Details – Manufacturing Tab - Outside Services - Vendors Sub-tab
List of Vendors available to perform service provided
Can select a different Vendor from list for this specific Step
For each Vendor, the following information is present:
Markup Percent: Determine what the Sales Price should be for the service
Lead Time Days: Anticipated amount of time it will take to receive items back
Price By Weight: Select if the Vendor prices the service based on the weight of the Parts sent to them, as
opposed to a per piece or Lot charge
Need Pricing: Mark this option to indicate the need to create a Vendor RFQ for the specific Service Step
Price Breaks and cost information become available in the bottom of the Grid as each Vendor is selected
Details – Manufacturing Tab - Outside Services - Routing Step Details Sub-tab
If Certifications Required is marked:
System places a comment on the PO for the Service to that effect
The PO information is placed in the Certification print spool and is available to select to print
Ignore Vendor Minimum Charge allows a PO to be created for an amount less than the stated Minimum Charge
If not allowed, the PO will be created for the Minimum Amount if the service cost is less than that value
Description prints on the PO created for the Service Step
Auto-populates from the Service Code selected
Can be manually entered or edited
Details - Miscellaneous Charges Tab
Select as many Miscellaneous Charge Codes as necessary to represent additional charges to be passed on to the
Customer other than Shipping and Unit Price
Common Miscellaneous Charges include
Document-related fees
Certification fees
Fuel surcharges
Unit Of Measure determines how the Charge Amount will be calculated
Purchasing Unit (EA by Default) – The amount will be charged for each unit purchased
LOT – Amount will be charged as flat amount regardless of quantity
C – Amount is divided by 100 and charged for each unit purchased
M – Amount is divided by 1,000 and charged for each unit purchased
Include In Piece Price determines how the Charge Amount will be displayed
Yes – Amount is rolled into Unit Price on Quote/Order
No – Amount will display as separate line item on Quote/Order
G/L Account represents the default income account that will auto-populate on Orders
Pay Commission – Indicates whether Charge Amount should be included in Sales Commission
Option must be selected if Include In Piece Price is used
Pay Tax – Indicates whether tax should be applied against Charge Amount if applicable
Apply Discount – Indicates whether Charge Amount is eligible for discount if A/R Invoices for Part are paid
within stated terms

How To Use the Enterprise E2 Shop System
R. 1.0 Page 190 of 295
Header Tab
Information that pertains to the entire Record as opposed to a specific Line Item
Header Items Sub-tab
*Currency Code: Defaults to the Currency Code associated with the Customer
*Exchange Rate: Defaults to the rate associated with the Currency Code at the time the record is created
Notes: Appear on printed Quote
Specific to selected Quote
Information that should appear on all Quotes should be entered in Report Customization
Displayed in Layout Tab prior to Generating
Can be edited for specific output Generation, but resets based on Report Customization values afterward
Addresses Tab
Quoting Address Sub-tab
Location Code: Uses Default Quoting Location designated on Customer
Physical Address Details populated based on the Location Code
Street Address
City
ZIP/Postal Code
State/Province
Country
Selecting a different Location Code re-populates Physical Address Details
Physical Address Details can be manually edited as well
*Company Code: Auto-populates from Customer Code
Can be manually edited
Quoting Address – Contact Sub-tab
(Quoting) Contact: Select a Contact from the Customer Contact list
Does not auto-populate
Provides email address when Quotes emailed directly from System
Pulls email address from Customer Contact details
Can be changed during process of emailing
Phone Number: Auto-populates with General Customer Contact information
Replaced by specific Contact Phone Number when one is entered
Fax Number: Auto-populates with General Customer Contact information
Replaced by specific Contact Fax Number when one is entered
Shipping Address Sub-tab
Address Type: Determines how Physical Address Details are obtained
Can be one of the following:
Internal
Customer (Default)
Vendor
Third Party
Allows for drop shipments

How To Use the Enterprise E2 Shop System
R. 1.0 Page 191 of 295
Address Type selection impacts Code options (below)
Code: Represents specific Company Code, depending on the Address Type selected
Customer Code list available if Address Type = Customer
Vendor Code List available if Address Type = Vendor
Code is not available if Address Type = Internal or Third Party
Location Code: Uses Default Shipping Location designated on Customer
Physical Address Details populated based on the Location Code
Street Address
City
ZIP/Postal Code
State/Province
Country
Location Code options narrow based on Address Type/Code selections
Address Type = Customer or Vendor
Location Codes listed based on specified Customer or Vendor Code selected
Address Type = Internal
Location Codes of your Company available
Address Type = Third Party
Location Code not available
Physical Address Details will need to be entered manually
Selecting a different Location Code re-populates Physical Address Details
Physical Address Details can be manually edited as well
Shipping Address – Contact Sub-tab
(Shipping) Contact: Select a Contact from the Customer Contact list
Does not auto-populate
Phone Number: Auto-populates with General Customer Contact information
Replaced by specific Contact Phone Number when one is entered
Fax Number: Auto-populates with General Customer Contact information
Replaced by specific Contact Fax Number when one is entered
Shipping Address – Miscellaneous Sub-tab
Shipping Code: Auto-populates from Location Code Details
Shipping Code Details used on Packing Lists
Can be edited on Packing List as needed
F.O.B. Point: Auto-populates from Location Code Details
Account Number: Your Account Number with the designated Shipping Code carrier
Auto-populates from Shipping Code
Territory Code: Auto-populates from Location Code Details
Can be used to filter reports and searches
Print Certifications: Passed on to Orders and Packing Lists
Option must be enabled on Packing Lists to be available to print Certification
Can be edited manually on Packing List as needed

How To Use the Enterprise E2 Shop System
R. 1.0 Page 192 of 295
Customer Request For Quotation (RFQ)
Overview
Customer-specific Request For Sales Quote
Can be used for Estimating purposes
Contains Manufacturing Details
Bill Of Materials
Routing
Outside Services
Miscellaneous Charges
Can be used to control which inquiries become actual Quotes
Keep list of Quotes limited to “valid” inquiries
Source Record(s)
This Record can use the following Sources to provide information during its creation:
Part Number (Table Item)
Customer RFQ (Copy)
Destination Record(s)
This Record can be used as a Source to provide information on the following Records:
Quotation
Customer RFQ
Key Values/Points of Consideration (An asterisk [*] indicates a Required Field)
General Tab
*RFQ Number: Up to 50 alpha-numeric characters
*Customer Code: Who the RFQ is for
Customer Name auto-populates based on the Customer Code selected
Customer Type auto-populates based on the Customer Code selected
Terms Code: Terms offered to the Customer for the listed Item(s)
Auto-populates based on information associated with Customer
Can be edited
*RFQ Date: Date the RFQ is valid from
Used to calculate Followup Date and Expires On date
Followup Date: Date the Customer should be contacted regarding the RFQ
Can be used to create an entry in Contact Management if Create Followup checkbox is enabled
System calculated/populated based on information provided in Company Preferences
Can be edited
Expires On: Date on which the RFQ will no longer be valid
System-calculated/-populated based on information provided in Company Preferences
Can be edited
Create Followup (checkbox): Creates an entry in Contact Management when enabled
Entry created for the User designated in Quoted By field

How To Use the Enterprise E2 Shop System
R. 1.0 Page 193 of 295
Quoted By is required if this option is enabled
Entry created first time RFQ is Saved after the option is enabled
Quoted By: User ID of the Salesperson associated with the RFQ
Blank by default
May not be the User that entered the RFQ into the System
Becomes required if option to Create Followup is enabled
Inquiry Number: Up to 50 alpha-numeric characters
Provides ability to track Customer Inquiries
Followup Created (checkbox): Indicates if a Followup entry has been created in Contact Management regarding the
RFQ
System maintained field
Quotation Line Item Grid
Status: Pending by default
Additional options include:
Pending: Default Status on all New RFQs
Quoted: System automatically changes Status when the RFQ is used to create a Quote
Expired: System changes Status to Expired if no action has been taken by the Expires On date
No Quote: User manually changes Status to No Quote if you decide not to send a Quote
Delivery Notes: Special instructions to include for delivery purposes
Print in Header of RFQ
Part Number: Can be selected from defined Table Items or entered “on the fly” for Estimating purposes
If the Part is a Table Item, all associated information automatically populates the Line Item Grid (including
Details)
Can be edited as needed
If the Part is Estimated directly on the RFQ, Part-related information must be entered manually
In the Line Item Grid, additional key values to consider include:
Revision Level
Part Description
Product Code (Required Field if Customer Billing driven by Product Code)
o Work Code auto-populates when Customer Code selected
Line Item Details must also be entered, including:
Sales Information
o Possible to enter Sales values without providing Costs
Manufacturing Information
Undefined Parts entered on RFQs will not be available in the Parts Table, meaning Available Quantities and
Dollar Valuations will not be present.
Quotation Line Item Details
Much of the information in the RFQ Details mirrors the functionality available on defined Manufactured Parts (See
Tables – Manufactured Parts)
Click the Magnifying Glass Icon to access the Detail Information for a specific Line Item

How To Use the Enterprise E2 Shop System
R. 1.0 Page 194 of 295
Can use VCR Buttons to navigate between record details if more than one Line Item is present
Details - General Tab
Notes: Auto-populates from Part Notes
Will carry forward to Order as Job Notes
Salesmen: Can designate one or more Salesmen for sales tracking and commission calculation
Taxes: Can designate one or more Tax Codes, as appropriate
While not required at this point, it is recommended to associate an Exempt Tax Code if no Tax is required
Tax Code becomes required further along in the System
Details - Sales Tab
Calculation Method determines how E2 will calculate the suggested sales price (Unit Price) of the Part
1 = Billing Rate Method: System looks at each component of the Part (Routing, Outside Services, Material, and
Miscellaneous Charges) and adds together the marked up value of each one
2 = Cost Plus Markup Method: System takes the calculated cost of making the Part and applies the User
provided Markup Percent for each Quantity Break
3 = Profit Margin Method: System takes the calculated cost of making the Part and applies the User provided
Profit Percent for each Quantity Break
Unit Price can be manually entered but requires User to enable the option to Prevent Automatic Calculation Of
Unit Price to maintain them
Prevent Automatic Calculation Of Unit Price – Prevents Unit Price from recalculating even if costs change
This option is enabled by default, but Unit Price can still be edited
Commission Percent is used for Estimating purposes only
Anticipated cost of Sales Commission is added back to Part as a cost and the Sales Price adjusts accordingly
Actual Commission earned/paid determined by Commission of Salesman Code(s) present on Jobs
Selling Price Breaks Grid
System calculates Unit Cost and Unit Price for each Price Break entered in the Quantity (Quote) column
Assign Estimate Codes to Price Breaks to determine what production-related costs and prices the system looks at to
determine overall Unit Cost and Unit Price for each quantity
Allows for specific costing and pricing of multiple production run scenarios based on quantities
Example: Assume Price Breaks of 100, 500, and 1,000
Estimate Codes = LOW (Volume) and HIGH (Volume) in addition to DEFAULT
Could assign LOW to quantities of 100 and 500 and HIGH to quantity of 1,000 and above
For each Estimate Code referenced on the Sales Tab, a complete set of production details needs to be entered
Markup Percent is applied to overall calculated Unit Cost at each Price Break if Calculation Method 2 selected
Profit Percent calculated accordingly
Markup can be different for each Price Break
Unit Price is calculated by system based on Calculation Method selected
Can be manually entered/adjusted
Pricing Unit determines how unit Price is applied to RFQs and Jobs
EA: Unit Price applied to each unit
LOT: Unit Price applied as flat value for any quantity up to Price Break provided
C: Divides Total Sales amount on RFQ or Order by 100

How To Use the Enterprise E2 Shop System
R. 1.0 Page 195 of 295
M: Divides Total Sales Amount on RFQ or Order by 1,000
If first Price Break is greater than 1, the Unit Cost associated with the first Price Break will be applied to all
quantities between 1 and the second Price Break. Make sure to click the Calculate Button when making
changes to any component of a RFQ to ensure the most accurate and up to date Price has been applied
(assuming they are not Locked).
Details - Manufacturing Tab
Manufacturing Tab (and associated Sub-tab) features and functionality are found on multiple records
Manufactured Part (Part Table)
RFQ – Line Item Details
Quote – Line Item Details
Order – Job Details
If defined as a Part Table record, Manufacturing Details auto-populate RFQs and/or Orders when selected
Can be edited on specific RFQs and/or Orders
Change would be unique to that record and would remain as permanent record unless deleted/purged
Complete Manufacturing details can be entered directly on RFQs or Orders
Permanent unless the record is deleted/purged
Cannot track Available quantity or inventory value if not entered in Part Table
Manufacturing details can be copied to Part Table record
Details – Manufacturing Tab - Engineering Sub-tab
Customer Part Number provides an additional way to identify the Part if the Customer has a different name for it
Assumes Part made for specific Customer
Assign a Customer Code if the Part should be identified with a specific Customer
Assigning one would not prevent making/selling the Part to other Customers
*Billing Rate represents the Billing Rate Code used by the system to pull Billing Rate dollar amounts from Work
Centers when Calculation Method 1 is selected on the Sales Tab
Minimum Run Quantity represents the lowest quantity a Job would be created for when making the Part
Used as the default Quantity Ordered on Orders created using the Default Stock Customer Code designated in
Company Preferences
Orders for any other Customer Code look to Quotes or first Quantity Break of Part
Used for Estimating purposes to keep anticipated costs for Sub-assemblies consistent on Estimates and Quotes
for Top Level Parts of smaller quantities
Example: Minimum Run for SUB1 is 200
Quote created for Top Level Part that uses SUB1 for quantity of 100
System uses cost to make 200 units of SUB1 for ESTIMATING cost of Top Level Part
o Assumes SUB1 will be made in advance or on separate Stock Run to accommodate Minimum Run
as opposed to simply making 100 units
Part Weight and Weight Unit Of Measure are dynamically linked to values on Inventory Tab
Details – Manufacturing - Bill Of Material Sub-tab
Enter Part Numbers for material or other Manufactured items used in the production of the Manufactured Part
being defined

How To Use the Enterprise E2 Shop System
R. 1.0 Page 196 of 295
Records can be one of two types
Purchased material (Part Type = P)
Can be defined in Part Table or added “free form”
Manufactured items, including Sub-assemblies (Part Type = M)
Must be defined in Part Table
If using records defined in Part Table, select them using drop-down menu
If adding records “on the fly,” manually enter Part Number and related details
Limited information can be provided “on the fly”
Only Purchased Parts can be added in this manner
Associate the appropriate Estimate Code for each item if creating multiple production scenarios
Parts must be listed multiple times if it is common to more than one Estimate Code process
DEFAULT Estimate Code assigned automatically by system
Assigning a Step Number to Material indicates it is not needed until that point of the production process
If Part is not Posted during Job Material Processing:
Order By Date based on anticipated Start Date/Time of designated Step (Purchased Part)
Due Date of Sub-Job based on anticipated Start Date/Time of designated Step (Manufactured Part)
Defaults to Step 0
Assumes Part is required at beginning of production
Quantity (Stocking) represents how much material is anticipated to be needed to make the Part
Value entered depends on Unit Of Measure (Stocking) selected
If Unit Of Measure (Stocking) is set to the required item’s Stocking Unit (BAR, EA, etc.):
Quantity (Stocking) represents how much material it will take to make One Unit (BARS per Part)
Quantity can be decimal value when dealing with Purchased Parts
Be aware of material configuration regarding use of decimals, as this an Estimate of what it will take to
make ONE UNIT
Actual amount required will depend on Quantity To Make of Manufactured Item
Quantity must be whole value when dealing with another Manufactured Part (Sub-assembly)
If Unit Of Measure (Stocking) is set to P:
Quantity (Stocking) represents how many Parts can be made out of 1 Stocking Unit’s worth of material
(Pieces or Parts per BAR)
System assumes at least one entire Stocking Unit (BAR, SHEET, etc.) will be Consumed and expensed to Jobs
for the Part
Cost of one Stocking Unit spread proportionately across Price Breaks up to amount in Quantity (Stocking)
field
Cost of another Stocking Unit is added each time Quantity threshold is reached
Example: Assume 10 Parts (Quantity) can be made from 1 BAR (Unit Of Measure = P)
o Price Breaks = 1, 5, 10, and 15 (Sales Tab)
o Entire cost of BAR placed in Unit Cost of Price Break = 1
o 20% of cost of BAR placed in Unit Cost of Price Break = 5
o 10% of cost of BAR placed in Unit Cost of Price Break = 10 (Optimal use of BAR)
o Unit Cost of 15 will increase as another BAR is expensed but not as high as Price Break = 1
The larger the Price Break the less impact each additional BAR has

How To Use the Enterprise E2 Shop System
R. 1.0 Page 197 of 295
Calculator Utility will be available for use if Calculator Code was associated with required material
Can be used to determine either Parts per Stocking Unit (Parts per BAR,SHEET, etc.) or Stocking Units per
Part (BARS per Part, SHEETS per Part, etc.)
Formula pulls from Calculator Code assigned to material
Unit Of Measure (Stocking) determines how material cost is distributed
See details of Quantity (Stocking) field immediately above for additional information
Vendor Code represents who the material is expected to be purchased from (Part Type = P)
Can select different Vendor if more than one associated with Part
Entire Vendor List will be available if adding “free form” material
There will be no Vendor Code associated with Sub-assembly items (Part Type = M)
Additional fields are available for reference in the Grid
Details – Manufacturing - Routing Sub-tab
Step Number represents the order in which work will progress
Defaults to increments of 10
Can edit Step Numbers
Can insert new Steps by entering information on first blank row of Grid and changing Step Number to fit
between existing ones
System will re-sort in correct sequence when record Saved
Can reset in increments of 10 by using the Renumber feature
Step Numbers “shared” by Routing Tab and Outside Services Tab
If a Step Number appears to be skipped, it is likely used on the Outside Services Tab (or vice versa)
Associate the appropriate Estimate Code for each Step if creating multiple production scenarios
Steps must be listed multiple times if it is common to more than one Estimate Code process
DEFAULT Estimate Code assigned automatically by system
Work Center represents where work is being performed (internally)
Cost and Billing Rate values auto-populate from Work Center selected
Operation Code can be used to specify what is being done at the Work Center
Auto-populates from Work Center if a Default Operation Code was designated
Can be selected or edited manually
Production-related details pull from Operation Code if selected
Operation Code is optional value
Description provides written details regarding the work to be performed
Prints on Job Traveler
Auto-populates from Operation Code selected
Can be manually entered or edited as needed
Setup Time represents the estimated amount of time (in terms of the selected Unit) it will take to prepare the Work
Center
Setup Unit works in conjunction with Setup Time to define how long it is estimated to take to prepare the Work
Center
Options include
Hours
Minutes

How To Use the Enterprise E2 Shop System
R. 1.0 Page 198 of 295
Seconds
Setup Time is a fixed value, regardless the quantity estimated/worked on
Cycle Time represents the estimated amount of time (in terms of the selected Unit) it will take to perform the work
detailed in the Description
Cycle Unit works in conjunction with Cycle Time to define how long it is estimated to take to perform the work
detailed in the Description
Options include
Hours
Minutes
Seconds
Pieces Per Hour (System uses value to calculate it will take to make one unit in terms of an hour)
Cycle Time will vary depending on the quantity estimated/worked on
Regardless the Unit Selected for estimating purposes the system will convert all values into terms of hours
for calculation and report purposes.
Machines Run (By Operator): The number of machines the Employee performing the work is capable of running at
one time
If greater than 1, estimated Labor Costs (Cycle Time only) will be reduced accordingly
Machines Job Run On: The number of machines the scheduled Job is able to be worked on at the same time (for a
given Step)
If greater than 1:
Estimated Cycle Time is decreased (same number of Machine Hours spread across multiple machines)
Estimated Setup Time is increased (multiple machines must be prepared)
The Capacity Factor of Work Centers need to match this value in order for scheduling assumptions to be
accurate
Team Size: The number of Employees it is estimated to take to perform the work detailed in the Description
If greater than 1, estimated Labor Costs (Cycle Time only) will be increased accordingly
Scheduled Cycle Time will not be impacted
Scrap Percent: The amount of expected scrap or wasted material that will occur during the Step
If greater than 0, the system will calculate(during Job Material Processing) how many additional units need to
be made to compensate for the anticipated scrapped pieces
At a minimum, you will be required to make one additional unit
Scrap is cumulative, meaning a 1% Scrap Percent on each of 5 Steps will result in a minimum of 5 additional
units being made
Costs and estimated times are impacted by what Step Scrap is associated with
If Scrap is on the first Step, the system assumes additional work is not required beyond that point for
anticipated “extra” scrap units
If Scrap is on final Step, the system assumes extra work is required throughout the entire production
process and the “extra” units will be dealt with at the end
If Scrap is located “somewhere in between,” additional work is scaled accordingly

How To Use the Enterprise E2 Shop System
R. 1.0 Page 199 of 295
Since Scrap Percentages are cumulative, consider placing a single Scrap Percent for the entire Routing on a
designated Step, but realize scheduled times (and associated costs) are impacted by the Step selected.
Percent Efficient represents how efficiently the work detailed in the Description can be performed
If less than 100%, Cycle Times (at the Job Level) will be scheduled to take longer to complete than the amount
of time listed here
Example: If Efficiency is 80%, Cycle Time will be increased by 20% FOR SCHEDULING PURPOSES
Estimated Cycle Time itself is not changed, just the amount of time it is expected to take on this particular
Work Center/Step.
G/L Account (Labor) represents expense account actual labor costs will be accumulated against as Time Tickets are
turned in against the Step
Mark a Step as Unattended (checkbox) if the Employee is able to prepare the Work Center and then leave it once
the work process has begun
Unattended Steps will estimate/capture Burden Costs for Cycle Time, but NOT Labor
Unattended Steps will estimate/capture BOTH Burden and Labor Costs for Setup Time
Mark the option Consumes Raw Material on the Work Center if material is physically altered during the Step
If Labor G/L Account is left blank at the Job Level, costing reports (Job Cost Summary, WIP Summary,
Margin Summary, etc.) will display dollar amounts with no description or a reference of UNKNOWN.
If Jobs are configured to perform Incremental Job Costing, material is not Consumed until pieces are completed
against the first step configured to do so
Once Consumed in this scenario
Material Cost captured
Material will not be automatically placed back into Inventory if the Job is subsequently Cancelled
Steps such as Engineering, Inspection, and Shipping will typically not Consume Material
Location Code represents physical location of Work Center
Helps track movement of material/Jobs
Used if you are requiring the creation of Inventory Transfer records before production can begin
Mark the option (checkbox) Overlap Steps if work can begin on subsequent Steps before all the pieces have been
completed on the current Step
If enabled, the system will schedule work to begin on the next Step once a pre-determined number of pieces
have been completed on the current Step, based on the Overlap Method
Overlap Method determines how many pieces must be completed on the current Step before work will be
scheduled to begin on the next Step
Automatic: The system will schedule the next Step to complete its Setup process as soon as the first piece is
completed on the current Step
If the Cycle Time on the next Step is FASTER than the Cycle Time of the current Step, it will build in a “head
start” amount to ensure the next Step does not run out of parts
There is no additional input required for this option
Hours: The system will wait a specified length of time before scheduling the next Step

How To Use the Enterprise E2 Shop System
R. 1.0 Page 200 of 295
If selected, you must also designate the number of hours to wait in the Overlap Quantity field
Percent: The system will wait until a specified percentage of pieces have been completed before scheduling
the next Step
If selected, you must also designate the percent that needs to be completed in the Overlap Quantity field
Pieces: The system will wait until a specified number of pieces have been completed before scheduling the
next Step
If selected, you must also designate the number of pieces that need to be completed in the Overlap
Quantity field
None: Overlapping is disabled and the system will schedule the next Step to begin after all the pieces have
been completed on the current Step
Additional fields are available for reference in the Grid
Each Step can have a different option with regards to Overlapping.
Details – Manufacturing - Outside Services Sub-tab
Step Number represents the order in which work will progress
Defaults to increments of 10
Can edit Step Numbers
Can insert Steps by entering information on first blank row of Grid and changing Step Number to fit between
existing ones
System will re-sort in correct sequence when record Saved
Can reset in increments of 10 by using the Renumber feature
Step Numbers “shared” by Routing Tab and Outside Services Tab
If a Step Number appears to be skipped, it is likely used on the Outside Services Tab (or vice versa)
Associate the appropriate Estimate Code for each Step if creating multiple production scenarios
Steps must be listed multiple times if it is common to more than one Estimate Code process
DEFAULT Estimate Code assigned automatically by system
Service Code represents the type of work being provided by the Vendor
Auto-populates Vendor (with Default Vendor) and Vendor-related details (Step Details) when selected
In Outside Services Step Details
Details – Manufacturing - Outside Services - Vendors Sub-tab
List of Vendors available to perform service required
Can select a different Vendor from list for this specific Step
For each Vendor, the following information is present:
Markup Percent: Determine what the Sales Price should be for the service
Lead Time Days: Anticipated amount of time it will take to receive items back
Price By Weight: Select if the Vendor prices the service based on the weight of the Parts sent to them as
opposed to a per piece or Lot charge
Need Pricing: Mark this option to indicate the need to create a Vendor RFQ for the specific Service Step
Price Breaks and cost information become available in the bottom of the Grid as each Vendor is selected
Details – Manufacturing - Outside Services - Routing Step Details Sub-tab
If Certifications Required is marked:

How To Use the Enterprise E2 Shop System
R. 1.0 Page 201 of 295
System places a comment on the PO for the Service to that effect
The PO information is placed in the Certification print spool and is available to select to print
Ignore Vendor Minimum Charge allows a PO to be created for an amount less than the stated Minimum Charge
If not allowed, the PO will be created for the Minimum Amount if the service cost is less than that value
Description prints on the PO created for the Service Step
Auto-populates from the Service Code selected
Can be manually entered or edited
Details - Miscellaneous Charges Tab
Select as many Miscellaneous Charge Codes as necessary to represent additional charges to be passed on to the
Customer other than shipping and Unit Price
Common Miscellaneous Charges include
Document-related fees
Certification fees
Fuel surcharges
Unit Of Measure determines how the Charge Amount will be calculated
Purchasing Unit (EA by Default) – The amount will be charged for each unit purchased
LOT – Amount will be charged as flat amount regardless of quantity
C – Amount is divided by 100 and charged for each unit purchased
M – Amount is divided by 1,000 and charged for each unit purchased
Include In Piece Price determines how the Charge Amount will be displayed
Yes – Amount is rolled into Unit Price on Quote/Order
No – Amount will display as separate line item on Quote/Order
G/L Account represents the default income account that will auto-populate on Orders
Pay Commission – Indicates whether Charge Amount should be included in Sales Commission
Option must be selected if Include In Piece Price is used
Pay Tax – Indicates whether tax should be applied against Charge Amount, if applicable
Apply Discount – Indicates whether Charge Amount is eligible for discount if A/R Invoices for Part are paid
within stated terms
Header Tab
Information that pertains to the entire Record as opposed to a specific Line Item
Header Items Sub-tab
*Currency Code: Defaults to the Currency Code associated with the Customer
*Exchange Rate: Defaults to the rate associated with the Currency Code at the time the record is created
Notes: Appear on printed RFQ
Specific to selected RFQ
Information that should appear on all RFQs should be entered in Report Customization
Displayed in Layout Tab prior to Generating
Can be edited for specific output Generation but resets based on Report Customization values afterward
Addresses Tab
Quoting Address Sub-tab
Location Code: Uses Default Quoting Location designated on Customer

How To Use the Enterprise E2 Shop System
R. 1.0 Page 202 of 295
Physical Address Details populate based on the Location Code
Street Address
City
ZIP/Postal Code
State/Province
Country
Selecting a different Location Code re-populates Physical Address Details
Physical Address Details can be manually edited as well
*Company Code: Auto-populates from Customer Code
Can be manually edited
Quoting Address – Contact Sub-tab
(Quoting) Contact: Select a Contact from the Customer Contact list
Does not auto-populate
Provides email address when RFQs emailed directly from System
Pulls email address from Customer Contact details
Can be changed during process of emailing
Phone Number: Auto-populates with General Customer Contact information
Replaced by specific Contact Phone Number when one is entered
Fax Number: Auto-populates with General Customer Contact information
Replaced by specific Contact Fax Number when one is entered
Shipping Address Sub-tab
Address Type: Determines how Physical Address Details are obtained
Can be one of the following:
Internal
Customer (Default)
Vendor
Third Party
Allows for drop shipments
Address Type selection impacts Code options (below)
Code: Represents specific Company Code depending on the Address Type selected
Customer Code list available if Address Type = Customer
Vendor Code List available if Address Type = Vendor
Code is not available if Address Type = Internal or Third Party
Location Code: Uses Default Shipping Location designated on Customer
Physical Address Details populated based on the Location Code
Street Address
City
ZIP/Postal Code
State/Province
Country
Location Code options narrow based on Address Type/Code selections
Address Type = Customer or Vendor

How To Use the Enterprise E2 Shop System
R. 1.0 Page 203 of 295
Location Codes listed based on specified Customer or Vendor Code selected
Address Type = Internal
Location Codes of your Company available
Address Type = Third Party
Location Code not available
Physical Address Details will need to be entered manually
Selecting a different Location Code re-populates Physical Address Details
Physical Address Details can be manually edited as well
Shipping Address – Contact Sub-tab
Shipping Contact: Select a Contact from the Customer Contact list
Does not auto-populate
Phone Number: Auto-populates with General Customer Contact information
Replaced by specific Contact Phone Number when one is entered
Fax Number: Auto-populates with General Customer Contact information
Replaced by specific Contact Fax Number when one is entered
Shipping Address – Miscellaneous Sub-tab
Shipping Code: Auto-populates from Location Code Details
Shipping Code Details used on Packing Lists
Can be edited on Packing List as needed
F.O.B. Point: Auto-populates from Location Code Details
Account Number: Your Account Number with the designated Shipping Code carrier
Auto-populates from Shipping Code
Territory Code: Auto-populates from Location Code Details
Can be used to filter reports and searches
Print Certifications: Passed on to Orders and Packing Lists
Option must be enabled on Packing Lists to be available to print Certification
Can be edited manually on Packing List, as needed

How To Use the Enterprise E2 Shop System
R. 1.0 Page 204 of 295
Orders
The Orders Menu provides access to the “heart” of the E2 Shop System – Order Entry – and the related records and
transactional utility- Job Material Processing - that allows Users to process Jobs.
Records/Functionality
Order Entry
Job Material Processing (utility)
Shipments
Customer Returns
Reports
Backlog Summary
Job Schedule
Order Cross Reference
Order Entry Summary
Customer Price Catalog
Shipment Summary
Customer Return Summary
Order Entry
Overview
Customer Code-specific production Orders
Can contain multiple Jobs
Each Job will have unique identity and production details
Can be for Customer or Stock
Depends on Release Type of Job
Can enter/edit manufacturing information on the fly
Each Job Contains Manufacturing Details
Bill Of Materials
Routing
Outside Services
Miscellaneous Charges
Source Record(s)
This Record can use the following Sources to provide information during its creation:
Part Number (Data Entry Table Item)
Quotation
Non-Conformance (Requires Quality Module)
Rework Orders
Requires Quality Module
Customer Return
Rework Orders

How To Use the Enterprise E2 Shop System
R. 1.0 Page 205 of 295
Use in lieu of Non-Conformance
Internal Rejection
Rework Orders
Use in lieu of Non-Conformance
Order (Copy)
Job Requirements (Stock Order)
Destination Record(s)
This Record can be used as a Source to provide information on the following Records:
Packing List (Customer Releases)
Stock Job Transfer (Stock Releases – including Sub-assemblies)
Purchase Orders (Job Requirements)
Inventory Inspection (Inspect Outgoing Orders)
Time and Attendance Records (Time Ticket Details)
Schedule Codes (Whiteboard Details)
Material Allocations
Key Values/Points of Consideration (An asterisk [*] indicates a Required Field)
General Tab
*Order Number: Up to 15 alpha-numeric characters
Be mindful of including alpha characters if Job Number is created using Order + Item Number method and wall-
mounted clocks are utilized for Data Collection
Wall-mounted clock keypads do not include alpha characters
If Bar Codes are not used, Employees could find it difficult to log on and off of Jobs
*Customer Code: Who the Order is for
Customer Name auto-populates based on the Customer Code selected
If the Customer Code selected is the default Stock Customer Code designated in Company Preferences:
All Jobs will have Stock Releases
All Jobs will be eligible to “Rob”
Customer Code will auto-populate if the Order is created from a Quote
If a Quote is not used as the Source, it is recommended to select a Customer Code prior to entering Part
Number information in the Line Item Grid
Customer Code allows Work Code to auto-populate in the Grid which can be a required field if Work Code is
selected in Company Preferences to drive Customer Billing
*Order Date: Date the Order is considered to be placed
Current Date populates by default
Can be edited
P.O Number: Customer’s PO Number
Entered manually
Can be duplicated
Due Date: Default Due Date used on new Jobs entered on Order
Represents the Date the Customer wants the Job completed
Current Date populates by default

How To Use the Enterprise E2 Shop System
R. 1.0 Page 206 of 295
Can be edited
Order Line Item Grid
Given the numerous values that can be displayed in the Order line item Grid, this section will cover the Key Fields that
impact Job creation and will summarize the function and purpose of others
*Item Number: Used by System to identify each record (Job) in the Grid
Used by System in Job Number creation if Order + Item Number method used
Can be edited
Subsequent records automatically renumber if changed
*Status: Indicates the production status of the job
Planned: Used for production planning purposes
Can be set as Default Job Status or selected manually
When selected:
The following CAN occur:
o Process to see anticipated requirements
o Use in Schedule Codes to see anticipated production times
The following CANNOT occur:
o Post Material to Job
o Enter Time against Job
o Ship or Transfer
Firm: Indicates the Job is ready for production
Can be set as Default Job Status or selected manually
All production-related transactions can be entered against the Job
Released: Indicates Job Traveler has been printed
System assigned
Changes to In Process once production-related transaction entered against Job
In Process: Indicates Job has begun production process
System-assigned when any of the following transactions occur:
Time Entered on a Sub-Job
Time entered directly on Job for Work Center that Consumes Material
Purchase Order Entered at Any Level
Miscellaneous Job Costs Entered
Shipments or Stock Job Transfers at Any Level
Inspections are Entered (Requires Quality Module)
Job is a Stock Job Linked to a Customer Job
Material Allocation does NOT cause a Job to switch to In Process Status
Hold: Indicates work on a Firm or In Process Job has been halted
Manually selected
While On Hold, the following records cannot be created/actions cannot be taken against the Job:
Job Material Processing
Time Tickets
Purchase Orders

How To Use the Enterprise E2 Shop System
R. 1.0 Page 207 of 295
Packing Lists/Stock Job Transfers
Material Allocations
Must manually reset Status to Firm when work can restart
Closed: Indicates the Job has been completed or otherwise terminated
System-assigned when one of the following conditions arise:
When Total Quantity Ordered has been Shipped (or Transferred to Stock):
o Includes pieces successfully made due to Projected Scrap
Job is manually Cancelled
*Job Number: Can be up to 20 alpha-numeric characters
See note on Order Number regarding use of alpha characters
Each Line Item entered must have a unique Job Number
Job Numbers cannot be duplicated
Recommended to allow System to generate Job Numbers
Order + Item number is suggested Job Number creation method
o Easily identifies what Order a Job belongs with
o Identifies the position in the Order Line item Grid
*Part Number: Can be selected from defined Table Items or entered “on the fly”
If the Part is a Table Item, many fields in the Line Item Grid will auto-populate (including Details)
Can be edited as needed
If the Part is entered directly on the Order, Part-related information must be entered manually
In the Line Item Grid additional key values to consider include:
Revision Level
Part Description
Product Code (Required Field if Customer Billing driven by Product Code)
o Work Code auto-populates when Customer Code selected
Inspection Settings, Use Time Tickets, and Incremental Job Costing options
o These must be designated on the Quote or subsequent Order if Part is not defined
Line Item Details must also be entered, including:
Sales Information
o Possible to enter Sales values without providing Costs
Manufacturing Information
Undefined Parts entered directly on Orders will not be available in the Parts Table, meaning Available
Quantities and Dollar Valuations will not be present.
Quantity Ordered: Quantity requested by Customer
Total of all Customer Releases
Quantity To Stock: Quantity to make for Inventory replenishment
Total of all Stock Releases
Sub-assemblies show as Stock Release for production tracking purposes
Priority: Indicates relative importance of Job for production purposes
Used by System in Scheduling
The lower the Priority, the “more important” a Job is deemed to be

How To Use the Enterprise E2 Shop System
R. 1.0 Page 208 of 295
Populates from Customer Details
Can be edited
Order Line Item Details
Much of the information in the Order Details mirrors the functionality available on defined Manufactured Parts (See
Tables – Manufactured Parts)
Click the Magnifying Glass Icon to access the Detail Information for a specific Line Item
Can use VCR Buttons to navigate between record details if more than one Line Item is present
Details - General Tab
Notes: Auto-populates from Quote Notes
Will print as Job Notes
Salesmen: Can designate one or more Salesmen for sales tracking and commission calculation
Taxes: Can designate one or more Tax Codes as appropriate
While not required at this point, it is recommended to associate an Exempt Tax Code if no Tax is required
Tax Code becomes required further along in the System
Details - Sales Tab
Calculation Method determines how E2 will calculate the suggested sales price (Unit Price) of the Part
1 = Billing Rate Method: System looks at each component of the Part (Routing, Outside Services, Material, and
Miscellaneous Charges) and adds together the marked up value of each one
2 = Cost Plus Markup Method: System takes the calculated cost of making the Part and applies the User-
provided Markup Percent for each Quantity Break
3 = Profit Margin Method: System takes the calculated cost of making the Part and applies the User-provided
Profit Percent for each Quantity Break
Unit Price can be manually entered but requires User to enable the option to Prevent Automatic Calculation Of
Unit Price to maintain them
Prevent Automatic Calculation Of Unit Price – Prevents Unit Price from recalculating even if costs change
This option is enabled by default, but Unit Price can still be edited
Commission Percent is used for Estimating purposes only
Anticipated cost of Sales Commission is added back to Part as a cost and the Sales Price adjusts accordingly
Actual Commission earned/paid determined by Commission of Salesman Code(s) present on Jobs
Selling Price Breaks Grid
System calculates Unit Cost and Unit Price for each Price Break entered in the Quantity (Quote) column
Assign Estimate Codes to Price Breaks to determine what production-related costs and prices the system looks at to
determine overall Unit Cost and Unit Price for each quantity
Allows for specific costing and pricing of multiple production run scenarios based on quantities
Example: Assume Price Breaks of 100, 500, and 1,000
Estimate Codes = LOW (Volume) and HIGH (Volume) in addition to DEFAULT
Could assign LOW to quantities of 100 and 500 and HIGH to quantity of 1,000 and above
For each Estimate Code referenced on the Sales Tab, a complete set of production details needs to be entered
Markup Percent is applied to overall calculated Unit Cost at each Price Break if Calculation Method 2 selected
Profit Percent calculated accordingly

How To Use the Enterprise E2 Shop System
R. 1.0 Page 209 of 295
Markup can be different for each Price Break
Unit Price is calculated by system based on Calculation Method selected
Can be manually entered/adjusted
Pricing Unit determines how unit Price is applied to Quotes and Jobs
EA: Unit Price applied to each unit
LOT: Unit Price applied as flat value for any quantity up to Price Break provided
C: Divides Total Sales amount on Quote or Order by 100
M: Divides Total Sales Amount on Quote or Order by 1,000
If first Price Break is greater than 1, the Unit Cost associated with the first Price Break will be applied to all
quantities between 1 and the second Price Break. Make sure to click the Calculate Button when making
changes to any component of a Job to ensure the most accurate and up to date Price has been applied
(assuming they are not Locked).
Details - Manufacturing Tab
Manufacturing Tab (and associated Sub-tab) features and functionality are found on multiple records
Manufactured Part (Part Table)
Quote – Line Item Details
Order – Job Details
If defined as a Part Table record, Manufacturing Details auto-populate Quotes and/or Orders when selected
Can be edited on specific Quotes and/or Orders
Change would be unique to that record and would remain as permanent record unless deleted/purged
Complete Manufacturing details can be entered directly on Quotes or Orders
Permanent, unless the record is deleted/purged
Cannot track Available quantity or inventory value if not entered in Part Table
Manufacturing details can be copied to Part Table record
Details – Manufacturing Tab - Engineering Sub-tab
Customer Part Number provides an additional way to identify the Part if the Customer has a different name for it
Assumes Part made for specific Customer
Assign a Customer Code if the Part should be identified with a specific Customer
Assigning one would not prevent making/selling the Part to other Customers
*Billing Rate represents the Billing Rate Code used by the system to pull Billing Rate dollar amounts from Work
Centers when Calculation method 1 is selected on the Sales Tab
Minimum Run Quantity represents the lowest quantity a Job would be created for when making the Part
Used as the default Quantity Ordered on Orders created using the Default Stock Customer Code designated in
Company Preferences
Orders for any other Customer Code look to Quotes or first Quantity Break of Part
Used for Estimating purposes to keep anticipated costs for Sub-assemblies consistent on Estimates and Quotes
for Top Level Parts for smaller quantities
Example: Minimum Run for SUB1 is 200
Quote created for Top Level Part that uses SUB1 for quantity of 100
System uses cost to make 200 units of SUB1 for ESTIMATING cost of Top Level Part

How To Use the Enterprise E2 Shop System
R. 1.0 Page 210 of 295
Assumes SUB1 will be made in advance or on separate Stock Run to accommodate Minimum Run as
opposed to simply making 100 units
Part Weight and Weight unit Of Measure are dynamically linked to values on Inventory Tab
Details – Manufacturing - Bill Of Material Sub-tab
Enter Part Numbers for material or other Manufactured items used in the production of the Manufactured Part
being defined
Records can be one of two types:
Purchased material (Part Type = P)
Can be defined in Part Table or added “free form”
Manufactured items (Part Type = M)
Must be defined in Part Table
If using records defined in Part Table, select them using drop-down menu
If adding records “on the fly,” manually enter Part Number and related details
Limited information can be provided
Only Purchased Parts can be added in this manner
Associate the appropriate Estimate Code for each item if creating multiple production scenarios
Parts must be listed multiple times if it is common to more than one Estimate Code process
DEFAULT Estimate Code assigned automatically by system
Assigning a Step Number to material indicates it is not needed until that point of the production process
If Part is not Posted during Job Material Processing:
Order By Date set based on anticipated Start Date/Time of designated Step (Purchased Part)
Due Date of Sub-Job based on anticipated Start Date/Time of designated Step (Manufactured Part)
Defaults to Step 0
Assumes Part is required at beginning of production
Quantity (Stocking) represents how much material is anticipated to be needed to make the Part
Value entered depends on Unit Of Measure (Stocking) selected
If Unit Of Measure (Stocking) is set to the required item’s Stocking Unit (BAR, EA, etc.):
Quantity (Stocking) represents how much material it will take to make One Unit (BARS per Part)
Quantity can be decimal value when dealing with Purchased Parts
Be aware of material configuration regarding use of decimals, as this an Estimate of what it will take to
make ONE UNIT
Actual amount required will depend on Quantity To Make of Manufactured Item
Quantity must be whole value when dealing with another Manufactured Part (Sub-assembly)
If Unit Of Measure (Stocking) is set to P:
Quantity (Stocking) represents how many Parts can be made out of 1 Stocking Unit’s worth of material
(Pieces or Parts per BAR)
System assumes at least one entire Stocking Unit (BAR, SHEET, etc.) will be Consumed and expensed to Jobs
for the Part
Cost of 1 Stocking Unit spread proportionately across Price Breaks up to the amount in Quantity (Stocking)
field
Cost of another Stocking Unit is added each time Quantity threshold is reached
Example: Assume 10 Parts (Quantity) can be made from 1 BAR (Unit Of Measure = P)

How To Use the Enterprise E2 Shop System
R. 1.0 Page 211 of 295
Price Breaks = 1, 5, 10, and 15 (Sales Tab)
Entire cost of BAR placed in Unit Cost of Price Break = 1
20% of cost of BAR placed in Unit Cost of Price Break = 5
10% of cost of BAR placed in Unit Cost of Price Break = 10 (Optimal use of BAR)
Unit Cost of 15 will increase as another BAR is expensed, but not as high as Price Break = 1
The larger the Price Break the less impact each additional BAR has
Calculator Utility will be available for use if Calculator Code was associated with required material
Can be used to determine either Parts per Stocking Unit (Parts per BAR, SHEET, etc.) or Stocking Units per
Part (BARS per Part, SHEETS per Part, etc.)
Formula pulls from Calculator Code assigned to material
Unit Of Measure (Stocking) determines how material cost is distributed
See details of Quantity (Stocking) field immediately above for additional information
Vendor Code represents who the material is expected to be purchased from (Part Type = P)
Can select different Vendor if more than one associated with Part
Entire Vendor List will be available if adding “free form” material
There will be no Vendor Code associated with Sub-assembly items (Part Type = M)
Additional fields are available for reference in the Grid
Details – Manufacturing - Routing Sub-tab
Step Number represents the order in which work will progress
Defaults to increments of 10
Can edit Step Numbers
Can insert new Steps by entering information on first blank row of Grid and changing Step Number to fit
between existing ones
System will re-sort in correct sequence when record Saved
Can reset in increments of 10 by using the Renumber feature
Step Numbers “shared” by Routing Tab and Outside Services Tab
If a Step Number appears to be skipped, it is likely used on the Outside Services Tab (or vice versa)
Associate the appropriate Estimate Code for each Step if creating multiple production scenarios
Steps must be listed multiple times if it is common to more than one Estimate Code process
DEFAULT Estimate Code assigned automatically by system
Work Center represents where work is being performed (internally)
Cost and Billing Rate values auto-populate from Work Center selected
Operation Code can be used to specify what is being done at the Work Center
Auto-populates from Work Center if a Default Operation Code was designated
Can be selected or edited manually
Production-related details pull from Operation Code if selected
Operation Code is optional value
Description provides written details regarding the work to be performed
Prints on Job Traveler
Auto-populates from Operation Code selected
Can be manually entered or edited as needed

How To Use the Enterprise E2 Shop System
R. 1.0 Page 212 of 295
Setup Time represents the estimated amount of time (in terms of the selected Unit) it will take to prepare the Work
Center
Setup Unit works in conjunction with Setup Time to define how long it is estimated to take to prepare the Work
Center
Options include
Hours
Minutes
Seconds
Setup Time is a fixed value, regardless the quantity estimated/worked on
Cycle Time represents the estimated amount of time (in terms of the selected Unit) it will take to perform the work
detailed in the Description
Cycle Unit works in conjunction with Cycle Time to define how long it is estimated to take to perform the work
detailed in the Description
Options include
Hours
Minutes
Seconds
Pieces Per Hour (System uses value to calculate it will take to make one unit in terms of an hour)
Cycle Time will vary depending on the quantity estimated/worked on
Regardless the Unit Selected for estimating purposes, the system will convert all values into terms of hours
for calculation and report purposes.
Machines Run (By Operator): The number of machines the Employee performing the work is capable of running at
one time
If greater than 1, estimated Labor Costs (Cycle Time only) will be reduced accordingly
Machines Job Run On: The number of machines the scheduled Job is able to be worked on at the same time (for a
given Step)
If greater than 1:
Estimated Cycle Time is decreased (same number of Machine Hours spread across multiple machines)
Estimated Setup Time is increased (multiple machines must be prepared)
The Capacity Factor of Work Centers need to match this value in order for scheduling assumptions to be
accurate
Team Size: The number of Employees it is estimated to take to perform the work detailed in the Description
If greater than 1, estimated Labor Costs (Cycle Time only) will be increased accordingly
Scheduled Cycle Time will not be impacted
Scrap Percent: The amount of expected scrap or wasted material that will occur during the Step
If greater than 0, the system will calculate(during Job Material Processing) how many additional units need to
be made to compensate for the anticipated scrapped pieces
At a minimum you will be required to make one additional unit
Scrap is cumulative meaning a 1% Scrap Percent on each of 5 Steps will result in a minimum of 5 additional
units being made
Costs and estimated times are impacted by what Step Scrap is associated with

How To Use the Enterprise E2 Shop System
R. 1.0 Page 213 of 295
If Scrap is on the first Step, the system assumes additional work is not required beyond that point for
anticipated “extra” scrap units
If Scrap is on final Step, the system assumes extra work is required throughout the entire production
process and the “extra” units will be dealt with at the end
If Scrap is located “somewhere in between,” additional work is scaled accordingly
Since Scrap Percentages are cumulative consider placing a single Scrap Percent for the entire Routing on a
designated Step, but realize scheduled time (and associated costs) are impacted by the Step selected.
Percent Efficient: How efficiently the work detailed in the Description can be performed
If less than 100%, Cycle Times (at the Job Level) will be scheduled to take longer to complete than the amount
of time listed here
Example: If Efficiency is 80%, Cycle Time will be increased by 20% FOR SCHEDULING PURPOSES
Estimated Cycle Time itself is not changed, just the amount of time it is expected to take on this particular
Work Center/Step.
G/L Account (Labor): Expense account actual labor costs will be accumulated against as Time Tickets are turned in
against the Step
If Labor G/L Account is left blank at the Job Level, costing reports (Job Cost Summary, WIP Summary,
Margin Summary, etc.) will display dollar amounts with no description or a reference of UNKNOWN.
Mark a Step as Unattended (checkbox) if the Employee is able to prepare the Work Center and then leave it once
the work process has begun
Unattended Steps will estimate/capture Burden Costs for Cycle Time but NOT Labor
Unattended Steps will estimate/capture BOTH Burden and Labor Costs for Setup Time
Mark the option Consumes Raw Material on the Work Center if material is physically altered during the Step
If Jobs are configured to perform Incremental Job Costing, material is not Consumed until pieces are completed
against the first step configured to do so
Once Consumed in this scenario:
Material Cost captured
Material will not be automatically placed back into Inventory if the Job is subsequently Cancelled
Steps such as Engineering, Inspection, and Shipping will typically not Consume Material
Location Code represents physical location of Work Center
Helps track movement of Material/Jobs
Used if you are requiring the creation of Inventory Transfer records before production can begin
Mark the option (checkbox) Overlap Steps if work can begin on subsequent Steps before all the pieces have been
completed on the current Step
If enabled, the system will schedule work to begin on the next Step once a pre-determined number of pieces
have been completed on the current Step based on the Overlap Method
Overlap Method determines how many pieces must be completed on the current Step before work will be
scheduled to begin on the next Step

How To Use the Enterprise E2 Shop System
R. 1.0 Page 214 of 295
Automatic: The system will schedule the next Step to complete its Setup process as soon as the first piece is
completed on the current Step
If the Cycle Time on the next Step is FASTER than the Cycle Time of the current Step, it will build in a “head
start” amount to ensure the next Step does not run out of parts
There is no additional input required for this option
Hours: The system will wait a specified length of time before scheduling the next Step
If selected, you must also designate the number of hours to wait in the Overlap Quantity field
Percent: The system will wait until a specified percentage of pieces have been completed before scheduling
the next Step
If selected, you must also designate the percent that needs to be completed in the Overlap Quantity field
Pieces: The system will wait until a specified number of pieces have been completed before scheduling the
next Step
If selected, you must also designate the number of pieces that need to be completed in the Overlap
Quantity field
None: Overlapping is disabled and the system will schedule the next Step to begin after all the pieces have
been completed on the current Step
Additional fields are available for reference in the Grid
Each Step can have a different option with regards to Overlapping.
Details – Manufacturing - Outside Services Sub-tab
Step Number represents the order in which work will progress
Defaults to increments of 10
Can edit Step Numbers
Can insert Steps by entering information on first blank row of Grid and changing Step Number to fit between
existing ones
System will re-sort in correct sequence when record Saved
Can reset in increments of 10 by using the Renumber feature
Step Numbers “shared” by Routing Tab and Outside Services Tab
If a Step Number appears to be skipped, it is likely used on the Outside Services Tab (or vice versa)
Associate the appropriate Estimate Code for each Step if creating multiple production scenarios
Steps must be listed multiple times if it is common to more than one Estimate Code process
DEFAULT Estimate Code assigned automatically by system
Service Code represents the type of work being provided by the Vendor
Auto-populates Vendor (with Default Vendor) and Vendor-related details (Step Details) when selected
In Outside Services Step Details
Details – Manufacturing - Outside Services - Vendors Sub-tab
List of Vendors available to perform service required
Can select a different Vendor from list for this specific Step
For each Vendor, the following information is present:
Markup Percent: Determine what the Sales Price should be for the service
Lead Time Days: Anticipated amount of time it will take to receive items back

How To Use the Enterprise E2 Shop System
R. 1.0 Page 215 of 295
Price By Weight: Select if the Vendor prices the service based on the weight of the Parts sent to them as
opposed to a per piece or Lot charge
Need Pricing: Mark this option to indicate the need to create a Vendor RFQ for the specific Service Step
Price Breaks and cost information become available in the bottom of the Grid as each Vendor is selected
Details – Manufacturing - Outside Services - Routing Step Details Sub-tab
If Certifications Required is marked:
System places a comment on the PO for the Service to that effect
The PO information is placed in the Certification print spool and is available to select to print
Ignore Vendor Minimum Charge allows a PO to be created for an amount less than the stated Minimum Charge
If not allowed, the PO will be created for the Minimum Amount if the service cost is less than that value
Description prints on the PO created for the Service Step
Auto-populates from the Service Code selected
Can be manually entered or edited
Details – Manufacturing – Scheduling Sub-tab
This Tab simply reflects the information calculated by the System and applied to the Job for scheduling purposes
Schedule Code: The Default Schedule Code
Displays only if Job has been included in the Schedule Code listed
Default Schedule Code designated in Scheduling Module
*Scheduling Direction: Indicates whether the Job is using Forward or Backward Scheduling Logic
Scheduled Start Date: Date the first non-completed Step is scheduled to begin
Will update as time and pieces are entered against the Job
Scheduled End Date: Date the final routed Step is scheduled to be completed
Scheduled (checkbox): Indicates whether the Job has been included in the Schedule Code’s Whiteboard
Schedule Locked (checkbox): Indicates whether the Job has been locked in place on the Default Schedule Code
Overlap Routing Steps (checkbox): Indicates whether the Job’s Steps will be overlapped for scheduling purposes
Scheduling Grid: Reflects the individual details of each routed Step of the Job
For additional information regarding Scheduling functionality and concepts, see the Scheduling section of
this manual, located under Shop Floor Control.
Details - Miscellaneous Charges Tab
Select as many Miscellaneous Charge Codes as necessary to represent additional charges to be passed on to the
Customer other than shipping and Unit Price
Common Miscellaneous Charges include:
Document-related fees
Certification fees
Fuel surcharges
Unit Of Measure determines how the Charge Amount will be calculated
Purchasing Unit (EA by Default) – The amount will be charged for each unit purchased
LOT – Amount will be charged as flat amount regardless of quantity
C – Amount is divided by 100 and charged for each unit purchased
M – Amount is divided by 1,000 and charged for each unit purchased

How To Use the Enterprise E2 Shop System
R. 1.0 Page 216 of 295
Include In Piece Price determines how the Charge Amount will be displayed
Yes – Amount is rolled into Unit Price on Quote/Order
No – Amount will display as separate line item on Quote/Order
G/L Account represents the default income account that will auto-populate on Orders
Pay Commission – Indicates whether Charge Amount should be included in Sales Commission
Option must be selected if Include In Piece Price is used
Pay Tax – Indicates whether tax should be applied against Charge Amount if applicable
Apply Discount – Indicates whether Charge Amount is eligible for discount if A/R Invoices for Part are paid
within stated terms
Details – Releases Tab
The Releases Tab represents the anticipated shipping schedule for the items being made on a particular Job
Regardless the number of Releases entered, E2 assumes the entire quantity represented will be made at
the same time by the earliest Due Date listed.
Release Number: Means of tracking various Releases
System-generated
Can be edited
Releases that share the same Due Date must have the same Release Number
Releases that share the same Due Date cannot have the same Release Type
Release Type: Indicates the nature and final destination of the Release
Customer: Default for Top Level, Non-Stock Jobs
Can have as many Customer Releases as desired so long as they have different Due Dates/Release Numbers
Use Packing Lists to send to Customer/close Job
Stock: Default for designated Stock Jobs
Can be added manually on “regular” Customer Job Releases PRIOR to Processing
Display as Quantity to Stock
Use Stock Job Transfer to send to Inventory
Cannot Rob From Stock Release on Customer Job
Use Stock Job Transfer to send parts to Inventory/close Job
Overship: Excess parts sent to the Customer
Expectation is to add to Packing List as items are being prepared to be shipped to Customer
Can add directly to Job AFTER Job is processed
Overtransfer: Excess parts sent to Inventory
Expectation is to add to Stock Job Transfer as items are being prepared to be placed into inventory
Can be selected on a Packing List if extra items will not be shipped to Customer
A Stock Job Transfer would still have to be created to finalize the process of placing the items into
inventory
Can add directly to Job AFTER Job is processed

How To Use the Enterprise E2 Shop System
R. 1.0 Page 217 of 295
Sub-assemblies: Manufactured parts required for the completion of other (Top Level) Manufactured items that
have not been pulled from Inventory
Assigned by E2 during Job Material Processing
Will have their own Job Numbers, requirements, etc.
Display as Quantity to Stock
Applied to Parent Job using Stock Job Transfer
Do not impact Inventory levels/valuation
Cancel: Releases on processed Jobs that have been manually cancelled by User
Not selected from drop-down
Assigned by E2 when “Cancel” utility used
Can Cancel Releases for:
Entire Order
Specific Job
Specific Release of a Job – but ONLY IF material has not been Filled From Bin or Stock Job
If Job not processed, simply Delete Release
Reject: Parts rejected from Customer Returns, Internal Rejections, etc.
Assigned by E2 as Quantity Rejected
Exact process depends on use of Inspections (Quality Module required)
Scrap: Anticipated or Actual scrap amounts
Can appear in one of two ways:
Assigned by E2 during Job Material Processing due to the presence of a Scrap Percentage on a Routed
Step
Assigned by E2 when pieces are Rejected from Time Tickets
Anticipated Scrap Releases converted to Overship or Overtransfer if successfully made (i.e. reported as
Accepted on Time Ticket)
Due Date: Date the Items being made are anticipated to be shipped/transferred
See notes regarding Item Number for additional information regarding Due Dates
Quantity: The number of Units anticipated to be shipped/transferred
Cannot increase Quantity beyond Quantity Ordered once the Job has been Processed
Quantity can be reduced and split into multiple Releases
Notes: Release Notes carry over to Packing List
Details - Order Material Tab
The Order Material Grid displays all the material-related records for the selected Job and can be reviewed to see what
has been applied to a Job and how
Status: Indicates the current status of the listed material record in relation to the Job
Works in conjunction with Source to indicate how requirements have been filled
Common Order Material Status options are listed below (Not an exhaustive list)
Needed: Requirement that needs to be filled
Default Status for all new records, including Item being made prior to Job Material Processing
Only Needed records display in the Grid unless the option at the bottom of the screen to Show
Additional Order Material Records is enabled
How To Use the Enterprise E2 Shop System
R. 1.0 Page 218 of 295
Posted: Material has been Posted to the Job
From Inventory
Received from PO
Also associated with Outside Service Requirements that have been received back from Service Vendor
Ordered: Requirement has been placed on a Purchase order
Purchased Part (Material Requirement)
Manufactured Part (Outside Service)
To Make: Manufactured Part that has undergone Job Material Processing and needs to go through
production process
Default Status when option to Use Time Tickets is enabled
Changes to Ready To Ship/Ready To Transfer when Pieces Accepted are entered on Time Ticket against
final routed Step of Job
Sub-assemblies will display on the Order Material Tab of two Jobs as To Make if not Posted from
Inventory:
o The Parent Job: As a Requirement of the Parent Part, the Sub will display as would any other
required item
o The Sub-assembly Job: As a Manufactured Part that needed to go through the production process
with its own set of requirements
Ready To Ship: Manufactured Part with Customer Release that is eligible to be shipped
Default Status when option to Use Time Tickets is not enabled
o Bypasses To Make Status, as System does not know whether Time Tickets will be used
To Make switches to Ready To Ship as Pieces are entered against final routed Step
Ready To Transfer: Manufactured Part with Stock Release that is eligible to be transferred
Default Status when option to Use Time Tickets is not enabled
o Bypasses To Make Status as System does not know whether Time Tickets will be used
To Make switches to Ready To Transfer as Pieces entered against final routed Step
Would be used on Jobs for Top Level Parts being made for Inventory or Sub-assemblies
Source: Works in conjunction with Status to identify how requirements are filled
Common Source options are listed below (Not an exhaustive list):
Needed: An unfilled requirement
To Make: Manufactured Part that needs to go through production process to fill requirement
Top Level (Parent) Part
Sub-assembly
Filled From Bin: Material Posted from Inventory
Filled From PO: Material or Service Requirement filled by receiving items from Purchase Order
Filled From Stock Job: Requirement for Manufactured Part has been met by robbing from a Stock Job
Top Level (Parent) Part
Sub-assembly
Would also see a “Break Link” icon indicating the creation of a link between the
Manufacturing (Stock) Job and the Destination (Customer) Job
o Use the option to Break Link if you wanted to edit the information on either Job

How To Use the Enterprise E2 Shop System
R. 1.0 Page 219 of 295
The ability to Rob from a Stock Job depends on the following things:
The Part being Robbed must be on an Order using the Default Stock Customer Code.
Company Preference to Fill Requirements From Stock Jobs is enabled.
Part Preference to Automatically Fill Requirements is enabled.
The Due Date of the Stock Job is equal to or prior to the Due Date of the Customer Job.
Part Number/Revision Level: Identifies the Part that is required
Additional Fields in Grid identify whether the Part represents a Manufactured part, Purchased Part, an Outside
Service or Sub-assembly
Step Number: Indicates what Step the Requirement is associated with
Outside Services display Step Number from Routing/Outside Service Grid
Material is assigned to a Step on the Bill Of Material
If a Job has been Processed, Material Requirements are added directly to the Order Material Grid
Cannot be added to Bill Of Material once processed
Enter the Quantity Required in terms of the Total Quantity Ordered
Unlike values entered on BOM which are in terms of making one unit
Additional Outside Service Requirements would be entered on the Outside Services Tab
Details - Miscellaneous Job Costs
Used to track additional costs that fall outside the traditional means of tracking
Part Number/Revision Level: Indicates the nature of the cost
Can select a defined Part from the drop-down list
Can enter a Part Number “on the fly”
Revision uses value of DEFAULT in this instance
Can be edited/entered manually
Part Description: Additional information regarding the cost
Auto-populates if Part selected from drop-down
Can be edited/entered manually
In addition to a Part Number, each record in the Grid needs the following values at a minimum:
Quantity: Must have a Quantity of 1 or more
Be mindful of the Unit applied to the Quantity
EA (Price Per Each)
LOT (Lot Price)
MIN (Minimum Price)
C (Price per Hundred)
M (Price Per Thousand)
Unit Cost: Must have a dollar value entered for cost calculation
Enter additional information as desired/appropriate
If G/L Account is left blank, Job Costing/WIP Reports will display a value associated with an entry of UNKNOWN
(or it may be blank)

How To Use the Enterprise E2 Shop System
R. 1.0 Page 220 of 295
Details – Image Tab
Associated images will display on Scheduling Whiteboards if option to do is enabled
Supported image types are .bmp and .jpg
Header Tab
Information that pertains to the entire Record, as opposed to a specific Line Item
Header Items Sub-tab
*Currency Code: Defaults to the Currency Code associated with the Customer/pulled form Quote
*Exchange Rate: Defaults to the rate associated with the Currency Code at the time the record is created
Notes: Appear on Work Order and Acknowledgement
Specific to selected Order
Information that should appear on all Orders should be entered in Report Customization
Displayed in Layout Tab prior to Generating
Can be edited for specific output Generation but resets based on Report Customization values afterward
Addresses Tab
Billing Address Sub-tab
Location Code: Uses Default Quoting Location designated on Customer/pulled from Quote
Physical Address Details populated based on the Location Code
Street Address
City
ZIP/Postal Code
State/Province
Country
Selecting a different Location Code re-populates Physical Address Details
Physical Address Details can be manually edited as well
*Company Name: Auto-populates from Customer Code
Can be manually edited
Billing Address – Contact Sub-tab
(Billing) Contact: Select a Contact from the Customer Contact list
Does not auto-populate
Provides email address when records emailed directly from System
Pulls email address from Customer Contact details
Can be changed during process of emailing
Phone Number: Auto-populates with General Customer Contact information
Replaced by specific Contact Phone Number when one is entered
Fax Number: Auto-populates with General Customer Contact information
Replaced by specific Contact Fax Number when one is entered
Shipping Address Sub-tab
Address Type: Determines how Physical Address Details are obtained
Can be one of the following:
Internal

How To Use the Enterprise E2 Shop System
R. 1.0 Page 221 of 295
Customer (Default)
Vendor
Third Party
Allows for drop shipments
Address Type selection impacts Code options (below)
Code: Represents specific Company Code depending on the Address Type selected
Customer Code list available if Address Type = Customer
Vendor Code List available if Address Type = Vendor
Code is not available if Address Type = Internal or Third Party
Location Code: Uses Default Shipping Location designated on Customer
Physical Address Details populated based on the Location Code
Street Address
City
ZIP/Postal Code
State/Province
Country
Location Code options narrow based on Address Type/Code selections
Address Type = Customer or Vendor
Location Codes listed based on specified Customer or Vendor Code selected
Address Type = Internal
Location Codes of your Company available
Address Type = Third Party
Location Code not available
Physical Address Details will need to be entered manually
Selecting a different Location Code re-populates Physical Address Details
Physical Address Details can be manually edited as well
Shipping Address – Contact Sub-tab
(Shipping) Contact: Select a Contact from the Contact list
Does not auto-populate
Selections will change based on Address Type and Code selected on Shipping Address Tab
Phone Number: Auto-populates with General Customer Contact information
Replaced by specific Contact Phone Number when one is entered
Fax Number: Auto-populates with General Customer Contact information
Replaced by specific Contact Fax Number when one is entered
Shipping Address – Miscellaneous Sub-tab
Shipping Code: Auto-populates from Location Code Details
Shipping Code Details used on Packing Lists
Can be edited on Packing List as needed
F.O.B. Point: Auto-populates from Location Code Details
Account Number: Your Account Number with the designated Shipping Code carrier
Auto-populates from Shipping Code
Territory Code: Auto-populates from Location Code Details

How To Use the Enterprise E2 Shop System
R. 1.0 Page 222 of 295
Can be used to filter reports and searches
Print Certifications: Passed on to Orders and Packing Lists
Option must be enabled on Packing Lists to be available to print Certification
Can be edited manually on Packing List, as needed
Job Material Processing (JMP)
Overview
Process Selected Jobs
Allows production to begin
Cannot create production records against Unprocessed Jobs:
Time Tickets
Material Allocations
Purchase Orders
Creates Requirements
Material Requirements may be filled during Processing, if settings allow
Allows for more efficient allocation of material
Can process Jobs for same Parts from multiple Orders at same time
Shared Requirements are listed on one screen
Unprocess Selected Jobs
Allows System to recalculate Requirements
So long as Jobs are not In Process
Can unprocess single Job from an Order
Can unprocess multiple Jobs from multiple Orders
Functionality: Loading Jobs
Company Preference: Automatically Perform Job Material Processing Following Order Entry = YES
Job Material Processing (also referred to as “JMP”) Utility launches every time an Order is Saved and Closed if any
Unprocessed Jobs are present
All Unprocessed Jobs are automatically loaded from Order
Same functionality in utility, as noted below
Would post material to Jobs continuously throughout the day
Do not have to Process Jobs even though utility launches
Company Preference: Automatically Perform Job Material Processing Following Order Entry = NO
JMP Utility does not launch when Order is Saved and Closed
EXCEPTION: Stock Orders (Default Stock Customer Code) will launch JMP Utility automatically
Default assumption is that the Order needs to be in System as soon as possible
Do not have to Process Jobs even though utility launches
User decides when to launch utility
Allows for posting of material at set times during day
Ability to consolidate Processing of like Parts
Utility located under Orders | Job Material Processing
JMP Search Grid loads with Open Customer Jobs by default

How To Use the Enterprise E2 Shop System
R. 1.0 Page 223 of 295
Jobs with a Customer Code other than the Default Stock Customer Code
Including Jobs with individual Stock Releases
Though considered Open, Jobs with a Status of Hold are not displayed
Planned Jobs do display
Can be Processed to see what Requirements would be needed
System will not Post material to Planned Jobs during JMP even if settings would otherwise allow it and
material is Available
Edit Search options to see Stock Orders
Orders using Default Stock Customer Code
Sub-assembly Jobs are not displayed
Cannot Process/Unprocess Sub-assemblies in same manner
They are dealt with inside the JMP utility
Search options can also be used to narrow list of Jobs in multiple ways
By Job Number
By Order Number
By Customer
By Part Number
Etc.
Grid Filter options can also be used to narrow list
Particularly useful to display only Processed or Unprocessed Jobs
Once desired Jobs are selected, click Process Job Material
Functionality: Processing Jobs
JMP Detail Grid displays consolidated list of Manufactured Parts present on selected Jobs when utility launches
Only Top Level (Parent) Parts are displayed
If same Part is present on multiple Jobs, it is only listed one time
Open Details to see what Jobs call for each Part
Consider the following Grid Fields:
Required:
Prior to Processing: Combined Quantity of Manufactured Part that has been Ordered
Once Processed: Includes combined Purchase Requirements and Sub-assemblies needed
Buy Or Make: Combined Quantity that needs to be filled
Will match Required Quantity prior to processing
Once Processed, this Quantity may decrease, depending on the following values and related settings:
Filled: Quantity Posted from Inventory during Processing
o Parts must be Available
o Settings must allow filling of Requirements
o Quantity Filled is subtracted from Quantity Required to determine Quantity to Buy Or Make
Available In Bin(s): Quantity of material in Inventory that is eligible to be Posted to fill Requirements
Available On Stock Jobs: Quantity of Parts that are eligible to Rob from current Stock Jobs
o Orders using Default Stock Customer Code
How To Use the Enterprise E2 Shop System
R. 1.0 Page 224 of 295
Automatically Fill (checkbox): Indicates if Part is eligible to be Posted during Processing if there is any
Available
o Can manually add/remove check if desired
When the Process button at top of utility is clicked:
Available Parent Parts are Posted to Fill Required Quantities, if Automatically Fill enabled
If Requirement for Parent Parts cannot be completely Filled:
Material Requirements for remaining (Buy Or Make) Quantities are calculated
Purchased Parts
Manufactured Parts (Sub-assemblies)
Additional Parts are displayed in JMP Detail Grid
System applies same logic as before to determine whether these Requirements can be completely Filled
If Yes – Material is Posted and Requirement is marked as Filled
If No – Requirement is generated that will need to be satisfied
Purchased Parts: By Purchase order or Material Allocation
Manufactured Parts: By completion of Sub-assembly Job that is created
Additional Requirements are consolidated in same fashion as original Parent Parts
Open Details of a Part Record to see what Job(s) it is needed on
Part Number Details Grid
Parent Job Number: Indicates which Job(s) need the material
Status: Indicates whether the Requirement has been met or not
Needed = No Material Posted – Requirement not filled at all
Partial = Some Material Posted – Requirement partially filled
Filled = All Material Posted – Requirement completely filled
If Material is listed as Available, it is possible to open Sub-details (Bin Locations of Part)
Unprocess specific Record
Can edit Quantity Posted if desired
Can specify Bins/Locations Material should Post from
Can Post drops of Material (if allowed) to make use of decimal quantities
Closing Sub-details after making change automatically Re-processes Record
If you do not want the Material to Post at all, remove the Automatically Fill option and then Re-process
If you do not want to create Requirements or post Material, simply Close the utility without Saving
Material is not actually Posted/Requirements not created until results of JMP Utility have been saved.
Jobs will not be marked as Processed
Functionality: Unprocessing jobs
Select previously Processed Jobs
Click Process Job Material
Within the utility
Unprocess specific Records (noted above)
Click Unprocess Button at top of utility to reset Job(s) to Unprocessed state
Cannot Unprocess Jobs if they are already In Process

How To Use the Enterprise E2 Shop System
R. 1.0 Page 225 of 295
See section on Order Entry for list of transactions that will cause a Job to be In Process
Shipments / Packing Lists
Overview
Used to track delivery of Parts to Customers
As final step of production process
Removes costs from WIP
Changes Job Status to Closed when all Parts shipped
Source Record(s)
This Record can use the following Sources to provide information during its creation:
Part Number
Order
Destination Record(s)
This Record can be used as a Source to provide information on the following Records:
A/R Invoice
Customer Return
Key Values/Points of Consideration (An asterisk [*] indicates a Required Field)
General Tab
*Packing List Number: Up to 50 alpha-numeric characters
*Customer Code: Who ordered the Parts
Auto-populates from Order if used as Source
Cannot change from value listed on Order
Selected manually if Part is used as Source
May not be the same as whom Parts are shipped to
Customer Name: Auto-populates based on Customer Code
*Packing List Date: Date Parts were shipped
Defaults to current day’s date
Can be edited
Packing List Line Item Grid
*Item Number: Uniquely identifies Grid Records present
Can be edited
Subsequent Item Numbers automatically renumber accordingly if changed
Job Number: Identifies the Job selected Parts are being shipped from
Auto-populates when Order is used as Source
Cannot be edited/entered manually
Not present if Order is not used as Source
Part Number: Items being shipped
Auto-populates when Order is used as Source
Cannot change from value listed on Order

How To Use the Enterprise E2 Shop System
R. 1.0 Page 226 of 295
Selected manually if Part is used as Source
Part does not have to be defined as Table Item
Can enter Part Number manually (“on the fly”)
Inventory levels not affected even if Part is defined as Table Item
Allows for shipping of Parts that have no Available Quantity
A/R Invoices will not display Unit Price on Parts shipped outside an Order
Manually enter Price on Invoice
Revision Level: Revision of Part being shipped
Auto-populates from Order when Order is used as Source
Cannot change from value listed on Order
Auto-populates from Part when Part is used as Source (selected from Table)
Can select different Revision if Part has more than one present
Populates with DEFAULT if Part Number entered manually
Can be edited
Quantity Open: Quantity not yet shipped
Pulls from Job Release Details if Order is used as Source
Defaults to 1 if Part is used as Source
Quantity To Ship: Quantity to include in current delivery
Pulls from Job Release Details if Order is used as Source
If multiple Releases are present, this value will be less than Quantity Open until the final shipment
Defaults to 1 if Part is used as Source
Quantity To Overship: Excess Parts made during production
Cannot be entered directly on Packing List
Pulls from Job Release Details
Quantity values must be edited in Line Item Details as they are Read Only directly within the Line Item Grid.
Part Weight: Weight of single Part
If User decides to utilize available functionality on Containers Tab, System uses Part Weight (in conjunction with
Weight Unit of Measure) to determine how heavy the total shipment would be
Also takes into account weight of Container
Applies this information against Shipping Code details to determine optimal distribution of Parts for shipping
purposes
Packing List Details – Releases Tab
*Release Type: Indicates nature of Release
Pulls from Job Details
Cannot be edited
*Due Date: Date Customer wants Parts completed by
Quantity To Ship/Cancel: Quantity to include in current shipment
Quantity can be reduced
Remaining amount split onto separate record
Considered as Backlogged to ship in the future
Quantity can be increased beyond Quantity Ordered

How To Use the Enterprise E2 Shop System
R. 1.0 Page 227 of 295
Excess Parts are added to Packing List as an Overship or Overtransfer Release Type
Additional Quantity can be added on the next available line if additional Releases are still open on the Job
Indicates an early shipment against already Ordered Parts
Reduces next Release accordingly
Header Tab
Information that pertains to the entire Record as opposed to a specific Line Item
Header Items Sub-tab
*Currency Code: Defaults to the Currency Code associated with the Customer/pulled form Order
*Exchange Rate: Defaults to the rate associated with the Currency Code at the time the record is created
Notes: Appear on Packing List
Specific to selected Packing List
Information that should appear on all Packing Lists should be entered in Report Customization
Displayed in Layout Tab prior to Generating
Can be edited for specific output Generation but resets based on Report Customization values afterward
Addresses Tab
Billing Address Sub-tab
Location Code: Uses Default Quoting Location designated on Customer/pulled from Order
Physical Address Details populated based on the Location Code
Street Address
City
ZIP/Postal Code
State/Province
Country
Selecting a different Location Code re-populates Physical Address Details
Physical Address Details can be manually edited as well
*Company Name: Auto-populates from Customer Code
Can be manually edited
Billing Address – Contact Sub-tab
Billing Contact: Select a Contact from the Customer Contact list
Does not auto-populate
Provides email address when records emailed directly from System
Pulls email address from Customer Contact details
Can be changed during process of emailing
Phone Number: Auto-populates with General Customer Contact information
Replaced by specific Contact Phone Number when one is entered
Fax Number: Auto-populates with General Customer Contact information
Replaced by specific Contact Fax Number when one is entered
Shipping Address Sub-tab
Address Type: Determines how Physical Address Details are obtained
Can be one of the following:

How To Use the Enterprise E2 Shop System
R. 1.0 Page 228 of 295
Internal
Customer (Default)
Vendor
Third Party - Allows for drop shipments
Address Type selection impacts Code options (below)
Code: Represents specific Company Code depending on the Address Type selected
Customer Code list available if Address Type = Customer
Vendor Code List available if Address Type = Vendor
Code is not available if Address Type = Internal or Third Party
Location Code: Uses Default Shipping Location designated on Customer
Physical Address Details populated based on the Location Code
Street Address
City
ZIP/Postal Code
State/Province
Country
Location Code options narrow based on Address Type/Code selections
Address Type = Customer or Vendor
Location Codes listed based on specified Customer or Vendor Code selected
Address Type = Internal
Location Codes of your Company available
Address Type = Third Party
Location Code not available
Physical Address Details will need to be entered manually
Selecting a different Location Code re-populates Physical Address Details
Physical Address Details can be manually edited as well
Shipping Address – Contact Sub-tab
(Shipping) Contact: Select a Contact from the Contact list
Does not auto-populate
Selections will change based on Address Type and Code selected on Shipping Address Tab
Phone Number: Auto-populates with General Customer Contact information
Replaced by specific Contact Phone Number when one is entered
Fax Number: Auto-populates with General Customer Contact information
Replaced by specific Contact Fax Number when one is entered
Shipping Address – Miscellaneous Sub-tab
Shipping Code: Auto-populates from Location Code Details
Shipping Code Details used to determine maximum weight limits for carrier
Can be changed as needed
F.O.B. Point: Auto-populates from Location Code Details
Account Number: Your Account Number with the designated Shipping Code carrier
Auto-populates from Shipping Code
Territory Code: Auto-populates from Location Code Details

How To Use the Enterprise E2 Shop System
R. 1.0 Page 229 of 295
Can be used to filter reports and searches
Print Certifications: Passed on to Orders and Packing Lists
Option must be enabled on Packing Lists to be available to print Certification
Can be edited manually on Packing List as needed
Containers Tab
Can be used to determine optimal distribution of Parts based on available criterion
Container Code: Default Container Code designated in Company Preferences
Used by System if option to Fill Containers is not utilized
Pack Each Line Item In A Separate Container (checkbox): Allows System to determine how Parts should be
distributed amongst Containers when selected
Works in conjunction with Fill Containers feature
Fill Containers (utility): Calculates distribution of Parts using available Criterion
Option to Pack Line Items in Separate Containers must be enabled
Looks to Part information to gather shipping-related information (present on General Tab of Packing List)
Container to use
Replaces default Container Code
Maximum number of Parts per Container
Part Weight
Looks to Shipping Code to get Carrier-related information
Maximum weight of container they will deliver
Creates list of needed Containers based on these factors in Containers Grid
If multiple Parts are present on Packing List, they are packed separately
Parts not automatically intermingled
Can be packed together by manually moving them
Grid details display results of Fill Containers utility
Can be manually edited in Details
Container Grid Details
Container Number: Current Container being viewed
Hazardous Material (checkbox): Indicate whether the contents of this Container are hazardous
Container Code: Container assigned by System for shipping
Can be changed
Tracking Number/Reference Number: Can be entered for reference purposes
Fees and Charges: Enter the appropriate dollar values for each item present as appropriate
Apply (checkbox): Indicate whether associated Fee/Charge should be applied to Packing List
Declared Value: Dollar value of items in Container
Pulls from Order details
Can be edited
Insured (checkbox): Indicates whether contents of Container have been Insured
Calculates cost based on Declared Value
Length/Width/Height/Empty Weight: Physical dimensions and weight of selected Container
Container Contents Grid displays results of Fill Container Utility for specific Container

How To Use the Enterprise E2 Shop System
R. 1.0 Page 230 of 295
Content Transfer Feature (Forklift Icon)
Allows for transfer of Parts between Containers
Designate Destination Container
Designate Quantity to Transfer
Allows for more efficient distribution of Parts if extra space is available or if Parts can be combined
If Container winds up exceeding allowable weight, System will advise when the Packing List is Saved
Contents will need to be re-adjusted or a different Shipping Code selected
If option to Fill Containers is not used, the System assumes all the Parts fit into a single Container (using
default Container Code) and no effort is made to validate Carrier Weight limits.
Bill Of Lading Tab
Carrier Sub-tab
Shipping Vendor: Vendor Code associated with Shipping Code
Can be changed
Shipping Service: Shipping options provided by Carrier (as designated by Shipping Code)
Shipping Charges Paid by: Indicates who will pay shipping costs
Prepaid
Freight Collect
Third Party – Allows for Drop Shipments
Freight Terms Code: Terms to be applied to shipping charges (reference)
Shipping Charges Sub-tab
Displays charges associated with Packing List
Pulls information from Container Details (Containers Tab)
Special Instructions
Information prints on Bill Of Lading for selected Packing List
Notifications
These notifications work in conjunction with the third party ShipRush interface
Information on configuring and using this feature is included with the interface
Freight Remittance Address
Address Type: Determines how Physical Address Details are obtained
Can be one of the following:
Internal
Customer (Default)
Vendor
Third Party
Allows for drop shipments
Address Type selection impacts Code options (below)
Code: Represents specific Company Code depending on the Address Type selected
Customer Code list available if Address Type = Customer
Vendor Code List available if Address Type = Vendor
How To Use the Enterprise E2 Shop System
R. 1.0 Page 231 of 295
Code is not available if Address Type = Internal or Third Party
Location Code: Uses Default Shipping Location designated on Customer
Physical Address Details populated based on the Location Code
Street Address
City
ZIP/Postal Code
State/Province
Country
Location Code options narrow based on Address Type/Code selections
Address Type = Customer or Vendor
Location Codes listed based on specified Customer or Vendor Code selected
Address Type = Internal
Location Codes of your Company available
Address Type = Third Party
Location Code not available
Physical Address Details will need to be entered manually
Selecting a different Location Code re-populates Physical Address Details
Physical Address Details can be manually edited as well
Contact Sub-tab
(Shipping) Contact: Select a Contact from the Contact list
Does not auto-populate
Selections will change based on Address Type and Code selected on Shipping Address Tab
Phone Number: Auto-populates with General Customer Contact information
Fax Number: Auto-populates with General Customer Contact information
Both Numbers replaced by specific Contact-related information when one selected
Customer Returns
Overview
Track Parts returned by Customers:
What Job
What Parts
Disposition
Source Record(s)
This Record can use the following Sources to provide information during its creation:
Packing Lists
Destination Record(s)
This Record can be used as a Source to provide information on the following Records:
Inspection (Assuming the following):
Quality Module is present
Option to Inspect Customer Returns is selected

How To Use the Enterprise E2 Shop System
R. 1.0 Page 232 of 295
Orders (Repair/Remake Jobs)
Material Allocations (Restock option)
Key Values/Points of Consideration (An asterisk [*] indicates a Required Field)
General Tab
*Return Number: Up to 50 alpha-numeric characters
*Customer Code: Who returned the Parts
Auto-populates from Packing List
*Date Issued: Date the Return was issued
Defaults to current day’s date
Can be changed
Customer Return Line Item Grid
*Item Number: Used by System to identify each record (Job) in the Grid
Can be edited
Subsequent records automatically renumber if changed
Status: Indicates state of the Return (where in the process is it?)
Issued: Return has been created
Received: Parts have been received from Customer
Status changes as information is entered in the corresponding Tabs of the Return
Inspected: Parts have been inspected
Requires access to and creation of Inspection Record
Status changes once Inspection Record created
Reason Code: Indicates reason Parts were returned
Quantity Details: Displays information regarding
The number of Parts originally shipped
The number of Parts returned by Customer
The disposition of the returned Parts
Information regarding quantities must be entered/edited in the Details of the Grid
Customer Return Line Item Details – Location Tab
Status: Indicates state of the Parts referenced on the Return
Defaults to Shipped (to Customer) until disposition indicated in Details
Job Number: Job that returned Parts were made on
System will use to create link for updating of costs if it gets to that point
Quantity: Total quantity originally shipped tracked in this column across all Detail records
Defaults to full quantity shipped on Packing List for Part being reviewed
Quantity will split into additional lines if the disposition is not the same for all Parts
Quantity Returned: Number of Parts actually returned by Customer
Value entered directly if Inspections have been enabled
Calculated value based on Disposition Quantities entered if Inspections are not enabled
Disposition Quantities: Indicates the number of Parts that fall into the appropriate disposition category
If Inspections have been enabled, the User will not be able to enter values into these fields

How To Use the Enterprise E2 Shop System
R. 1.0 Page 233 of 295
System would require creation of Inspection to indicate whether the Parts were defective or not
If Inspections have not been enabled, the User would enter a value into the appropriate Column(s):
Remake – Remake from scratch
Create Remake Job on new Order
Repair – Repair existing Parts
Create Repair Job on new Order
Restock – Place Parts back into Inventory
Create Material Allocation to place Parts back into Inventory
Scrap – Scrap Parts as useless
If more than one Disposition is applicable, they would be entered on separate lines
If both Remake and Repair are applicable, consider creating multiple Returns as they would otherwise get
consolidated into one Job.
Return Creation Tab
Issued By: Employee who created the Return
Reason For Return: Information regarding why the Customer returned the Parts
Receiving Tab
Received By: Employee who received/indicated the Parts have been received
Entering this (or any other information on the Tab) updates the Status on the General Tab to Received
Date Received: Enter the date the Parts were received into your Shop
Does not auto-populate
Comments: Information regarding the receipt of the Parts or the condition of the Parts when they arrived

How To Use the Enterprise E2 Shop System
R. 1.0 Page 234 of 295
Purchasing
The Purchasing Menu provides access to the tools necessary to acquire material and services
Records/Functionality
Purchase Orders
Vendor Shipments
Vendor Request For Quotation
Receiving
Vendor Returns
Reports
Purchase Order Summary
Vendor Shipment Summary
Receiving Summary
Vendor Quality Summary
Vendor RFQ Summary
Job Requirements Summary
Vendor Return Summary
Vendor Price Catalog
Purchase Orders
Overview
Vendor Code specific purchases of
Material
Outside Services
Source Record(s)
This Record can use the following Sources to provide information during its creation:
Part Number (Typically to replenish Inventory)
Purchase Order (Copy)
Vendor RFQ (Only RFQs created from Job Requirements will display)
Job Requirements
Note Regarding Job Requirements as Source
When Material Job Requirements are used as the Source of the PO (either through the Wizard or the Job Requirement
Icon in the Grid), the User will have the ability to select specific Parts that have been created as Requirements.
When selecting these Parts, there are two settings that need to be considered:
Combine Multiple Due Dates Into The Earliest Due Date: Allows consolidation of deliveries
Combines multiple Releases (for delivery) into earliest one, if more than one present
If not combined (enabled), additional material may be purchased IF material cannot be purchased in decimal
values (Each delivery would be rounded up if necessary)
Spread Extra Material Proportionally Over All Jobs: Determines how extra material is dealt with

How To Use the Enterprise E2 Shop System
R. 1.0 Page 235 of 295
If disabled (not selected), any extra material will be placed into Inventory
Part must allow Decimal Inventory if extra amount is a partial unit to work
If enabled (selected), any extra material (and its cost) is spread proportionally across all Jobs it is being
purchased for based on original requirement distribution
When dealing with Service Requirements, only the option to Combine Multiple Due Dates will be applicable, and
then there will be no impact on the Quantity eventually received - only when received
Destination Record(s)
This Record can be used as a Source to provide information on the following Records:
Receiver
Vendor Shipment (Outside Services only – optional)
Key Values/Points of Consideration (An asterisk [*] indicates a Required Field)
General Tab
*P.O. Number: Up to 50 alpha-numeric characters
*Vendor Code: Company providing the material or service
Auto-populates if Job Requirements or Vendor RFQ is the Source
Can be changed
System prompts to update Unit Costs
Can do so only if new Vendor is associated with Parts
o Keeps previous cost information otherwise
Vendor Type: Indicates nature of material/service provided by Vendor
Can be changed on PO
*P.O. Date: Date of Purchase Order
Defaults to current day’s date
Can be changed
Outside Service (checkbox): Must be checked to indicate the PO is for an Outside Service, as opposed to material
Auto-populates, based on Vendor selected
Can be changed
When checked, it impacts the nature of Requirements displayed when Job Requirements are used as the
Source
Purchased By: Employee who created the PO
Due Date: Default Due Date to use on PO if it is not calculated by Scheduling
Defaults to current day’s date
Can be edited
Each record on PO uses the date present at the time it is added, unless Scheduling has assigned one
Purchase Order Line Item Grid
*Item Number: Used by System to identify each record (Job) in the Grid
Can be edited
Subsequent records automatically renumber, if changed
Part Number/Revision Level: Material being purchased or having service performed on it
Selected in Wizard if Job Requirements is used as Source

How To Use the Enterprise E2 Shop System
R. 1.0 Page 236 of 295
Auto-populates if Vendor RFQ is used as Source
Can be selected from drop-down if purchasing directly to Inventory
Can enter non-defined Part value manually (“on the fly”)
Unit Of Measure (Stocking and Purchasing) defaults to EA
Cannot change
Same Part Number can be present on PO multiple times
Quantity Ordered (Stocking): Amount of material being purchased in terms of its Stocking Unit
Quantity Ordered (Purchasing): Amount of material being purchased in terms of its Purchasing Unit
If a Purchased Part has different Purchasing and Stocking Units and it is not designated to Allow Purchasing
in Decimal (Stocking) Values, the PO can still be created for a decimal value in terms of its Purchasing Unit.
Unit Cost (Purchasing): Cost of one unit of material in terms of its Purchasing Unit
Unit Cost (Weight): Cost of one unit of material in terms of its Weight Unit of Measure
Typically in pounds (LB), but can be other (hard-coded) values
Applicable for Parts/Services where Vendor charges based on weight
PO Line Item Details
Details – General Tab
Notes: Auto-populates from Part Notes
Prints on Purchase Order along with Part information
Taxes: Can designate one or more Tax Codes, as appropriate
While not required at this point, it is recommended to associate an Exempt Tax Code if no Tax is required
Tax Code becomes required further along in the System
Details – Releases Tab
Release Type: Indicates whether the specified Item has been Ordered or not
*Due Date: Date the material is needed
Inherits default Due Date of PO Header if not assigned by Scheduling
Can be changed
Quantity (Purchasing): Total amount of material being purchased on specified Due Date
If being purchased for more than one Job (or for Jobs and Stock), amount summarized here:
If material/service being purchased to one or more Jobs, Sub-details must be used to make edits to
Quantity
If material is being purchased to Stock only, edit to Quantity can be made in Releases Grid for given Due
Date
If Items being purchased are due on different dates, each record must have its own Release Number
Details – Releases – Due Date Sub-details
Job Number: Indicates what Job material or service is being purchased for
Cannot be changed if the record was added from Job Requirements
Can manually select a new Job Number on the next blank line
Purchasing material to a Job in this manner WILL NOT fill an open Job Requirement even if the material and
Quantity match
Will simply add the material to the existing Requirement

How To Use the Enterprise E2 Shop System
R. 1.0 Page 237 of 295
Must use Job Requirement as Source to move it through the System
Can select Stock as the Job Number if material is replenishing Inventory levels
Quantity To Order (Purchasing): Amount of material being purchased to Job or Stock
Can be edited either up or down
If record is present as result of Job Requirement and it is decreased, the remaining amount will be still be seen
as Required
Can edit Quantity here or in Stocking or Weight fields
Location Code: Anticipated physical location of material when it is received
Details - Miscellaneous Charges Tab
Select as many Miscellaneous Charge Codes as necessary to represent additional charges to include on the PO
Common Miscellaneous Charges include
Document-related fees
Certification fees
Fuel surcharges
Unit Of Measure determines how the Charge Amount will be calculated
Purchasing Unit (EA by Default) – The amount will be charged for each unit purchased
LOT – Amount will be charged as flat amount regardless of quantity
C – Amount is divided by 100 and charged for each unit purchased
M – Amount is divided by 1,000 and charged for each unit purchased
Include In Piece Price determines how the Charge Amount will be displayed
Yes – Amount is rolled into Unit Price on Quote/Order
No – Amount will display as separate line item on Quote/Order
G/L Account represents the default income account that will auto-populate on Orders
Pay Commission – Indicates whether Charge Amount should be included in Sales Commission
Option must be selected if Include In Piece Price is used
Pay Tax – Indicates whether tax should be applied against Charge Amount if applicable
Apply Discount – Indicates whether Charge Amount is eligible for discount if A/R Invoices for Part are paid within
stated terms
Header Tab
Information that pertains to the entire Record, as opposed to a specific Line Item
Header Items Sub-tab
*Currency Code: Defaults to the Currency Code associated with the Vendor/pulled from RFQ
*Exchange Rate: Defaults to the rate associated with the Currency Code at the time the record is created
Notes: Appear on Purchase Order
Specific to selected Purchase Order
Information that should appear on all Purchase Orders should be set up in Report Customization
Displayed in Layout Tab prior to Generating
Can be edited for specific output Generation, but resets based on Report Customization values afterward
Addresses Tab
Purchasing Address Sub-tab
Location Code: Uses Default Purchasing Location designated on Vendor/pulled from RFQ

How To Use the Enterprise E2 Shop System
R. 1.0 Page 238 of 295
Physical Address Details populated based on the Location Code
Street Address
City
ZIP/Postal Code
State/Province
Country
Selecting a different Location Code re-populates Physical Address Details
Physical Address Details can be manually edited as well
*Company Name: Auto-populates from Customer Code
Can be manually edited
Purchasing Address – Contact Sub-tab
Contact: Select a Contact from the Customer Contact list
Does not auto-populate
Provides email address when records emailed directly from System
Pulls email address from Customer Contact details
Can be changed during process of emailing
Phone Number: Auto-populates with General Customer Contact information
Replaced by specific Contact Phone Number when one is entered
Fax Number: Auto-populates with General Customer Contact information
Replaced by specific Contact Fax Number when one is entered
Shipping Address Sub-tab
Address Type: Determines how Physical Address Details are obtained
Can be one of the following:
Internal
Customer (Default)
Vendor
Third Party
Allows for drop shipments
Address Type selection impacts Code options (below)
Code: Represents specific Company Code depending on the Address Type selected
Customer Code list available if Address Type = Customer
Vendor Code List available if Address Type = Vendor
Code is not available if Address Type = Internal or Third Party
Location Code: Uses Default Shipping Location designated on Customer
Physical Address Details populated based on the Location Code
Street Address
City
ZIP/Postal Code
State/Province
Country
Location Code options narrow based on Address Type/Code selections
Address Type = Customer or Vendor

How To Use the Enterprise E2 Shop System
R. 1.0 Page 239 of 295
Location Codes listed based on specified Customer or Vendor Code selected
Address Type = Internal
Location Codes of your Company available
Address Type = Third Party
Location Code not available
Physical Address Details will need to be entered manually
Selecting a different Location Code re-populates Physical Address Details
Physical Address Details can be manually edited as well
Shipping Address – Contact Sub-tab
Shipping Contact: Select a Contact from the Contact list
Does not auto-populate
Selections will change based on Address Type and Code selected on Shipping Address Tab
Phone Number: Auto-populates with General Customer Contact information
Replaced by specific Contact Phone Number when one is entered
Fax Number: Auto-populates with General Customer Contact information
Replaced by specific Contact Fax Number when one is entered
Shipping Address – Miscellaneous Sub-tab
Shipping Code: Auto-populates from Location Code Details
Shipping Code Details used on Packing Lists
Can be edited on Packing List as needed
F.O.B. Point: Auto-populates from Location Code Details
Account Number: Your Account Number with the designated Shipping Code carrier
Auto-populates from Shipping Code
Outside Service Packing Lists
Overview
Used to track delivery of Parts to Outside Service Vendors
Source Record(s)
This Record can use the following Sources to provide information during its creation:
Purchase Order (Outside Service POs only)
Destination Record(s)
This Record can be used as a Source to provide information on the following Records:
Receiver
Must use Outside Service Packing List to populate Receiver if created
PO no longer available as option
Key Values/Points of Consideration (An asterisk [*] indicates a Required Field)
General Tab
*Outside Service Packing List Number: Up to 50 alpha-numeric characters
*Vendor Code: Who is servicing the Parts

How To Use the Enterprise E2 Shop System
R. 1.0 Page 240 of 295
Auto-populates from Purchase Order
Cannot change from value listed on Purchase Order
Vendor Name: Auto-populates based on Vendor Code
*Outside Service Packing List Date: Date Parts were shipped
Defaults to current day’s date
Can be edited
Outside Service Packing List Line Item Grid
*Item Number: Uniquely identifies Grid Records present
Can be edited
Subsequent Item Numbers automatically renumber accordingly, if changed
PO Number: Identifies the Job selected Parts are being shipped from
Auto-populates from Purchase Order
Cannot be edited/entered manually
Not present if Order is not used as Source
Part Number/Revision Level: Items being shipped
Auto-populates from Purchase Order
To Ship: Quantity being sent to Vendor
Pulls from Job Release Details of Purchase Order
Edit Quantity in Line Item Details if amount being shipped is not the amount on PO
Part Weight: Weight of single Part
If User decides to utilize available functionality on Containers Tab, System uses Part Weight (in conjunction with
Weight Unit of Measure) to determine how heavy the total shipment would be
Also takes into account weight of Container
Applies this information against Shipping Code details to determine optimal distribution of Parts for shipping
purposes
Outside Service Packing List Details – Releases Tab
*Release Type: Indicates nature of Release
Reflected on Purchase Order
Cannot be edited
*Due Date: Date Parts are needed by
Quantity To Ship (Purchasing): Total Quantity being sent to the Vendor
Quantity can be reduced by opening Releases Sub-details
Details – Releases – Sub-details
Job number: Jobs the Parts are being serviced for
Quantity to Ship (Purchasing): Quantity of Parts being sent to Vendor broken down by Job
Quantity can be reduced
Remaining amount split onto separate record with Status of Ordered
Available to place on future Outside Service Packing List
Header Tab
Information that pertains to the entire Record as opposed to a specific Line Item

How To Use the Enterprise E2 Shop System
R. 1.0 Page 241 of 295
Header Items Sub-tab
*Currency Code: Defaults to the Currency Code associated with the Vendor/pulled from PO
*Exchange Rate: Defaults to the rate associated with the Currency Code at the time the record is created
Notes: Appear on Outside Service Packing List
Specific to selected Outside Service Packing List
Information that should appear on all Outside Service Packing Lists should be entered in Report Customization
Displayed in Layout Tab prior to Generating
Can be edited for specific output Generation but resets based on Report Customization values afterward
Addresses Tab
Purchasing Address Sub-tab
Location Code: Uses Default Quoting Location designated on Vendor/pulled from PO
Physical Address Details populated based on the Location Code
Street Address
City
ZIP/Postal Code
State/Province
Country
Selecting a different Location Code re-populates Physical Address Details
Physical Address Details can be manually edited as well
*Company Name: Auto-populates from Vendor Code
Can be manually edited
Shipping Address Sub-tab
Address Type: Determines how Physical Address Details are obtained
Can be one of the following:
Internal
Customer (Default)
Vendor
Third Party
Allows for drop shipments
Address Type selection impacts Code options (below)
Code: Represents specific Company Code depending on the Address Type selected
Customer Code list available if Address Type = Customer
Vendor Code List available if Address Type = Vendor
Code is not available if Address Type = Internal or Third Party
Location Code: Uses Default Shipping Location designated on Customer
Physical Address Details populated based on the Location Code
Street Address
City
ZIP/Postal Code
State/Province
Country

How To Use the Enterprise E2 Shop System
R. 1.0 Page 242 of 295
Location Code options narrow based on Address Type/Code selections
Address Type = Customer or Vendor
Location Codes listed based on specified Customer or Vendor Code selected
Address Type = Internal
Location Codes of your Company available
Address Type = Third Party
Location Code not available
Physical Address Details will need to be entered manually
Selecting a different Location Code re-populates Physical Address Details
Physical Address Details can be manually edited as well
Shipping Address – Contact Sub-tab
Shipping Contact: Select a Contact from the Contact list
Does not auto-populate
Selections will change based on Address Type and Code selected on Shipping Address Tab
Phone Number: Auto-populates with General Customer Contact information
Replaced by specific Contact Phone Number when one is entered
Fax Number: Auto-populates with General Customer Contact information
Replaced by specific Contact Fax Number when one is entered
Shipping Address – Miscellaneous Sub-tab
Shipping Code: Auto-populates from Location Code Details
Shipping Code Details used to determine maximum weight limits for carrier
Can be changed as needed
F.O.B. Point: Auto-populates from Location Code Details
Account Number: Your Account Number with the designated Shipping Code carrier
Auto-populates from Shipping Code
Territory Code: Auto-populates from Location Code Details
Can be used to filter reports and searches
Containers Tab
Can be used to determine optimal distribution of Parts based on available criterion
Container Code: Default Container Code designated in Company Preferences
Used by System if option to Fill Containers is not utilized
Pack Each Line Item In A Separate Container (checkbox): Allows System to determine how Parts should be
distributed amongst Containers when selected
Works in conjunction with Fill Containers feature
Fill Containers (utility): Calculates distribution of Parts using available Criterion
Option to Pack Line Items in Separate Containers must be enabled
Looks to Part information to gather shipping-related information (present on General Tab of Packing List)
Container to use
Replaces default Container Code
Maximum number of Parts per Container
Part Weight

How To Use the Enterprise E2 Shop System
R. 1.0 Page 243 of 295
Looks to Shipping Code to get Carrier-related information
Maximum weight of container they will deliver
Creates list of needed Containers based on these factors in Containers Grid
If multiple Parts are present on Packing List, they are packed separately
Parts not automatically intermingled
Can be packed together by manually moving them
Grid details display results of Fill Containers utility
Can be manually edited in Details
Container Grid Details
Container Number: Current Container being viewed
Hazardous Material (checkbox): Indicate whether the contents of this Container are hazardous
Container Code: Container assigned by System for shipping
Can be changed
Tracking Number/Reference Number: Can be entered for reference purposes
Fees and Charges: Enter the appropriate dollar values for each item present as appropriate
Apply (checkbox): Indicate whether associated Fee/Charge should be applied to Packing List
Declared Value: Dollar value of items in Container
Pulls from Order details
Can be edited
Insured (checkbox): Indicates whether contents of Container have been Insured
Calculates cost based on Declared Value
Length/Width/Height/Empty Weight: Physical dimensions and weight of selected Container
Container Contents Grid displays results of Fill Container Utility for specific Container
Content Transfer Feature (Forklift Icon)
Allows for transfer of Parts between Containers
Designate Destination Container
Designate Quantity to Transfer
Allows for more efficient distribution of Parts if extra space is available or if Parts can be combined
If Container winds up exceeding allowable weight, System will advise when the Packing List is Saved
Contents will need to be re-adjusted or a different Shipping Code selected
If option to Fill Containers is not used, the System assumes all the Parts fit into a single Container (using
default Container Code) and no effort is made to validate Carrier Weight limits.
Bill of Lading Tab
Carrier Sub-tab
Shipping Vendor: Vendor Code associated with Shipping Code
Can be changed
Shipping Service: Shipping options provided by Carrier, as designated by Shipping Code
Shipping Charges Paid by: Indicates who will pay shipping costs
Prepaid
Freight Collect

How To Use the Enterprise E2 Shop System
R. 1.0 Page 244 of 295
Third Party
Freight Terms Code: Terms to be applied to shipping charges (reference)
Shipping Charges Sub-tab
Displays charges associated with Packing List
Pulls information from Container Details (Containers Tab)
Special Instructions
Information prints on Bill of Lading for selected Packing List
Notifications
These notifications work in conjunction with the third party ShipRush interface
Information on configuring and using this feature is included with the interface
Freight Remittance Address
Address Type: Determines how Physical Address Details are obtained and impacts code options (see below)
Can be one of the following:
Internal
Customer (Default)
Vendor
Third Party
Allows for drop shipments
Code: Represents specific Company Code depending on the Address Type selected
Customer Code list available if Address Type = Customer
Vendor Code List available if Address Type = Vendor
Code is not available if Address Type = Internal or Third Party
Location Code: Uses Default Shipping Location designated on Customer
Physical Address Details populated based on the Location Code
Street Address
City
ZIP/Postal Code
State/Province
Country
Location Code options narrow based on Address Type/Code selections
Address Type = Customer or Vendor
Location Codes listed based on specified Customer or Vendor Code selected
Address Type = Internal
Location Codes of your Company available
Address Type = Third Party
Location Code not available
Physical Address Details will need to be entered manually
Selecting a different Location Code re-populates Physical Address Details
Physical Address Details can be manually edited as well
Contact Sub-tab
Shipping Contact: Select a Contact from the Contact list
How To Use the Enterprise E2 Shop System
R. 1.0 Page 245 of 295
Does not auto-populate
Selections will change based on Address Type and Code selected on Shipping Address Tab
Phone Number: Auto-populates with General Customer Contact information
Fax Number: Auto-populates with General Customer Contact information
Both Numbers replaced by Contact-specific information when one selected
Vendor Request For Quotation (RFQ)
Overview
Update cost information on with Vendor specific prices on
Purchased Parts
Manufactured Parts
Material component – BOM
Outside Services
Service Codes
Job Requirements
Source Record(s)
This Record can use the following Sources to provide information during its creation:
Purchase Part (Table Items only)
Outside Service
Service Code (Typically only for Services that Price By Weight)
Job Requirements
Note Regarding Configuration of Source Records
When creating a Vendor RFQ from Purchased Items, Outside Services, or Service Codes, only those Source Records that
have been marked as Need Pricing will be available to select
Destination Record(s)
This Record can be used as a Source to provide information on the following Records:
Purchase Order
Key Values/Points of Consideration (An asterisk [*] indicates a Required Field)
General Tab
*Vendor RFQ Number: Up to 50 alpha-numeric characters
*Vendor Code: Company providing the Quote
Auto-populates from the Source Record
EXCEPTION – Job Requirements
Vendor Code left blank when Source is Job Requirements
Selected by User
Changing the Vendor Code causes the Grid to be cleared
Vendor Name: Auto-populates based on Vendor Code
Vendor Type: Indicates nature of material/service provided by Vendor
Can be changed on PO

How To Use the Enterprise E2 Shop System
R. 1.0 Page 246 of 295
Terms Code: Payment terms offered by Vendor
Auto-populates from Vendor Code selected
Can be changed
*Vendor RFQ Date: Date Quote was created
Defaults to current day’s date
Can be edited
Date Required: Date a response is needed by
Calculates based on information provided in Company Preferences
Can be changed
Expires On: Date the Quote is no longer valid after
Calculates based on information provided in Company Preferences
Can be changed
Outside Service (checkbox): Must check to indicates the Vendor RFQ is for an Outside Service, as opposed to
material
Auto-populates based on Source
Changing the selection causes the grid to be cleared
Requested By: Employee who entered the RFQ
Vendor Quote Number: Reference field to track Vendor’s Quote Number
Vendor RFQ Line Item Grid
*Item Number: Uniquely identifies Grid Records present
Can be edited
Subsequent Item Numbers auto renumber accordingly if changed
Status: Indicates the state of the RFQ in terms of the Vendor response
Pending – No response received yet
Default Status
No Quote – Vendor advised they will not provide Quote
User sets Status manually
Received – Vendor has provided updated cost information
System sets Status when RFQ costs are updated
Applied – Vendor Cost Analysis has been run
Expired – Quote has expired
System sets Status when Expires On date is reached
Listed Part(s) are automatically marked as Need Pricing again
Part Number/Revision Level: Items having costs updated
Auto-populates when Source Record is one of the following:
Purchased Part
Outside Service (Manufactured Part listed)
Job Requirements
Service Code: Auto-populates when Source Record is Service Code
Step Number: Auto-populates when Source Record is Outside Service
Reference to Step of specific Job

How To Use the Enterprise E2 Shop System
R. 1.0 Page 247 of 295
Vendor RFQ Details – Job Requirements Tab
Grid displays Requirement details from Job(s) selected
Read Only – Values cannot be edited
Line Items can be deleted
Vendor RFQ Details –Cost Breaks/Outside Service Breaks Tab
Grid Fields will vary slightly based on the following:
Source Record (Service vs. Material)
Pricing Unit of Measure
Purchasing Unit (Price By Weight = No)
Weight Unit (Price By Weight = Yes)
In any case, costs are updated at this level for all Items listed on Vendor RFQ
Lead Time can also be updated at this level
Updating Costs has the following effects, based on the Source Record:
Purchased Part
Part costs and sales prices (Purchasing Tab) are updated automatically for specified Vendor
System also automatically updates all Manufactured Parts (cost and sales price) where Purchased Part is
present on BOM
This occurs regardless how the Purchased Part costs are updated – manually or via RFQ
Outside Service
Specific Manufactured Part where Outside Service Step is located is updated (cost and sales price)
Service Code
Service Code costs and sales price updated automatically
Outside Service Steps on Manufactured Parts that reference the Service Code are NOT updated
In all three cases above, Quotes and Jobs are not impacted by the updating of Costs.
Job Requirements
No other records are automatically updated
System assumes RFQs from Requirements will be used as Source for future Purchase Orders when buying
required items
Header Tab
Information that pertains to the entire Record as opposed to a specific Line Item
Header Items Sub-tab
*Currency Code: Defaults to the Currency Code associated with the Vendor
*Exchange Rate: Defaults to the rate associated with the Currency Code at the time the record is created
Notes: Appear on Vendor RFQ
Addresses Tab
Purchasing Address Sub-tab
Location Code: Uses Default Quoting Location designated on Vendor
Physical Address Details populated based on the Location Code

How To Use the Enterprise E2 Shop System
R. 1.0 Page 248 of 295
Street Address
City
ZIP/Postal Code
State/Province
Country
Selecting a different Location Code re-populates Physical Address Details
Physical Address Details can be manually edited as well
*Company Name: Auto-populates from Vendor Code
Can be manually edited
Shipping Address Sub-tab
Address Type: Determines how Physical Address Details are obtained
Can be one of the following:
Internal
Customer (Default)
Vendor
Third Party
Allows for drop shipments
Address Type selection impacts Code options (below)
Code: Represents specific Company Code depending on the Address Type selected
Customer Code list available if Address Type = Customer
Vendor Code List available if Address Type = Vendor
Code is not available if Address Type = Internal or Third Party
Location Code: Uses Default Shipping Location designated on Customer
Physical Address Details populated based on the Location Code
Street Address
City
ZIP/Postal Code
State/Province
Country
Location Code options narrow based on Address Type/Code selections
Address Type = Customer or Vendor
Location Codes listed based on specified Customer or Vendor Code selected
Address Type = Internal
Location Codes of your Company available
Address Type = Third Party
Location Code not available
Physical Address Details will need to be entered manually
Selecting a different Location Code re-populates Physical Address Details
Physical Address Details can be manually edited as well
Shipping Address – Contact Sub-tab
Shipping Contact: Select a Contact from the Contact list
Does not auto-populate
How To Use the Enterprise E2 Shop System
R. 1.0 Page 249 of 295
Selections will change based on Address Type and Code selected on Shipping Address Tab
Phone Number: Auto-populates with General Customer Contact information
Fax Number: Auto-populates with General Customer Contact information
Both Numbers replaced by Contact-specific information when one selected
Shipping Address – Miscellaneous Sub-tab
Shipping Code: Auto-populates from Location Code Details
Shipping Code Details used to determine maximum weight limits for carrier
Can be changed as needed
F.O.B. Point: Auto-populates from Location Code Details
Account Number: Your Account Number with the designated Shipping Code carrier
Auto-populates from Shipping Code
Vendor Cost Analysis (Utility)
Overview
Update Default Vendor settings
Functionality
Located as an Action under Vendor RFQ Ribbon Menu Tab
When launched, User can select to run analysis on the following Setting Types:
Outside Service
Purchased Item
In addition, select the desired Selection Criteria:
Lowest Price
Shortest Lead Time
When configured and completed, the System simply uses the information provided and applies it to the selected
Parts to determine the Default Vendor
Would be used on new Estimates
Clears the Waiting Cost Analysis flag selected Records
Receiver
Overview
Track incoming deliveries of Parts and Material
Purchased Items from Material Vendors and Customers (Customer Provided Material)
To Jobs
To Stock
Manufactured Parts from Service Vendors
To Jobs
Receiving Material directly to a Job does not mean the Material is immediately costed to the Job. Material
cost is captured when it is marked as Consumed.

How To Use the Enterprise E2 Shop System
R. 1.0 Page 250 of 295
Source Record(s)
This Record can use the following Sources to provide information during its creation:
Part Number (No PO available)
Typically used for Customer Provided Material)
Purchase Order
Vendor Shipment
Must be used in lieu of PO when Vendor Shipment exists
Destination Record(s)
This Record can be used as a Source to provide information on the following Records:
A/P Invoice
Vendor Return
Key Values/Points of Consideration (An asterisk [*] indicates a Required Field)
General Tab
*Receiver Number: Up to 50 alpha-numeric characters
*Vendor Code: Company items are coming from
Auto-populates from the Source Record
Cannot change if Source is PO or Vendor Shipment
Vendor Name: Auto-populates based on Vendor Code
Vendor Type: Indicates nature of material/service provided by Vendor
Can be changed
*Receiver Date: Date material was received
Defaults to current day’s date
Can be edited
Reference Number: Up to 50 alpha-numeric characters
Searchable field
Shipping Code: Indicates method of delivery
Auto-populates from Purchase Order
Can be changed
Shipped Via: Specific delivery option in relation to Shipping Code
Auto-populates from Shipping Code
Can be edited
Shipping Charges: Total cost for shipping
Calculated field
Based on items selected to Receive
Cannot be edited
Receiver Line Item Grid
*Item Number: Uniquely identifies Grid Records present
Can be edited
Subsequent Item Numbers auto renumber accordingly, if changed
Part Number/Revision Level: Items being received

How To Use the Enterprise E2 Shop System
R. 1.0 Page 251 of 295
Auto-populates from Source Record
Can be entered manually
Customer sends material not defined in System
Quantity Open: Quantity currently open on the underlying PO
Quantity Received: Quantity actually received in current delivery
Defaults to Quantity Open amount
Must be edited in Line Item Details if different
Additional Quantity-related fields displayed in Grid (Edited in Details/Sub-details)
Cancelled
Rejected
Over Received
Receiver Details – Releases Tab
This level of Details provides a summary of all the Items received in the Releases present. Depending on the nature of
the change, some edits to Quantity will be made here and some will be made in the Sub-details.
*Release Type: Indicates nature of each Release Number
Ordered: Assigned by System to records that are split off/created when some items are not delivered
Source Record = PO
Reject: Assigned to items that are being returned to the Vendor to be replaced
Manually assign on Receiver if option to Inspect is not enabled
Designation made on Inspection otherwise
Only Receivers that have Quantities to Reject will be available as Source Records on Vendor Returns
(assumes the Receiver does not require an Inspection Record).
Cancel: Assigned to items you decide are not needed and should not be delivered
Manually assign on Receiver if option to Inspect is not enabled
Designation made on Inspection otherwise
If Material has already been delivered:
Mark as Rejected
Create Vendor Return
Cancel on new Receiver
Over Receive: Assigned when more material is delivered than is listed on the PO
Manually assigned by User
Shipped To Vendor: Assigned by System to records that are split off/created when some Parts are not delivered
Source Record = Outside Service Packing List
Quantity To Receive (Purchasing): Total Quantity (number of items) actually delivered in relation to specific Release
Number
To Under Receive
Open Sub-details and edit specific Record
Reduces the Quantity Received
Creates a new Release Record with one of the following Release Types:
Ordered – If Source Record is PO

How To Use the Enterprise E2 Shop System
R. 1.0 Page 252 of 295
Shipped To Vendor – If Source Record is Outside Service Packing List
To Over Receive
Change the Release Type on the next available Blank Row to Over Receive and enter the additional amount
in the Quantity To Receive (Purchasing) field
Increases Quantity Received
Receiver - Releases Sub-details
Status: Material Status
Mirrors information found on Order Material Tab (if Received to a Job)
Typical Status options
Posted – Received to Job
Available – Received to Stock
Job Number: Indicates destination of items received
Specific Job Number: Can be destination for Material or Services
Stock: Can be used only on Material
If creating a Record for Over Received Material, select a Job Number or designate Stock accordingly
Quantity To Receive (Purchasing): Total Quantity (number of items) actually delivered in relation to specific Job
Number or Stock reference
Reduce this value accordingly if fewer items than expected were delivered
Additional Record created (see Releases Tab information)
Header Tab
Information that pertains to the entire Record as opposed to a specific Line Item
Header Items Sub-tab
Notes: Appear on Receiver
No Charge (checkbox): If selected, the Receiver will not display as a Source Record for A/P Invoices
Vendor Invoice Received: Indicates the Receiver has been used as the Source Record for an A/P Invoice
If selected, the Receiver will not display as a Source Record for future A/P Invoices
System automatically selects option when Receiver selected on an A/P Invoice
Can be selected manually
Vendor Returns
Overview
Track Parts returned to Vendors:
What Job
What Parts
Disposition
Source Record(s)
This Record can use the following Sources to provide information during its creation:
Receiver
If Receivers are not Inspected:
Only Receivers that have Quantities marked as Reject will display

How To Use the Enterprise E2 Shop System
R. 1.0 Page 253 of 295
Non-Conformance (Requires Quality Module)
If Receivers are Inspected
Destination Record(s)
This Record is not used as a Source on any other Record
When created, Vendor Returns reopen the underlying Purchase Order, which is then used as the Source Record for
future Receivers or Outside Service Packing Lists
Key Values/Points of Consideration (An asterisk [*] indicates a Required Field)
General Tab
*Return Number: Up to 50 alpha-numeric characters
*Vendor Code: Company the Parts are being returned to
Auto-populates from Source Record
Return Date: Date the Return was issued
Defaults to current day’s date
Can be changed
RMA (Return Merchandise Authorization) Number: Up to 50 alpha-numeric characters
Manually entered
Searchable field
Vendor Return Line Item Grid
*Item Number: Used by System to identify each record (Job) in the Grid
Can be edited
Subsequent records automatically renumber if changed
Quantity Details: Displays information regarding
The number of Parts originally received
The number of Parts returned to Vendor
The disposition of the returned Parts
Information regarding quantities must be entered/edited in the Details of the Grid
Reason Code: Indicates reason Parts were returned
Shipping Details: Used on Containers Tab for purposes of sending Items back to Vendor
Container Code
Max Quantity Per Container
Vendor Return Line Item Details – Releases Tab
Release Number: Uniquely identifies Grid Records present
Release Type: Indicates nature of each Release Number
Returned To Vendor (Cannot Edit)
Quantity Values default to full amount present marked as Rejected
Edits to these values must be made at the Release Sub-Detail Level
Vendor Return – Releases Sub-details
Quantity To Return (Purchasing): Number of Items being returned to the Vendor
Enter reduced value if Items will be returned at different times

How To Use the Enterprise E2 Shop System
R. 1.0 Page 254 of 295
Return Creation Tab
Issued By: Employee who created the Return
Reason For Return: Information regarding why the Parts were returned to the Vendor
Header Tab
Information that pertains to the entire Record as opposed to a specific Line Item
Header Items Sub-tab
*Currency Code: Defaults to the Currency Code associated with the Vendor
*Exchange Rate: Defaults to the rate associated with the Currency Code at the time the record is created
Notes: Appear on Vendor Return
Specific to selected Vendor Return
Information that should appear on all Vendor Returns should be entered in Report Customization
Displayed in Layout Tab prior to Generating
Can be edited for specific output Generation but resets based on Report Customization values afterward
Addresses Tab
Shipping Address Sub-tab
Address Type: Determines how Physical Address Details are obtained
Can be one of the following:
Internal
Customer (Default)
Vendor
Third Party
Allows for drop shipments
Address Type selection impacts Code options (below)
Code: Represents specific Company Code depending on the Address Type selected
Customer Code list available if Address Type = Customer
Vendor Code List available if Address Type = Vendor
Code is not available if Address Type = Internal or Third Party
Location Code: Uses Default Shipping Location designated on Customer
Physical Address Details populated based on the Location Code
Street Address
City
ZIP/Postal Code
State/Province
Country
Location Code options narrow based on Address Type/Code selections
Address Type = Customer or Vendor
Location Codes listed based on specified Customer or Vendor Code selected
Address Type = Internal
Location Codes of your Company available
Address Type = Third Party
Location Code not available

How To Use the Enterprise E2 Shop System
R. 1.0 Page 255 of 295
Physical Address Details will need to be entered manually
Selecting a different Location Code re-populates Physical Address Details
Physical Address Details can be manually edited as well
Shipping Address – Contact Sub-tab
Shipping Contact: Select a Contact from the Contact list
Does not auto-populate
Selections will change based on Address Type and Code selected on Shipping Address Tab
Phone Number: Auto-populates with General Customer Contact information
Replaced by specific Contact Phone Number when one is entered
Fax Number: Auto-populates with General Customer Contact information
Replaced by specific Contact Fax Number when one is entered
Shipping Address – Miscellaneous Sub-tab
Shipping Code: Auto-populates from Location Code Details
Shipping Code Details used to determine maximum weight limits for carrier
Can be changed as needed
F.O.B. Point: Auto-populates from Location Code Details
Account Number: Your Account Number with the designated Shipping Code carrier
Auto-populates from Shipping Code
Territory Code: Auto-populates from Location Code Details
Can be used to filter reports and searches
Containers Tab
Can be used to determine optimal distribution of Parts based on available criterion
Container Code: Default Container Code designated in Company Preferences
Used by System if option to Fill Containers is not utilized
Pack Each Line Item In A Separate Container (checkbox): Allows System to determine how Parts should be
distributed amongst Containers when selected
Works in conjunction with Fill Containers feature
Fill Containers (utility): Calculates distribution of Parts using available Criterion
Option to Pack Line Items in Separate Containers must be enabled
Looks to Part information to gather shipping-related information (present on General Tab of Packing List)
Container to use
Replaces default Container Code
Maximum number of Parts per Container
Part Weight
Looks to Shipping Code to get Carrier-related information
Maximum weight of container they will deliver
Creates list of needed Containers based on these factors in Containers Grid
If multiple Parts are present on Packing List, they are packed separately
Parts not automatically intermingled
Can be packed together by manually moving them
Grid details display results of Fill Containers utility

How To Use the Enterprise E2 Shop System
R. 1.0 Page 256 of 295
Can be manually edited in Details
Container Grid Details
Container Number: Current Container being viewed
Hazardous Material (checkbox): Indicate whether the contents of this Container are hazardous
Container Code: Container assigned by System for shipping
Can be changed
Tracking Number/Reference Number: Can be entered for reference purposes
Fees and Charges: Enter the appropriate dollar values for each item present as appropriate
Apply (checkbox): Indicate whether associated Fee/Charge should be applied to Packing List
Declared Value: Dollar value of items in Container
Pulls from Order details
Can be edited
Insured (checkbox): Indicates whether contents of Container have been Insured
Calculates cost based on Declared Value
Length/Width/Height/Empty Weight: Physical dimensions and weight of selected Container
Container Contents Grid displays results of Fill Container Utility for specific Container
Content Transfer Feature (Forklift Icon)
Allows for transfer of Parts between Containers
Designate Destination Container
Designate Quantity to Transfer
Allows for more efficient distribution of Parts if extra space is available or if Parts can be combined
If Container winds up exceeding allowable weight, System will advise when the Packing List is Saved
Contents will need to be re-adjusted or a different Shipping Code selected
If option to Fill Containers is not used, the System assumes all the Parts fit into a single Container (using
default Container Code) and no effort is made to validate Carrier Weight limits.
Bill of Lading Tab
Carrier Sub-tab
Shipping Vendor: Vendor Code associated with Shipping Code
Can be changed
Shipping Service: Shipping options provided by Carrier (as designated by Shipping Code)
Shipping Charges Paid by: Indicates who will pay shipping costs
Prepaid
Freight Collect
Third Party
Freight Terms Code: Terms to be applied to shipping charges (reference)
Shipping Charges Sub-tab
Displays charges associated with Packing List
Pulls information from Container Details (Containers Tab)

How To Use the Enterprise E2 Shop System
R. 1.0 Page 257 of 295
Special Instructions Sub-tab
Information prints on Bill of Lading for selected Packing List
Notifications Sub-tab
These notifications work in conjunction with the third party ShipRush interface
Information on configuring and using this feature is included with the interface
Freight Remittance Address Sub-tab
Address Type: Determines how Physical Address Details are obtained
Can be one of the following:
Internal
Customer (Default)
Vendor
Third Party
Allows for drop shipments
Address Type selection impacts Code options (below)
Code: Represents specific Company Code depending on the Address Type selected
Customer Code list available if Address Type = Customer
Vendor Code List available if Address Type = Vendor
Code is not available if Address Type = Internal or Third Party
Location Code: Uses Default Shipping Location designated on Customer
Physical Address Details populated based on the Location Code
Street Address
City
ZIP/Postal Code
State/Province
Country
Location Code options narrow based on Address Type/Code selections
Address Type = Customer or Vendor
Location Codes listed based on specified Customer or Vendor Code selected
Address Type = Internal
Location Codes of your Company available
Address Type = Third Party
Location Code not available
Physical Address Details will need to be entered manually
Selecting a different Location Code re-populates Physical Address Details
Physical Address Details can be manually edited as well
Contact Sub-tab
(Shipping) Contact: Select a Contact from the Contact list
Does not auto-populate
Selections will change based on Address Type and Code selected on Shipping Address Tab
Phone Number: Auto-populates with General Customer Contact information
Fax Number: Auto-populates with General Customer Contact information

How To Use the Enterprise E2 Shop System
R. 1.0 Page 258 of 295
Both Numbers replaced by Contact-specific when one selected

How To Use the Enterprise E2 Shop System
R. 1.0 Page 259 of 295
Inventory
The Inventory Menu provides access to multiple Inventory Management Tools
Records/Functionality
Fill Job Requirements
Inventory Adjustments
Inventory Inspections (Quality Related Record)
Inventory Transfers
Material Allocations
Stock Job Transfers
Reports
Inventory Summary
Material Allocation Summary
Inventory Inspection Summary
Stock Job Transfer Summary
Reorder Summary
Usage Summary
Inventory Count Sheet
Inventory Adjustment Summary
Fill Job Requirements (Utility)
Overview
Post Available Material to Jobs with matching Needed Records
Ability to Post Material to Jobs after they have been Processed without having Material Requirements filled
Functionality: Loading Jobs
Utilizes Job Material Processing Navigator and related functionality
Search Grid displays all Open Jobs that meet the following criterion (by Default):
Job Status is Firm, Released, or In Process
At least one Record on Order Material Tab for Purchased Part with Material Status of Needed
At least one Available (Inventory) Record for the same Purchased Part is present in the System
Search parameters can be narrowed using existing Search Filters, as is the case throughout the software
Once desired Jobs are selected, click Fill Requirements
Functionality: Fill Requirements
Needed Purchased Parts that have at least partial Availability are displayed
If same Part is present on multiple Jobs, it is only listed one time
Open Details to see what Jobs call for each Part
Consider the following Grid Fields:
Required: Combined Quantity of Purchased Part that is Needed
Buy Or Make: Combined Quantity that needs to be filled
Will match Required Quantity prior to processing

How To Use the Enterprise E2 Shop System
R. 1.0 Page 260 of 295
Once Processed this Quantity will decrease depending on amount of Available Material
Filled: Quantity Posted from Inventory when Utility is run (Process Button is clicked)
Parts must be Available
Settings must allow filling of Requirements
Quantity Filled is subtracted from Quantity Required to determine Quantity to Buy Or Make
Available In Bin(s): Quantity of material in Inventory that is eligible to be Posted to fill Requirements
Available On Stock Jobs: Will not be applicable in this circumstance
Fill Job Requirements will not display Manufactured Parts (Sub-assemblies), as they are considered To Make
Manufactured Parts Posted to a Processed Job will simply be added to it as extra Parts
System will not reduce the Quantity To Make of Manufactured Parts (Sub-assemblies or Top Level
Parts) as a result of Material Allocations
Automatically Fill (checkbox): Indicates if Part is eligible to be Posted during Processing
Can manually add/remove check, if desired
When the Process button at top of utility is clicked:
Available Parts are Posted to Fill Required Quantities if Automatically Fill enabled
If Requirement cannot be completely Filled, the remaining Quantity remains as a Needed Record
Part Number Details Grid
Parent Job Number: Indicates which Job(s) need the material
Status: Indicates whether the Requirement has been met or not
Needed = No Material Posted – Requirement not filled at all
Partial = Some Material Posted – Requirement partially filled
Filled = All Material Posted – Requirement completely filled
If Material is listed as Available, it is possible to open Sub-details (Bin Locations of Part)
Unprocess specific Record
Can edit Quantity Posted if desired
Can specify Bins/Locations Material should Post from
Can Post drops of Material (if allowed) to make use of decimal quantities
Closing Sub-details after making change automatically reprocesses Record
If you do not want the Material to Post at all, remove the Automatically Fill option and then Reprocess
If you do not want to create Requirements or post Material, simply Close the utility without Saving
Material is not actually Posted/Requirements not created until results of JMP Utility have been saved.
Jobs will not be marked as Processed
If Material needs to be removed from a Job, a Job to Stock, or a Job to Job, a Material Allocation Record would be
created.
Inventory Adjustments (Utility)
Overview
Adjust key values for defined Part Records outside of Receivers (Purchased Parts), Stock Job Transfers
(Manufactured Parts), and Material Allocations
Often used when the originating information is not available or is otherwise unknown

How To Use the Enterprise E2 Shop System
R. 1.0 Page 261 of 295
Examples:
Inventory counts
Entering opening Inventory levels
Functionality: Select Records
Utilizes Part Number Navigator and related functionality
Search Grid displays all Active Parts by default
Search parameters can be narrowed using existing Search Filters as is the case throughout the software
Once desired Parts are selected, click Make Adjustment
Since they share the same Navigator Search Grid, Inventory Adjustments cannot be made if you already
have the Parts Table open on your PC.
Functionality: Make Adjustments
*Location Code: Represents physical location of Parts
Location Code associated with the Part will display by default on Blank Rows
Can be changed on any record present
Multiple Records can use the same Location Code and Lot Number combination
Lot Number: Optional information that can be used to specify exact location
Quantity (Stocking): Number of Parts (in terms of Stocking Unit) that are Available
Value can be edited for any record present
Vendor Code: Company Part was purchased from
Auto-populates from Receiver
Can be changed/selected manually
Reason Code: Use to indicate why adjustment was necessary
Material Unit Cost: Per Unit Cost (in terms of Stocking Unit) for selected record
Auto-populates from Source Record (if present)
Purchased Part = PO (via Receiver)
Manufactured Part = Material Costs from Stock Job (via Stock Job Transfer)
Additional Manufacturing-related Costs are captured in the same manner
All Cost Fields can be changed or entered manually
Is A Drop (checkbox): When selected, indicates the Record represents a Quantity of less than one Stocking Unit
Purchased Parts only
Part must be marked to Allow Decimal Values
Must be selected if Quantity (Stocking) is less than one
Dimension Values: Enter appropriate Dimension information
Especially useful for Drops of Material to know if it is usable
Click Save to complete the Adjustment

How To Use the Enterprise E2 Shop System
R. 1.0 Page 262 of 295
Inventory Inspections
Overview
Create formalized Inspection Records during specified points of the production process
Inspections become a required Record to proceed with production once the underlying Record is marked to be
inspected
Use of Inspections requires access to the Quality Module.
Source Record(s)
This Record can use the following Sources to provide information during its creation:
Order
Customer Return
Internal Rejection
Receiver
Destination Record(s)
This Record can be used as a Source to provide information on the following Records:
Non-Conformance
Given the need for the Quality Module to create Inspection Records, this feature is covered in our documentation on
the Configuration and Use of The Quality Module.
Material Allocation
Overview
Allows Posting/Unposting of Material
Functionality: Allocate Material
The Material Allocation Navigator displays previous transactions, but they can only be viewed. To Allocate Material
simply click New Material Allocation.
*Material Allocation Number: Up to 50 alpha-numeric characters
*Material Allocation Date: Date Material was Posted or Unposted
Defaults to current day’s date
Can be changed
Material Allocation Type: Determines Source and Destination points for the Allocation Record
Stock To Job: Post Material from Inventory to specified Job
Job To Stock: Unpost Material from specified Job and place back into Inventory
Job To Job: Unpost Material from specified Job and Post against another Job
Options in the Material Allocation Grid will vary based on the Allocation Type Selected.

How To Use the Enterprise E2 Shop System
R. 1.0 Page 263 of 295
Material Allocation Line Item Grid
Allocation Type = Stock To Job
*Target Job Number: Job to which Material will be Posted
Only Material with Available Quantities display as eligible to Post
Multiple Parts can be Posted at same time
To Post Material to more than one use next available Blank Row
Quantity to Post must be set in Line Item Details
Material Allocation Details
Quantity Available: Amount of selected Material currently Available for Posting
Quantity Required (Stocking): Indicates if selected material is listed as a Needed Record for the designated Job
Posting Material to Job will fill Requirement
Quantity To Post (Stocking): Amount of Material to Post to designated Job
Must Post whole amounts, even if Part Allows Decimal Values
Can Post Records that are marked as a Drop
Allocation Type = Job To Stock
*Source Job Number: Job from which Material will be Unposted
Only Jobs that have Material Posted to them will display
All Material Posted to selected Job displays for selection purposes
Can select multiple Parts if present
Create Job Requirement (checkbox): If selected, the System will create a Needed Record (Order Material Tab) on
the selected Job for the Unposted Material
Quantity to Unpost must be set in Line Item Details
Material Allocation Details
Quantity To Unpost (Stocking): Amount of Material to place back into Stock
Quantity Available (Stocking): Amount of selected Material currently present on Job that can be Unposted
*Location Code: Physical location Material is designated to be moved to for Inventory Tracking purposes
Lot Number: Optional value to further specify location or production run information
Is A Drop (checkbox): Indicates if the Quantity being Unposted is a decimal value
Marked automatically when value less than one entered
Unable to enter partial amounts on Parts that do not Allow Decimal Values
Allocation Type = Job To Job
*Source Job Number: Job from which Material will be Unposted
Only Jobs that have Material Posted to them will display
All Material Posted to selected Job displays for selection purposes
Can select multiple Parts if present
Create Job Requirement (checkbox): If selected, the System will create a Needed Record (Order Material Tab) on
the selected Job for the Unposted Material
*Target Job Number: Job to which Material will be Posted
Quantity to Unpost must be set in Line Item Details

How To Use the Enterprise E2 Shop System
R. 1.0 Page 264 of 295
Material Allocation Details
Quantity To Post To Target Job (Stocking): Amount of Material to re-allocate to the selected Target Job
Can be a decimal value
Does not have to be marked as a Drop since it is not going to Inventory
Quantity Available (Stocking): Amount of selected Material currently present on Job that can be Unposted
Stock Job Transfers
Overview
Used to track Posting of Manufactured Parts (Stock Releases)
To Inventory to replenish Inventory levels
To Parent Job to satisfy need for Sub-assembly
To designated Job for same Part to utilize a Stock Run (Rob From Stock Job)
To designated Job to satisfy need for reworked Parts
As final step of production process
Removes costs from WIP
Changes Job Status to Closed when all Parts transferred
Source Record(s)
This Record can use the following Sources to provide information during its creation:
Order
Destination Record(s)
This Record is not used as a Source on any other Record
Key Values/Points of Consideration (An asterisk [*] indicates a Required Field)
General Tab
*Stock Job Transfer Number: Up to 50 alpha-numeric characters
* Stock Job Transfer Date: Date Parts were transferred
Defaults to current day’s date
Can be edited
Stock Job Transfer Line Item Grid
*Item Number: Uniquely identifies Grid Records present
Can be edited
Subsequent Item Numbers automatically renumber accordingly if changed
Order Number: Identifies Order that contains at least one Job with a Stock Release present
Can select multiple Orders/Jobs as there is no need to segregate based on Customer
Job Number: Identifies the Job selected Parts are being transferred from
Selected by User after selecting Order
Part Number/Revision Level: Items being transferred
Auto-populates when Job is selected
Cannot change from value listed on Order
Quantity Open: Quantity not yet transferred

How To Use the Enterprise E2 Shop System
R. 1.0 Page 265 of 295
Pulls from Job Release Details
Quantity To Transfer: Quantity to include in current delivery
Pulls from Job Release Details
Quantity To Overtransfer: Excess Parts made during production
Cannot be entered directly on Stock Job Transfer
Pulls from Job Release Details
Quantity values must be edited in Line Item Details
Stock Job Transfer Details – Releases Tab
*Release Type: Indicates nature of Release
Pulls from Job Details
Cannot be edited
*Due Date: Date Parts are designated to be transferred
Quantity To Transfer/Cancel: Quantity to include in current transfer
Quantity can be reduced
Remaining amount split onto separate record
Considered as Backlogged to transfer in the future
Quantity cannot be increased beyond Quantity Ordered
Excess Parts must be added to the Job
How this is accomplished depends on whether the option to Track Consumed by Reported Pieces is
enabled
Header Tab
Information that pertains to the entire Record as opposed to a specific Line Item
Header Items Sub-tab
Notes: Appear on Stock Job Transfer
Specific to selected Stock Job Transfer
Information that should appear on all Stock Job Transfers should be entered in Report Customization
Displayed in Layout Tab prior to Generating
Can be edited for specific output generation, but resets based on Report Customization values afterward
How To Use the Enterprise E2 Shop System
R. 1.0 Page 266 of 295
Shop Floor Control
The Shop Floor Control Menu provides access to Time-related tools.
Records/Functionality
Time And Attendance Tickets
Scheduling
Internal Rejections
Reports
Production Summary
Loading Summary
Work In Process Summary
Attendance Summary
Time Tracking Summary
Job Cost Summary
Actual vs Estimated Summary
Performance Summary
Hourly Rate Summary
Margin Summary
Outside Cost Summary
Rejected Parts Summary
Internal Rejection Summary
Time And Attendance Tickets
Overview
Track Time-related information for Employees
Time And Attendance tickets can be created in two ways:
Batch Entry: User enters details via Shop Floor Control after the fact
Real-time: Employee enters details at the time work is performed via Real-time Data Collection Devices
Shop Application – Clock Emulation
Wall-mounted Clocks
Source Record(s)
This Record does not use other Sources to provide information during its creation
Destination Record(s)
This Record can be used as a Source to provide information on the following Records:
Internal Rejections
Key Values/Points of Consideration (An asterisk [*] indicates a Required Field)
General Tab
*Employee Code: Employee who clocked in/performed the work
*Time Ticket Date: Date the Employee clocked in/performed the work

How To Use the Enterprise E2 Shop System
R. 1.0 Page 267 of 295
Defaults to current day’s date
Can be edited
*Pay Period Code: Pay Period the Attendance information should be calculated for
System assigns Pay Period based on the Time Ticket Date entered
If no current Pay Periods exist, the most current one available is used
Can be changed
Time And Attendance Ticket Line Item Grid
*Shift Code: Indicates the Shift the Employee worked
Auto-populates from Employee Code
Can be changed
Actual Clock In/Clock Out: Time and date the Employee actually clocked in and clocked out
Auto-populates from Shift Code
Can be edited
If Ticket entered via Batch Entry, it is best to adjust Times before entering Time Ticket Details
Adjusted Clock In/Clock Out: Adjusted time Employee clocked in and clocked out
This value is used for Payroll export purposes
System can be configured (in Company Preferences) to round Clock In and Clock Out Times
Can be edited manually
Attendance Code: Determines whether Time should be considered Productive or not
Break Code: Determines whether Break (if one present) should be Paid or not
Payroll Code: Provides dollar value for hourly payroll rate
Auto-populates from Employee Code
Can be changed
G/L Account: G/L Account payroll expense is assigned to
Auto-populates from Attendance Code
Can be changed
Overtime (checkbox): If selected, Overtime Factor will be applied against the Pay Rate (dollar value) of the
designated block of time
Attendance Ticket Line Item Details (Time Ticket Details)
Job-specific Time Ticket information is maintained in the Line Item Details
*Time Start/End: Time and date Employee worked on specified Job
If entering Time Details via Batch Entry:
Values can be edited, but need to fit within the Attendance Ticket Start and End Times
Time End value will auto-calculate, based on combined Setup and Cycle Hours provided
If Real-time Data Collection Devices are used, all Time Ticket Details are captured by the System and displayed
here
Setup Hours: Amount of time (in hours) Employee took to prepare the Work Center for the designated Step/Job
Can be edited
Cycle Hours update automatically if changed (based on Attendance Start and End Times)
Cycle Hours: Amount of time (in hours) Employee performed work directly on the Job
Can be edited

How To Use the Enterprise E2 Shop System
R. 1.0 Page 268 of 295
Time on next available Line Item updates automatically if changed (based on Attendance Start and End Times)
Break Hours: Amount of time (in hours) Employee was on Break
*Job Number: Job the Employee worked on during the designated block of time
*Step Number: Routed Step the Employee worked on during the designated block of time
Information will be printed on Job Traveler
Step 0 indicates work was performed on an Un-routed Step
*Work Center: Work Center the Employee used during the designated block of time
Provides various Rate Dollar Values (Billing Rate/Burden Rate)
Operation Code: Provides additional details regarding the specific work performed at the Work Center
Quantity Accepted: Number of Parts the Employee successfully completed on the designated Step during the
designated block of time
Quantity Suspect: Number of Parts set aside during production that have some kind of issue
Based on Company Preference settings, marking Parts as Suspect does not necessarily mean they are defective
Provides opportunity to review Parts to determine whether they can continue through production
May use as a means to perform random spot checks
Quantity Reported: Combined value of Quantity Accepted and Quantity Suspect
Work Centers Run By Employee: Number of Work Centers the Employee ran while performing work
If greater than one, Labor Costs are divided evenly between the number run
Work Center Jobs Run On: Number of machines (in designated Work Center) the Job was run on during the
designated block of time
If greater than one, the Work Center selected needs to have a Capacity Factor of at least the same size
Burden Cost increases
Unattended Operation (checkbox): If selected, System does not capture Labor Cost for Cycle Time
Does capture Labor Cost for Setup Time
Billing Rate: Determines the sales value (dollar amounts) to use for time spent on Work Center
Reason Code: Can be selected if Suspect Parts are entered to indicate reason they are Suspect
As many Line Items as necessary can be entered for Time Ticket
Points of Consideration
When the Time Record is saved (if entered via Batch Entry), any Breaks associated with the Employee on the Record
will be automatically applied by the System
Will “force” them into the appropriate blocks of time based on Break Code details
Schedule Codes
Overview
Provides estimates regarding time of completion and Resource Load Levels
Ability to have multiple Schedule Codes to allow for various scheduling scenarios
Schedule Code marked as the Default Code is the one used by the System to provide “actual” Scheduling
Estimates to Jobs
Information displayed in Manufacturing Details – Scheduling Tab at the Job Level
Source Record(s)
This Record is not directly created from any other Source Record

How To Use the Enterprise E2 Shop System
R. 1.0 Page 269 of 295
Destination Record(s)
This Record is not used as a Source to create other Records
Key Values/Points of Consideration (An asterisk [*] indicates a Required Field)
Given the overall complexity of Scheduling as a component of the E2 Shop System, functionality is addressed in
separate documentation dealing with the Configuration and Use of the Scheduling Module. Included here is a brief
overview of some of the key fields and concepts pertaining to the creation of a Schedule Code.
General Tab
*Schedule Code: Up to 20 alpha-numeric characters
Settings Sub-tab – Global Reschedule Settings
Perform Nightly Global Reschedule: If enabled, the System will automatically perform a Global Reschedule of the
current Schedule Code
Occurs at midnight
Uses remaining Settings to determine updated results
Perform Nightly Prioritization: If enabled, System will re-prioritize Jobs during Nightly Global Reschedule
Uses Priority Criterion designated on Priority Sub-tab
The lower the Priority (number), the more important a Job is deemed to be
Forward Schedule Jobs That Are Currently Running In The Shop: If enabled, the System will apply Forward
Scheduling Logic to all Jobs that are currently In Process (have hours entered against them)
Applied even if they were previously entered using Backward Scheduling Logic
System looks to this setting ANY TIME Global Reschedule performed (not just Nightly)
Forward Schedule Jobs That Have Scheduled Steps Prior To Today: If enabled, the System will reschedule such Jobs
using Forward Scheduling Logic, even if they originally used Backward Scheduling Logic
System looks to this setting ANY TIME Global Reschedule performed (not just Nightly)
Settings Sub-tab – New Job Settings
If enabled, the following settings are applied as the default Scheduling Assumptions against any New Job as it is
processed:
Scheduling Direction: Determines what “directional” Scheduling Logic should be applied to New Jobs
Forward: Begins with the current day’s date and schedules forward in time to determine Schedule End Date
Does not take Job Due Date into consideration
Backward: Schedules backward from Job Due Date to determine Schedule Start Date
Could result in a Job being scheduled in the past
Overlap Routing Steps: System will overlap Routing Steps using Overlap Method designated on the Job Routing
Can be changed at the Job Router Level or in Schedule Code Details for the Job (Jobs Tab or Whiteboard)
Relieve Hours Left Based on Pieces Reported: As time is entered against a Step, hours left to work are calculated by
multiplying Pieces Remaining by Cycle Time
If not selected, hours left are calculated by subtracting Actual Hours (entered) from Estimated Hours
Add Firm Jobs/Planned Jobs to Schedule Automatically: Provides ability to have multiple Schedule Codes that do or
do not take Firm or Planned Jobs into consideration
Calendar Sub-tab
Set Shop Capacity by designating when work is expected to be performed within the Shop

How To Use the Enterprise E2 Shop System
R. 1.0 Page 270 of 295
Days Of The Week – Designates the “General” availability of the Shop
Utilizes Shift Codes to provide default times
Specific Date – Designate specific dates when the typical work schedule will not be in effect
Breaks Sub-tab
Indicate standard company-wide Breaks
Work is not scheduled during defined Break times
Priority Sub-tab
Designate Priority Criterion for System to use if option to Prioritize Jobs selected
Can be enabled to occur automatically during Nightly Global Reschedule
Can be performed manually on the Jobs Tab
System uses Priority to determine which Jobs should take precedence
Priority Criterion allows it to “break ties” when they occur
Jobs Tab
Designate which Jobs should be included in the Scheduling Code
Tools located here allow for the following actions to be performed manually:
Prioritize Jobs
Apply Directional Scheduling Logic (Forward or Backward)
Lock or Unlock Jobs
Enable or disable Overlap option
Perform Global Reschedule
Click Process Button
Advisor Tab
System-generated “alerts” based on various hard-coded criterion
Provides Number of Jobs that fall into specified categories
Common Examples:
Jobs Already Past Due Date
Jobs Scheduled To Ship By Today
Jobs With Open Raw Material PO
Etc.
Whiteboard Tab
Visual representation (Gantt Chart Format) of Scheduling Code estimations
Multiple Display Options available:
Display Modes:
By Day
By Week
By Week
Timeline
Group (Results) By:
Job Number
Customer

How To Use the Enterprise E2 Shop System
R. 1.0 Page 271 of 295
Work Center
Department
Location
Part Number
Operation
Product Code
Work Code
Resource
Ability to display Part and/or Resource Image if desired
Takes up additional computing resources due to graphics
Designate the Date Range to display
Can hide/display specific Jobs
Scheduling Details can be accessed
Information displayed depends on viewing options selected
Resources Tab
Displays various Scheduling Resources and their associated details
Specific Resource Settings can be edited
Some Resources have limits regarding Loading Method
Key Concepts:
Loading Method: Determines how much work (Load) will be assigned to a Resource
Finite: Load capped based on the Resource’s Capacity and Utilization
Infinite: Load is not capped; Multiple Jobs can be scheduled for the same time
Utilization Percent: Determines how much of the Work Center’s Capacity can effectively be used
Unique to Work Centers
If less than 100%, the Resource will not be available for all of its listed Capacity (from a scheduling
perspective)
Work is moved to the next available Shift
Capacity Factor: Number of machines in a Work Center that are capable of performing the same type and
amount of work
Unique to Work Centers
Machines must be able to perform same type and amount of work to avoid false scheduling assumptions
about the Work Center’s ability to get work accomplished
If Capacity Factor is greater than one, Loading Method must be Infinite

How To Use the Enterprise E2 Shop System
R. 1.0 Page 272 of 295
Internal Rejections
Overview
Review Parts set aside during production process and marked as Suspect
Ability to more accurately determine quality of Parts being made
More time to review Suspect Parts, as opposed to immediately Scrapping
Can place Good Parts back into production
Can spot check Parts during production and track results
Source Record(s)
This Record can use the following Sources to provide information during its creation:
Time And Attendance Tickets
Only Time Records that have Parts marked as Suspect will be available to use
Must use Time Record to create Internal Rejection
Destination Record(s)
This Record can be used as a Source to provide information on the following Records:
Orders (Rework Jobs)
Assumes Inspections not enabled for Internal Rejection
Inspections (Quality Module Required)
Must create Inspection if Internal Rejection marked to Inspect
Key Values/Points of Consideration (An asterisk [*] indicates a Required Field)
General Tab
*Rejection Number: Up to 50 alpha-numeric characters
*Customer Code: Customer the Parts are being made for
Auto-populates from Job (via Time And Attendance Ticket)
*Date Issued: Date the Internal Rejection was created
Defaults to Current Day’s date
Can be changed
Internal Rejection Line Item Grid
*Item Number: Used by System to identify each record (Job) in the Grid
Can be edited
Subsequent records automatically renumber if changed
Status: Indicates state of the Return (where in process is it?)
Issued: Rejection has been created
Inspected: Parts have been inspected
Requires access to and creation of Inspection Record
Status changes once Inspection Record created
Reason Code: Indicates reason the Parts were rejected
Quantity Details: Displays information regarding:
The number of Parts originally marked Suspect
The number of Parts originally Accepted

How To Use the Enterprise E2 Shop System
R. 1.0 Page 273 of 295
The disposition of the rejected Parts
Information regarding quantities must be entered/edited in the Details of the Grid
Customer Return Line Item Details – Location Tab
Status: Indicates state of the Parts referenced on the Return
Defaults to Suspect until disposition indicated in Details
Job Number: Job the rejected Parts were made on
System will use to create link for updating of costs if it gets to that point
Quantity: Total quantity originally rejected tracked in this column across all Detail records
Defaults to full quantity rejected
Quantity will split into additional lines if the disposition is not the same for all Parts
Disposition Quantities: Indicates the number of Parts that fall into the appropriate disposition category
If Inspections have been enabled, the User will not be able to enter values into these fields
System would require creation of Inspection to indicate whether the Parts were defective or not
If Inspections have not been enabled, the User would enter a value into the appropriate Column(s):
Remake – Remake from scratch
Create Remake Job on new Order
Repair – Repair existing Parts
Create Repair Job on new Order
Scrap – Scrap Parts as useless
Accept – Parts are acceptable
Added back to Job to be worked on
Quantity Accepted increased on Time Ticket
If more than one Disposition is applicable, they would be entered on separate lines
If both Remake and Repair are applicable, consider creating multiple Rejections as they would get
consolidated into one Job otherwise.
Rejection Creation Tab
Issued By: Employee who created the Rejection
Reason For Rejection: Information regarding why the Parts were marked as Suspect
Time Ticket Tab
Rejected By: Employee who marked the Parts as Suspect (on Time Ticket)
Date Rejected: Date of the Time Ticket
Comments: Auto-populate from Time Ticket

How To Use the Enterprise E2 Shop System
R. 1.0 Page 274 of 295
Accounts Receivable
The Accounts Receivable (A/R) Menu provides access to Customer-related accounting records.
Records/Functionality
Customer Billing
Cash Receipts
Reports
A/R Aging Summary
Sales Summary
Deposit Summary
Customer Statements
Commission Summary
A/R Sales Summary
Unbilled Shipment Summary
Customer Billing
Overview
Generate Invoices for your Customers based on Parts sold/services rendered
Source Record(s)
This Record can use the following Sources to provide information during its creation:
Part Number
Packing List
Non-Conformance (Re-stocking Fees – Inspections enabled)
Customer Return (Re-stocking Fees – Inspections disabled)
Customer Invoice (Copy)
Destination Record(s)
This Record can be used as a Source to provide information on the following Records:
Cash Receipt
Customer Invoice
Key Values/Points of Consideration (An asterisk [*] indicates a Required Field)
General Tab
*Invoice Number: Up to 50 alpha-numeric characters
Typically set to match Packing List Number by default
*Customer Code: Customer being billed
Auto-populates from Job (via Source Record) if Source Record is
Packing List
Non-Conformance
Customer Return

How To Use the Enterprise E2 Shop System
R. 1.0 Page 275 of 295
Auto-populates form other Invoice if Copy option is selected
Select manually if Part Number is the Source Record
*Invoice Date: Date from which Aging and Terms begin calculating
Auto-populates with Date of Packing List if Invoices created individually and Packing List is used as the Source
Defaults to Current Day’s Date otherwise
Able to designate Date used when using Automatic Billing Utility
Can be changed
*Period Number: Period in which the Invoice will be Posted to financial statements
Auto-populates based on the Invoice Date
Can be changed
Would likely lead to discrepancies between results of Aging Summary and other reports, depending on how
it was run (Date vs. Period)
Core financial statements display information based on the Period being Posted
Balance Sheet
Income Statement
G/L Summary
Trial Balance
See information on Fiscal Years for information regarding the creation and Posting of Periods
Terms Code: Terms offered to the Customer for the listed Item(s)
Auto-populates, based on Source Record or information associated with Customer, as appropriate
Can be edited
Cash Discount Date: Date by which Invoice must be paid for System to consider it eligible for stated Discount (if any
present) in Terms Code
System calculates value based on Terms Code details
Can be changed
Net Due Date: Date by which Invoice must be paid before System considers Invoice to be Past Due
System calculates value based on Terms Code details
Can be changed
Projected Pay Date: Date by which Customer is expected to pay Invoice
System calculates based on payment history
Can be changed
Customer Invoice Line Item Grid
*Item Number: Used by System to identify each record (Job) in the Grid
Can be edited
Subsequent records automatically renumber if changed
*Part Number/Revision Level: Part or Service being sold
Auto-populates form Source Record
Cannot be changed
Can be entered manually (Type value directly, if undefined) on a Blank Row
Quantity Shipped: Number of Parts being billed for
Line Item Total can be impacted by Unit of Measure
Example: LOT Pricing is a flat charge regardless of Quantity

How To Use the Enterprise E2 Shop System
R. 1.0 Page 276 of 295
Unit Of Measure: Determines how Line Item Total is calculated
Purchasing Unit (EA by Default) – The amount will be charged for each unit purchased
LOT – Amount will be charged as flat amount regardless of quantity
C – Amount is divided by 100 and charged for each unit purchased
M – Amount is divided by 1,000 and charged for each unit purchased
Unit Price: Amount Customer is being charged for Part/Service (in terms of Unit of Measure)
Lock Price (checkbox): Prevents price from changing
Discount Percent: Applied against Unit Price to determine Lint Item Total
Invoice displays discounted amount, not original price
Work Code: Means of associating Jobs/Invoices by Customer-related feature
Associated with Customers
Auto-populates from underlying Job (via Source Record)
Required field if Customer Billing driven by Work Code in Company Preferences
Product Code: Means of associating Jobs/Invoices by Part-related feature
Associated with Parts
Auto-populates from underlying Job (via Source Record)
Required field if Customer Billing driven by Work Code in Company Preferences
Customer Invoice Line Item Details – General Tab
Notes: Auto-populates from Job Notes
Salesmen: Can designate one or more Salesmen for sales tracking and commission calculation
*Taxes: Can designate one or more Tax Codes, as appropriate
If no Tax being assessed, use an Exempt Tax Code (0% Tax Rate)
Customer Invoice Line Item Details – Accounting Distribution Tab
Displays Debits and Credits along with G/L Codes for this Line Item
Change G/L Account/Amount here if needed
Cannot change in “Master” Accounting Distribution Grid
Can only modify records with Account Type of Total
Cannot change the Line Item/Invoice balance
Debits and Credits MUST balance
Customer Invoice Line Item Details – Miscellaneous Charges Tab
Select as many Miscellaneous Charge Codes as necessary to represent additional charges to be passed on to the
Customer, other than shipping and Unit Price
Common Miscellaneous Charges include:
Document-related fees
Certification fees
Fuel surcharges
Unit Of Measure determines how the Charge Amount will be calculated
Purchasing Unit (EA by Default) – The amount will be charged for each unit purchased
LOT – Amount will be charged as flat amount regardless of quantity
C – Amount is divided by 100 and charged for each unit purchased
M – Amount is divided by 1,000 and charged for each unit purchased

How To Use the Enterprise E2 Shop System
R. 1.0 Page 277 of 295
Include In Piece Price determines how the Charge Amount will be displayed
Yes – Amount is rolled into Unit Price on Quote/Order
No – Amount will display as separate line item on Quote/Order
G/L Account represents the default income account that will auto-populate on Orders
Pay Commission – Indicates whether Charge Amount should be included in Sales Commission
Option must be selected if Include In Piece Price is used
Pay Tax – Indicates whether tax should be applied against Charge Amount if applicable
Apply Discount – Indicates whether Charge Amount is eligible for discount if A/R Invoices are paid within stated
terms
Header Tab
Information that pertains to the entire Record as opposed to a specific Line Item
Header Items Sub-tab
*Currency Code: Defaults to the Currency Code associated with the Customer
*Exchange Rate: Defaults to the rate associated with the Currency Code at the time the record is created
Notes: Appear on printed Customer Invoice
Specific to selected Invoice
Information that should appear on all Invoices should be entered in Report Customization
Displayed in Layout Tab prior to Generating
Can be edited for specific output Generation, but resets based on Report Customization values afterward
Accounting Distribution Tab (Master Distribution Grid)
Sets A/R, Freight, and Cash Discount G/L for entire Invoice
Defaults based on values set in Current Fiscal Year
Can change as needed
Summary/Total Debits and Credits for all items on Invoice
Cannot make changes here
Freight pulls from Line Items
Freight entered on each record
Addresses Tab
Billing Address Sub-tab
Location Code: Uses Default Billing Location designated on Customer
Physical Address Details populated based on the Location Code
Street Address
City
ZIP/Postal Code
State/Province
Country
Selecting a different Location Code re-populates Physical Address Details
Physical Address Details can be manually edited as well
*Company Code: Auto-populates from Customer Code
Can be manually edited

How To Use the Enterprise E2 Shop System
R. 1.0 Page 278 of 295
Billing Address – Contact Sub-tab
Billing Contact: Select a Contact from the Customer Contact list
Does not auto-populate
Provides email address when Quotes emailed directly from System
Pulls email address from Customer Contact details
Can be changed during process of emailing
Phone Number: Auto-populates with General Customer Contact information
Replaced by specific Contact Phone Number when one is entered
Fax Number: Auto-populates with General Customer Contact information
Replaced by specific Contact Fax Number when one is entered
Shipping Address Sub-tab
Address Type: Determines how Physical Address Details are obtained
Can be one of the following:
Internal
Customer (Default)
Vendor
Third Party
Allows for drop shipments
Address Type selection impacts Code options (below)
Code: Represents specific Company Code depending on the Address Type selected
Customer Code list available if Address Type = Customer
Vendor Code List available if Address Type = Vendor
Code is not available if Address Type = Internal or Third Party
Location Code: Uses Default Shipping Location designated on Customer
Physical Address Details populated based on the Location Code
Street Address
City
ZIP/Postal Code
State/Province
Country
Location Code options narrow based on Address Type/Code selections
Address Type = Customer or Vendor
Location Codes listed based on specified Customer or Vendor Code selected
Address Type = Internal
Location Codes of your Company available
Address Type = Third Party
Location Code not available
Physical Address Details will need to be entered manually
Selecting a different Location Code re-populates Physical Address Details
Physical Address Details can be manually edited as well
Shipping Address – Contact Sub-tab

How To Use the Enterprise E2 Shop System
R. 1.0 Page 279 of 295
Shipping Contact: Select a Contact from the Customer Contact list
Does not auto-populate
Phone Number: Auto-populates with General Customer Contact information
Replaced by specific Contact Phone Number when one is entered
Fax Number: Auto-populates with General Customer Contact information
Replaced by specific Contact Fax Number when one is entered
Shipping Address – Miscellaneous Sub-tab
Shipping Code: Auto-populates from Location Code Details
Shipping Code Details used on Packing Lists
Can be edited on Packing List as needed
F.O.B. Point: Auto-populates from Location Code Details
Account Number: Your Account Number with the designated Shipping Code carrier
Auto-populates from Shipping Code
Territory Code: Auto-populates from Location Code Details
Can be used to filter reports and searches
Cash Receipt
Overview
Payments made by Customers as a result of Customer Billing
Can have Miscellaneous Cash Receipts (No Invoice associated)
Track deposits made into Cash Accounts/Bank Codes
Source Record(s)
This Record can use the following Sources to provide information during its creation:
Customer Invoice
Not required – can have “Manual” or Miscellaneous Cash Receipt
Destination Record(s)
This Record is not used as a Source to create other Records
Cash Receipts are displayed in the Bank Reconciliation Utility
Key Values/Points of Consideration (An asterisk [*] indicates a Required Field)
General Tab
*Bank Code: Represents the Bank Code/Cash Account the Cash Receipt is being deposited to
Bank Reconciliation Utility actually pulls deposit/withdrawal information associated with Deposits and Checks
from Bank Code Details
*Check Number: Up to 50 alpha-numeric characters
Must be entered manually
Represents Customer’s payment instrument
*Customer Code: Customer providing the payment
Auto-populates from Invoice
Select manually if Invoice not used

How To Use the Enterprise E2 Shop System
R. 1.0 Page 280 of 295
*Receipt Date: Date payment is considered to be made
Defaults to Current Day’s Date
Can be changed
*Period Number: Period in which the Receipt will be Posted to financial statements
Auto-populates based on the Receipt Date
Can be changed
Would likely lead to discrepancies between results of Aging Summary and other reports depending on how
it was run (Date vs. Period)
Core financial statements display information based on the Period being Posted
Balance Sheet
Income Statement
G/L Summary
Trial Balance
See information on Fiscal Years for information regarding the creation and Posting of Periods
Batch Number: Groups Receipts into batches for Deposit purposes
Allows tracking of multiple Deposits made on same day
Reference Number: Up to 50 alpha-numeric characters
Searchable field
Header Tab
Information that pertains to the entire Record, as opposed to a specific Line Item
Header Items Sub-tab
*Currency Code: Defaults to the Currency Code associated with the Customer
*Exchange Rate: Defaults to the rate associated with the Currency Code at the time the record is created
Notes: Used for reference
Cleared (checkbox): Indicates Cash Receipt has been Cleared
Typically done via Bank Reconciliation Utility
Can be selected/de-selected manually
Reconciled (checkbox): Indicates Cash Receipt has been Reconciled
Must be Cleared before it can be Reconciled
Typically done via Bank Reconciliation Utility
Can be selected/de-selected manually
Accounting Distribution Tab (Master Distribution Grid)
Summary/Total Debits and Credits for all items on Receipt
Cannot make changes here

How To Use the Enterprise E2 Shop System
R. 1.0 Page 281 of 295
Accounts Payable
The Accounts Payable (A/P) Menu provides access to Vendor-related accounting records.
Records/Functionality
Vendor Invoices
Cash Disbursements (Check Writing)
Reports
A/P Aging Summary
Vendor Invoice Summary
Check Summary
Unbilled Receiver Summary
A/P Sales Tax Summary
Vendor Invoice
Overview
Generate Invoices received from Vendors based on Parts/Services purchased
Source Record(s)
This Record can use the following Sources to provide information during its creation:
Part Number
Receiver
Non-Conformance (Re-stocking Fees – Inspections enabled)
Vendor Return (Re-stocking Fees – Inspections disabled)
Vendor Invoice (Copy)
Destination Record(s)
This Record can be used as a Source to provide information on the following Records:
Cash Disbursement
Vendor Invoice
Key Values/Points of Consideration (An asterisk [*] indicates a Required Field)
General Tab
*Invoice Number: Up to 50 alpha-numeric characters
Must enter value manually
*Vendor Code: Vendor sending the Invoice
Auto-populates from PO (via Source Record) if Source Record is
Receiver List
Non-Conformance
Customer Return
Auto-populates form other Invoice if Copy option is selected
Auto-populates from Part Details if Part is the Source
Can be changed in this case

How To Use the Enterprise E2 Shop System
R. 1.0 Page 282 of 295
*Invoice Date: Date from which Aging and Terms begin calculating
Auto-populates with Date of Receiver if Invoices created individually and Receiver is used as the Source
Defaults to Current Day’s Date otherwise
Can be changed
*Period Number: Period in which the Invoice will be Posted to financial statements
Auto-populates based on the Invoice Date
Can be changed
Would likely lead to discrepancies between results of Aging Summary and other reports depending on how
it was run (Date vs. Period)
Core financial statements display information based on the Period being Posted
Balance Sheet
Income Statement
G/L Summary
Trial Balance
See information on Fiscal Years for information regarding the creation and Posting of Periods
Terms Code: Terms offered by the Vendor for the listed Item(s)
Auto-populates based on Source Record or information associated with Vendor as appropriate
Can be edited
Discount Date: Date by which Invoice must be paid for System to consider it eligible for stated Discount (if any
present) in Terms Code
System calculates value based on Terms Code details
Can be changed
Net Due Date: Date by which Invoice must be paid before System considers Invoice to be Past Due
System calculates value based on Terms Code details
Can be changed
Projected Pay Date: Date by which you are expected to pay Invoice
System calculates based on payment history
Can be changed
Vendor Invoice Line Item Grid
*Item Number: Used by System to identify each record (Job) in the Grid
Can be edited
Subsequent records automatically renumber if changed
*Part Number/Revision Level: Part or Service being sold
Auto-populates form Source Record
Cannot be changed
Can be entered manually (Type value directly if undefined) on a Blank Row
Quantity (Purchasing): Number of Parts being billed for
Line Item Total can be impacted by Unit of Measure
Example: LOT Pricing is a flat charge regardless of Quantity
Unit Of Measure: Determines how Line Item Total is calculated
Purchasing Unit (EA by Default) – The amount will be charged for each unit purchased
LOT – Amount will be charged as flat amount regardless of quantity

How To Use the Enterprise E2 Shop System
R. 1.0 Page 283 of 295
C – Amount is divided by 100 and charged for each unit purchased
M – Amount is divided by 1,000 and charged for each unit purchased
Unit Cost: Amount Vendor is charging for Part/Service (in terms of Unit of Measure)
Lock Cost (checkbox): Prevents cost from changing
Vendor Invoice Line Item Details – General Tab
Notes: Auto-populates from Part Notes
*Taxes: Can designate one or more Tax Codes as appropriate
If no Tax being assessed, use an Exempt Tax Code (0% Tax Rate)
Vendor Invoice Line Item Details – Accounting Distribution Tab
Displays Debits and Credits along with G/L Codes for this Line Item
Change G/L Account/Amount here if needed. Debits and Credits MUST balance.
Cannot change in “Master” Accounting Distribution Grid
Can only modify records with Account Type of Total
Cannot change the Line Item/Invoice balance
Vendor Invoice Line Item Details – Miscellaneous Charges Tab
Select as many Miscellaneous Charge Codes as necessary to represent additional charges to be passed on to the
Customer, other than shipping and Unit Price
Common Miscellaneous Charges include
Document-related fees
Certification fees
Fuel surcharges
Unit Of Measure determines how the Charge Amount will be calculated
Purchasing Unit (EA by Default) – The amount will be charged for each unit purchased
LOT – Amount will be charged as flat amount regardless of quantity
C – Amount is divided by 100 and charged for each unit purchased
M – Amount is divided by 1,000 and charged for each unit purchased
Include In Piece Price determines how the Charge Amount will be displayed
Yes – Amount is rolled into Unit Price on Quote/Order
No – Amount will display as separate line item on Quote/Order
G/L Account represents the default income account that will auto-populate on Orders
Pay Commission – Indicates whether Charge Amount should be included in Sales Commission
Option must be selected if Include In Piece Price is used
Pay Tax – Indicates whether tax should be applied against Charge Amount if applicable
Apply Discount – Indicates whether Charge Amount is eligible for discount if A/P Invoices are paid within stated
terms
Vendor Invoice Line Item Details – Miscellaneous Job Costs Tab
Used to track additional costs that fall outside the traditional means of tracking
Job Number: Job to which additional costs should be associated
Part Number/Revision Level: Displays the Part associated with the selected Job
Cannot change at the Invoice Level

How To Use the Enterprise E2 Shop System
R. 1.0 Page 284 of 295
Part Description: Additional information regarding the cost
Auto-populates from Part
Can edit to better describe nature of the cost
In addition to a Job Number, each record in the Grid needs the following values at a minimum:
Quantity: Must have a Quantity of 1 or more. Be mindful of the Unit applied to the Quantity:
EA (Price Per Each)
LOT (Lot Price)
MIN (Minimum Price)
C (Price per Hundred)
M (Price Per Thousand)
Unit Cost: Must have a dollar value entered for cost calculation
Enter additional information as desired/appropriate
If G/L Account is left blank, Job Costing/WIP Reports will display a value associated with an entry of UNKNOWN (or
it may be blank)
Header Tab
Information that pertains to the entire Record as opposed to a specific Line Item
Header Items Sub-tab
*Currency Code: Defaults to the Currency Code associated with the Vendor
*Exchange Rate: Defaults to the rate associated with the Currency Code at the time the record is created
Vendor Type: Indicates nature of business of associated Vendor
Can be changed
Shipping Code: Indicates how items were shipped
Notes: Available for reference
Hold Payment (checkbox): If selected, the Invoice will not be available to pull onto Cash Disbursements
Must be cleared manually to allow payment
Accounting Distribution Tab (Master Distribution Grid)
Sets A/P, Freight, and Purchase Discount G/L for entire Invoice
Defaults based on values set in Current Fiscal Year
Can change as needed
Summary/Total Debits and Credits for all items on Invoice
Cannot make changes here
Freight pulls from Line Items
Freight entered on each record
Cash Disbursement
Overview
Payments made to Vendors as a result of Vendor Invoice
Can have Miscellaneous Cash Disbursement (No Invoice associated)
Track withdrawals made from Cash Accounts/Bank Codes

How To Use the Enterprise E2 Shop System
R. 1.0 Page 285 of 295
Source Record(s)
This Record can use the following Sources to provide information during its creation:
Vendor Invoice
Not required – can have “Manual” Cash Disbursement
Destination Record(s)
This Record is not used as a Source to create other Records
Cash Disbursements are displayed in the Bank Reconciliation Utility
Key Values/Points of Consideration (An asterisk [*] indicates a Required Field)
General Tab
*Bank Code: Represents the Bank/Cash Account the Cash Disbursement is being deposited to
Bank Reconciliation Utility actually pulls deposit/withdrawal information associated with Deposits and Checks
from Bank Code Details
*Check Number: Up to 50 alpha-numeric characters
Auto-populates from Bank Code Details
*Vendor Code: Vendor providing the payment
Auto-populates from Invoice
Select manually if Invoice not used
Manual Check (checkbox): System automatically marks option if no Invoice is associated with the Check
*Check Date: Date check was written/payment is considered to be made
Defaults to Current Day’s Date
Can be changed
*Period Number: Period in which the Check will be Posted to financial statements
Auto-populates based on the Check Date
Can be changed
Would likely lead to discrepancies between results of Aging Summary and other reports depending on how
it was run (Date vs. Period)
Core financial statements display information based on the Period being Posted
Balance Sheet
Income Statement
G/L Summary
Trial Balance
See information on Fiscal Years for information regarding the creation and Posting of Periods
Batch Number: Groups Disbursements into batches for Deposit purposes
Allows tracking of multiple Withdrawals made on same day
Reference Number: Up to 50 alpha-numeric characters
Searchable field
Header Tab
Information that pertains to the entire Record, as opposed to a specific Line Item

How To Use the Enterprise E2 Shop System
R. 1.0 Page 286 of 295
Header Items Sub-tab
*Currency Code: Defaults to the Currency Code associated with the Vendor
*Exchange Rate: Defaults to the rate associated with the Currency Code at the time the record is created
Vendor Type: Indicates nature of business of associated Vendor
Can be changed
Vendor Account Number: Available for reference
Notes: Used for reference
Cleared (checkbox): Indicates Cash Disbursement has been Cleared
Typically done via Bank Reconciliation Utility
Can be selected/de-selected manually
Reconciled (checkbox): Indicates Cash Disbursement has been Reconciled
Must be Cleared before it can be Reconciled
Typically done via Bank Reconciliation Utility
Can be selected/de-selected manually
Accounting Distribution Tab (Master Distribution Grid)
Summary/Total Debits and Credits for all items on Check
Cannot make changes here
Addresses Tab
Payee Address Sub-tab
*Company Name: Name that will appear on the Payee line of the check
Auto-populates from Vendor
Can be entered manually
Remaining address details auto-populate from Vendor or can be entered manually
Not required information
Payee Address – Contact Sub-tab
Contact: Select a Contact from the Vendor Contact list
Does not auto-populate
Phone Number: Auto-populates with General Vendor Contact information
Replaced by specific Contact Phone Number when one is entered
Fax Number: Auto-populates with General Customer Contact information
Replaced by specific Contact Fax Number when one is entered

How To Use the Enterprise E2 Shop System
R. 1.0 Page 287 of 295
General Ledger
The General Ledger (G/L) Menu provides access to “internal” accounting records.
Records/Functionality
Journal Entries
Fiscal Years
Reports
Journal Entry Summary
Trial Balance
Balance Sheet
Income Statement
General Ledger Summary
Budget Analysis
Journal Entry
Overview
Enter information directly to financial statements, outside of Invoices, Cash Receipts, or Checks
Source Record(s)
This Record is not directly created from any other Source Record
Destination Record(s)
This Record is not used as a Source to create other Records
Duplicate Journal Entries can be created by copying individual line items from specified Journal Entries
Key Values/Points of Consideration (An asterisk [*] indicates a Required Field)
General Tab
*Entry Number: Up to 50 alpha-numeric characters
Bank Code: Indicates the account cash transactions impact
Unlike Cash Receipts and Checks, this value is optional on Journal Entries
If a Journal Entry impacts multiple Cash G/L Accounts, the System looks directly to the G/L Account to
know which Bank Code to make an entry for (regarding Checkbook Register/Bank Reconciliation)
o If used in this manner, the entire Journal Entry is considered to be Cleared/Reconciled when it is
selected on any one of the designated Bank Codes
*Entry Date: Date on which the transactions are posted to financial statements
Defaults to Current Day’s Date
Can be changed
*Period Number: Period in which the Invoice will be Posted to financial statements
Auto-populates based on the Invoice Date
Can be changed
Would likely lead to discrepancies between results of Aging Summary and other reports depending on how
it was run (Date vs. Period)

How To Use the Enterprise E2 Shop System
R. 1.0 Page 288 of 295
Core financial statements display information based on the Period being Posted
Balance Sheet
Income Statement
G/L Summary
Trial Balance
See information on Fiscal Years for information regarding the creation and Posting of Periods
Cleared (checkbox): Indicates Cash Receipt has been Cleared
Typically done via Bank Reconciliation Utility
Can be selected/de-selected manually
Reconciled (checkbox): Indicates Cash Receipt has been Reconciled
Must be Cleared before it can be Reconciled
Typically done via Bank Reconciliation Utility
Can be selected/de-selected manually
See notes regarding Bank Code (above) for information pertaining to Clearing/Reconciling Journal Entries
Journal Entry Line Item Grid
*Item Number: Used by System to identify each record (Job) in the Grid
Can be edited
Subsequent records automatically renumber if changed
*G/L Account: Indicates the Account the listed Debit or Credit will impact
Selected manually
Amount Debit/Credit: Enter the dollar amount to Debit or Credit the selected G/L Account
It does not matter how many Debits and Credits are present so long as they balance in total value
Journal Entry Number: Select existing Journal Entries from which to copy one or more line items
Allows the User to customize Journal Entry based off of previous Entries in their entirety or in part
Explanation: Information regarding the selected line item
Does not auto-populate from one line to the next
Notes Tab
Information entered here will display in the Journal Entry Navigator Search Grid for reference
Miscellaneous Job Costs Tab
Used to track additional costs that fall outside the traditional means of tracking
Part Number/Revision Level: Indicates the nature of the cost
Can select a defined Part from the drop-down list
Can enter a Part Number on the fly
Revision uses value of DEFAULT in this instance
Can be edited/entered manually
Part Description: Additional information regarding the cost
Auto-populates if Part selected from drop-down
Can be edited/entered manually
In addition to a Part Number, each record in the Grid needs the following values at a minimum:
Quantity: Must have a Quantity of 1 or more. Be mindful of the Unit applied to the Quantity.

How To Use the Enterprise E2 Shop System
R. 1.0 Page 289 of 295
EA (Price Per Each)
LOT (Lot Price)
MIN (Minimum Price)
C (Price per Hundred)
M (Price Per Thousand)
Unit Cost: Must have a dollar value entered for cost calculation
Enter additional information as desired/appropriate
If G/L Account is left blank, Job Costing/WIP Reports will display a value associated with an entry of UNKNOWN (or
it may be blank)

How To Use the Enterprise E2 Shop System
R. 1.0 Page 290 of 295
Fiscal Years
Location: G/L | Fiscal Years
Overview
Define Fiscal Year for accounting purposes
Years can be defined differently, if needed
Post Periods to print finalized core financial reports
Balance Sheet
Income Statement
Trial Balance
General Ledger Summary
Key Values/Points of Consideration (An asterisk [*] indicates a Required Field)
General Tab
*Fiscal Year can be up to 50 alpha-numeric characters
*Fiscal Year Begin Date is when the year being defined will begin for accounting purposes
Can be any month
Must be the first day of the month
*Fiscal Year End Date represents when the fiscal year being defined will end for accounting purposes
Can be any month
Can be any day of the month
Period Creation options
Use 12 Periods (Monthly Periods)
Starts at designated Begin Date and creates 12 monthly Periods
Total Days In Period
Designate how many days each Period should have
System creates as many Periods as necessary between Begin Date and End Date to accommodate the
number of days designated
Last Period may be longer or shorter to hit exact End Date
Click Set Periods to have system create Periods based on selected option
Period Grid contains the list of Periods for the Fiscal Year
Click the Post Icon (Green Arrow) to Post a specific Period
Cannot enter accounting records into a Posted Period (with the exception of a Journal Entry)
Period must be Posted for core financial reports listed previously to print accurately
Unpost a Period to enter additional accounting records or edit existing ones
If Period has been Locked (Padlock icon), it cannot be Unposted
Only lock Periods that will not need to be edited as there is no Un-lock option in the system
Period Number is assigned by the system
Can be edited
Begin and End Dates of specific Periods can be adjusted
Following Period adjusts automatically to match

How To Use the Enterprise E2 Shop System
R. 1.0 Page 291 of 295
Accounts Tab
Designate the default G/L Accounts the system will use on accounting records if individual records do not have the
necessary values
Each Fiscal Year can have different default values
There is no default Sales Account for A/R Invoices
Product Codes and Work Codes provide that default value
Process Year
Click the Process Year icon to close out the current Fiscal Year
All Periods must be Posted
Current Earnings closed and rolled into Retained Earnings
No accounting records can be entered into a closed Year (includes Journal Entries)
Financial reports can be printed for closed Years
